YesAX V3.1.2 - Software User Manual.pdf - 第55页
Inspection and De fect Revie w Step by S tep 5-9 The following is a sample Defect.ini file: [01] Unclassified [02] Missing Part@S [03] Wrong Part@S [04] Tombstone Part [05] BillBoard Part [06] Skew Part [07] Wrong Polari…
5-8 Inspection and Defect Review Step by Step
Recipe programmers can fine-tune the inspection recipe during defect review. An alternate
template can be added to handle new alternate component markings and the inspection pass score
can be adjusted to handle random noise in the image.
The Next button on the Review Failed Parts dialog moves to the next defect whether it is on the
same part or next part. The Next Part button moves to the first defect on the next part of the
defect list.
Inspection and Defect Review Step by Step 5-9
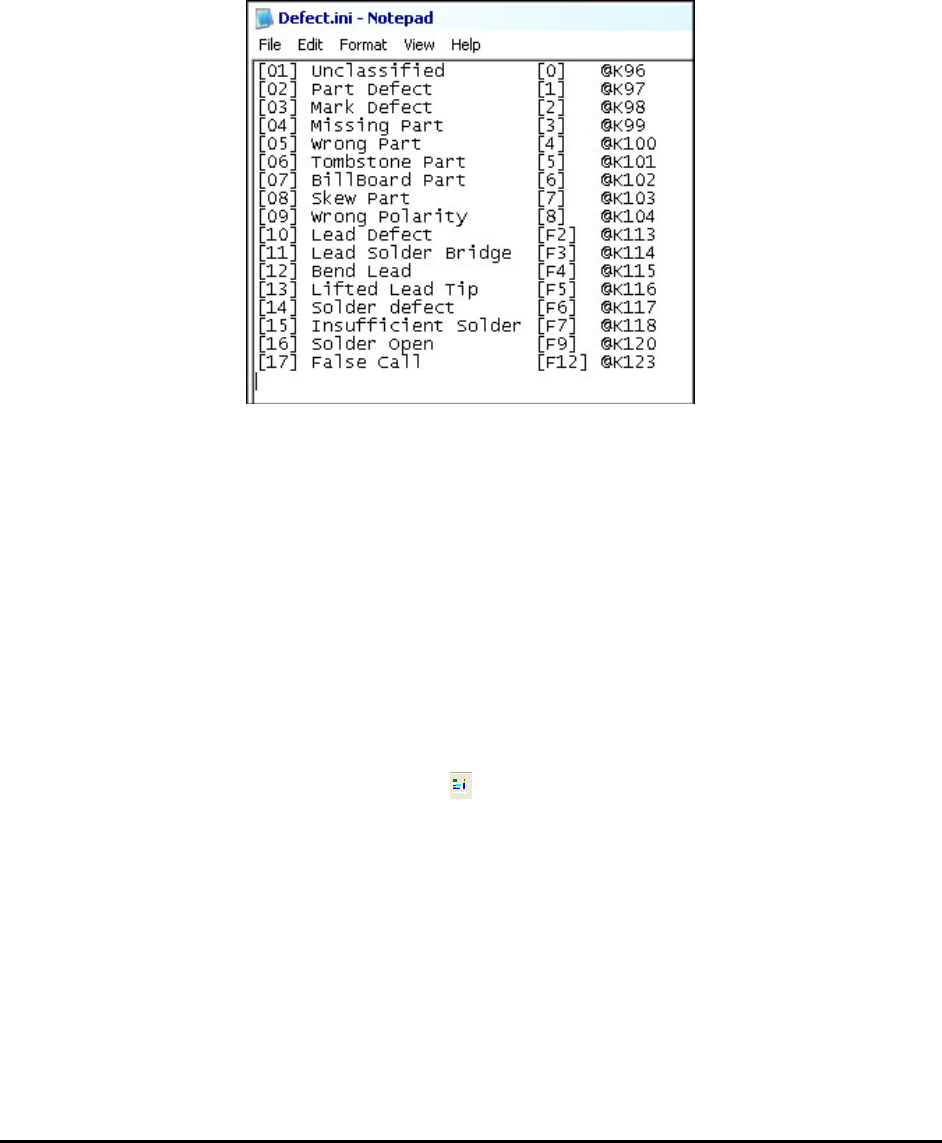
The following is a sample Defect.ini file:
[01] Unclassified
[02] Missing Part@S
[03] Wrong Part@S
[04] Tombstone Part
[05] BillBoard Part
[06] Skew Part
[07] Wrong Polarity
[08] Lead Solder Bridge
[09] Bend Lead
[10] Insufficient Solder
[11] Solder defects
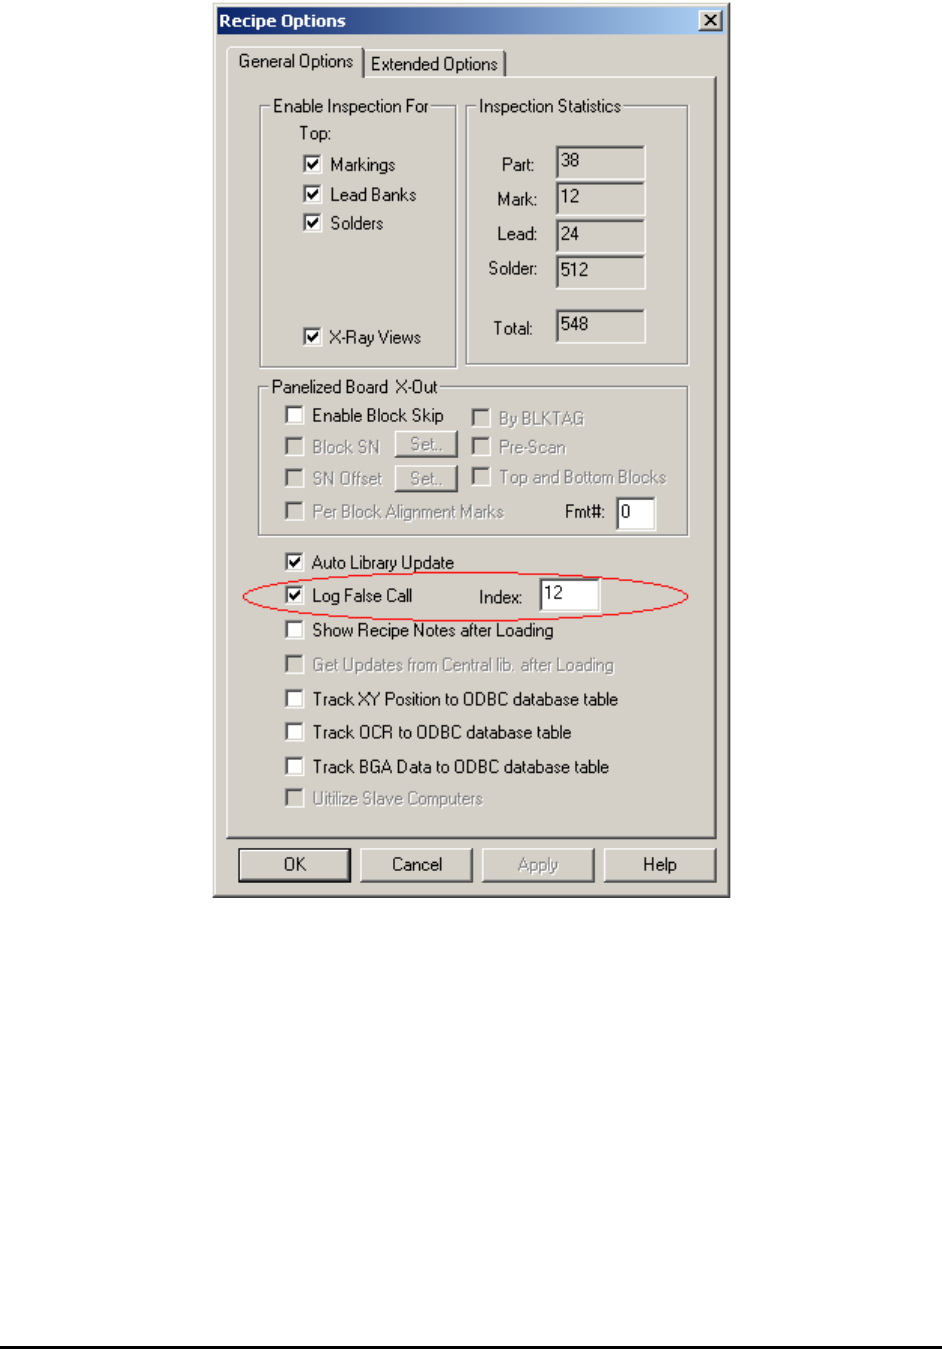
[12] False Call
When there is a missing part defect (e.g. U1 is missing) the AXI would probably detect one
marking defect, some lead defects and many solder defects for the same reference designator
(U1). However, if U1 is missing the user probably does not care about the other defects the
system detects. To simplify defect review, the software has two main types of defects: Singular
and Multiple. One Reference ID can have only one singular defect. Missing part is a good
example of the singular defect.
In the defect.ini file the @S symbol trailing the defect description indicates that the defect is a
singular defect. Defects without @S are of type Multiple.
You can assign default classifications based on the inspection type (mark, solder and lead) to
speed up the defect classification process. The following section can be found in the YesAX.ini
file.
[Review]
DefaultMarkClass=1
DefaultLeadClass=8
DefaultSolderClass=10
QuickNext=0
5-10 Inspection and Defect Review Step by Step
You can also assign a keyboard “shortcut” key to each classification. Compared to selecting the
defect classification from the pull down list box, pressing the short cut key is a lot faster. By
default the function keys and the keys on the numerical key pad are assigned to classification.
Pressing the shortcut key has the same effect as selecting a classification from the pull down list.
The @K symbol followed by the key code assigns a key to a defect line. The sample INI file
below assigns the first 9 defects to number keys 0-8, and the rest of the defects are assigned to
the Function keys.
5.4 Step4: Preview and Print out defect Report
If Preview or Print Report is selected in the Run Inspection dialog, the defect report will
preview or print after the review process.
After the defect report is generated, the Inspection Result dialog will reappear. Pressing the Next
button on it will start the inspection process for the next board.
5.5 User Practice
On the YesAX software installation DVD there are four inspection recipes; DEMO_X1.rcp,
demo_x3_1.rcp, demo_x3_2.rcp and demo_x3_3.rcp. You are encouraged to load them up and
practice the inspection and defect review process.
These recipes have corresponding ImageSets. You can run them in offline mode without the
actual PC board by pressing the online/offline button on the toolbar.
The demo recipes are not installed automatically by the installation program. They need to be
copied from the DVD to the computer’s hard disk before use. The folder where they can be
found is AOI_Data\Recipe.
5.6 Find Recipe
The Find Recipe feature was added to facilitate the finding of recipes in a high mix environment
where users have to select from a large pool of recipes. The feature presents user with a graphic
view of all the recipes in a user specified folder. User can then load the recipe by double clicking
its image.