FlexTRAK 2MB Material Handler Addendum Rev 05.pdf - 第130页
FlexTRAK Series 2MB Mater ial Handler Adden dum Teaching Axis Positions 7-2 © 2023 Nordson Corporati on 4. Touch the SHUTTLE R button. „ The Axis Status screen opens (Figure 7- 1). Figure 7-1 Axis Status Screen 5. Touch …

© 2023 Nordson Corporation 7-1
7 Teaching Axis Positions
7.1 Teaching MH Axis Positions
The MH Axis Status screen displays the current position for each of the five drive axes. Both the upper
and lower gripper assemblies have two axes per assembly: a Z-axis controlling the vertical motion, and a
Y-axis controlling the horizontal motion.
One of the following positions will be displayed:
q Z AT UP POSITION - Z-axis drive is in the up position
q Z AT BOT POSITION - Z-axis drive is in the down position
q Z NOT IN POSITION - Z-axis drive is not in position
q Y AT CONVEYOR - Y-axis drive is at the conveyor
q Y AT CHAMBER - Y-axis drive is at the chamber
q Y NOT IN POSITION - Y-axis drive is not in position
Teach mode allows the user to teach new set points for any one of the five (5) drive axes. There are
two (2) teachable set points per drive axis.
The gripper assembly positions are:
q Top at Conv
q Top at Chamber
q Bot at Conv
q Bot at Chamber
The conveyor assembly positions are:
q Conveyor Pick
q Conveyor Inline
q Conveyor Lane 1
q Conveyor Lane 2
To teach the MH axis positions:
1. If Manual mode is not enabled, touch the MANUAL button, see 6.7 Manual Mode.
?
NOTE Manual mode must be enabled in order for the TEACH button to be enabled.
2. Turn the Bypass Key Switch to BYPASS, see 7.2 Bypass Mode.
3. Touch the MAINTENANCE button on the MH Overview screen.
„ The Maintenance Master screen opens (Figure 5-5).
FlexTRAK Series 2MB Material Handler Addendum Teaching Axis Positions
7-2 © 2023 Nordson Corporation
4. Touch the SHUTTLER button.
„ The Axis Status screen opens (Figure 7-1).
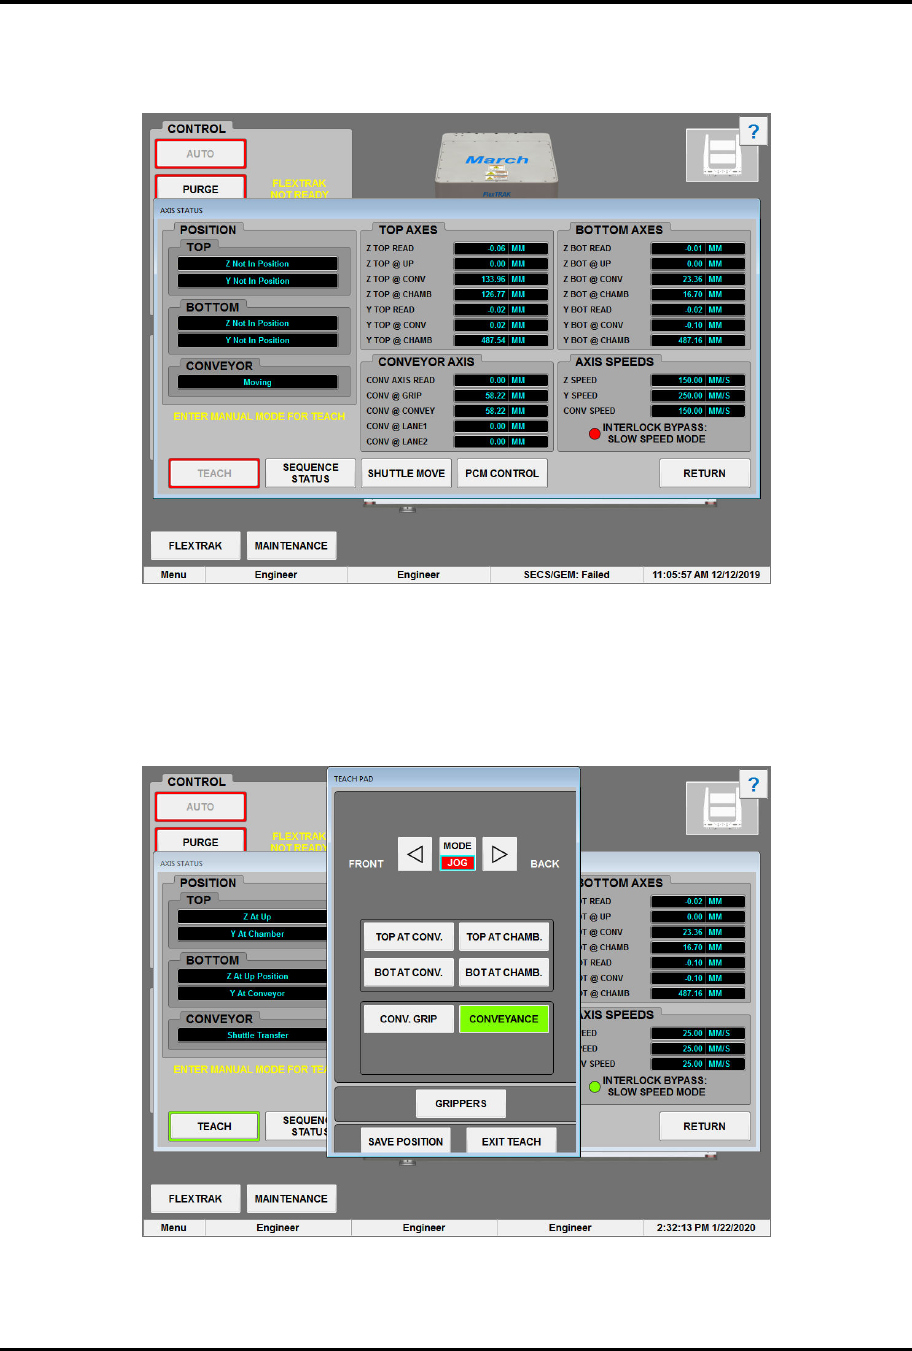
Figure 7-1 Axis Status Screen
5. Touch the TEACH button.
„ The Teach Pad screen opens (Figure 7-2).
„ The TEACH button is only active after Manual mode is entered.
Figure 7-2 Teach Pad - Jog Mode

FlexTRAK Series 2MB Material Handler Addendum Teaching Axis Positions
© 2023 Nordson Corporation 7-3
6. Touch the button that corresponds with the position to be taught. That button highlights
green indicating that position can be taught. Teach commands are described in Table 5-9.
7. Touch the MODE button to select the mode to control the speed of the drive being taught.
There are two modes: STEP and JOG.
8. Press once or hold down a directional arrow button to move the assembly in the desired
position.
FRONT UP DOWN BACK
STEP: equals 0.05 mm per touch.
FRONT UP DOWN BACK
JOG: equals 25 mm per sec.
9. Touch the SAVE POSITION button to save new teach points and overwrite existing
values.
10. Repeat Step 6 through Step 9 for each set point that needs to be updated.
?
NOTE A save must be performed after each position is taught. Make sure the correct
position is highlighted before clicking SAVE. The new values will become the
new set points for the highlighted position.
11. Touch the EXIT TEACH button to exit the teach mode.
?
NOTE Closing the Teach dialog box will return the machine to stop mode.