Spectrum+Operating+Manual.pdf - 第155页
S2-9 XXX Se ri es Dispensing Sys te m IOM Man ual Parts Replacement © 2023 Nordson C orpor ation 8-3 8.5.1 R eturn Ma t erial Au tho ri zation C onta ct Asymtek T echnical Sup po rt to obtain a R etur n M at er ial Au t …
S2-9XXX Series Dispensing System IOM Manual Parts Replacement
8-2 © 2023 Nordson Corporation
WARNING! DO NOT hot swap connections when working with electrical and pneumatic
power supplies. Turn the main circuit break off before disconnecting the external
power plug from the facility.
8.3 Parts Ordering Information
8.3.1 Placing Your Order
Customers can order spare parts by contacting Asymtek Customer Service. Contact information is listed
in the front of this manual. Spare parts can also be ordered online through our Internet Web Store. To set
up a web store account, send an email to americas.es.cs@nordson.com.
NOTE This section does not include the removal and replacement of dispensing valve
components. Refer to the applicable applicator(s) manual for instructions.
When ordering parts, be prepared to provide the following information:
• Your Company Name
• Billing Address
• Shipping Address
• Part Number and Description
• Purchase Order Number
• Quantity
• Dispensing System Serial Number
(found on back panel)
• Shipping Instructions with Collect Account
Number
8.3.2 Shipping Instructions
When ordering parts, specify which carrier you prefer to use and provide your shipping account number.
If no instructions are received, Asymtek will determine the best shipping method and items will be
shipped prepaid with the shipping charge added to the invoice.
8.4 Warranty
Contact Asymtek Technical Support for any warranty issues pertaining to spare parts. Wear items and
consumables are covered under warranty against manufacturer defect only. Expected lifetimes for these
parts will vary based upon application and use.
Consumable parts are generally considered as parts that are replaced on a frequency of > 1 per calendar
year under expected regular usage. In most cases, these parts are “wetted parts” that make contact with
the dispensed fluid. Wear items are those items that have been identified to have limited life expectancy
(less than 5 years) but are not considered consumables. Wear items are often highly application
dependent, high user-touch, or adjusted parts.
8.5 Credit and Exchanges
Contact Asymtek Customer Service for credit or exchanges of recommended spare parts or refurbished
components (components restored to original specifications but not sold as new).

S2-9XXX Series Dispensing System IOM Manual Parts Replacement
© 2023 Nordson Corporation 8-3
8.5.1 Return Material Authorization
Contact Asymtek Technical Support to obtain a Return Material Authorization (RMA) before returning
any parts.
NOTE Find your local Technical Support contact on the Asymtek web page,
www.nordsonasymtek.com.
8.6 Record Keeping
The type of service performed should be recorded in the dispensing system maintenance records. Dates,
part numbers/serial numbers of replaced parts, names of technicians, and other pertinent data should be
recorded.
8.7 Unpacking and Inspecting Replacement Parts
Replacement parts are shipped to distributor or customer facilities in individual shipping cartons. Review
the packing slip to ensure that the correct parts were received. Contact Asymtek Technical Support if any
discrepancies are discovered.
Before unpacking your spare parts, visually inspect the carton for damage. If applicable, check the
"Tip & Tell" and "Shockwatch" devices for indications of improper shipping and handling. Inform the
freight carrier of any damage.
8.8 Cleaning and Inspection
Always clean the area made visible after a failed part is removed from the dispensing system. Inspect the
area for signs of what may have caused the part to fail. This may help prevent future part damage.
While removing parts that will be reinstalled, visually inspect them for damage. If found undamaged,
retain them for reinstallation. Replace damaged parts and hardware as appropriate.
S2-9XXX Series Dispensing System IOM Manual Parts Replacement
8-4 © 2023 Nordson Corporation
8.9 Removing and Installing the Top Cover and
Components
Tools and Materials Needed:
• Hex Key Set (Item 59)
• Adjustable Wrench
WARNING! Ensure the dispensing system has been completely shutdown before attempting
to remove any panel.
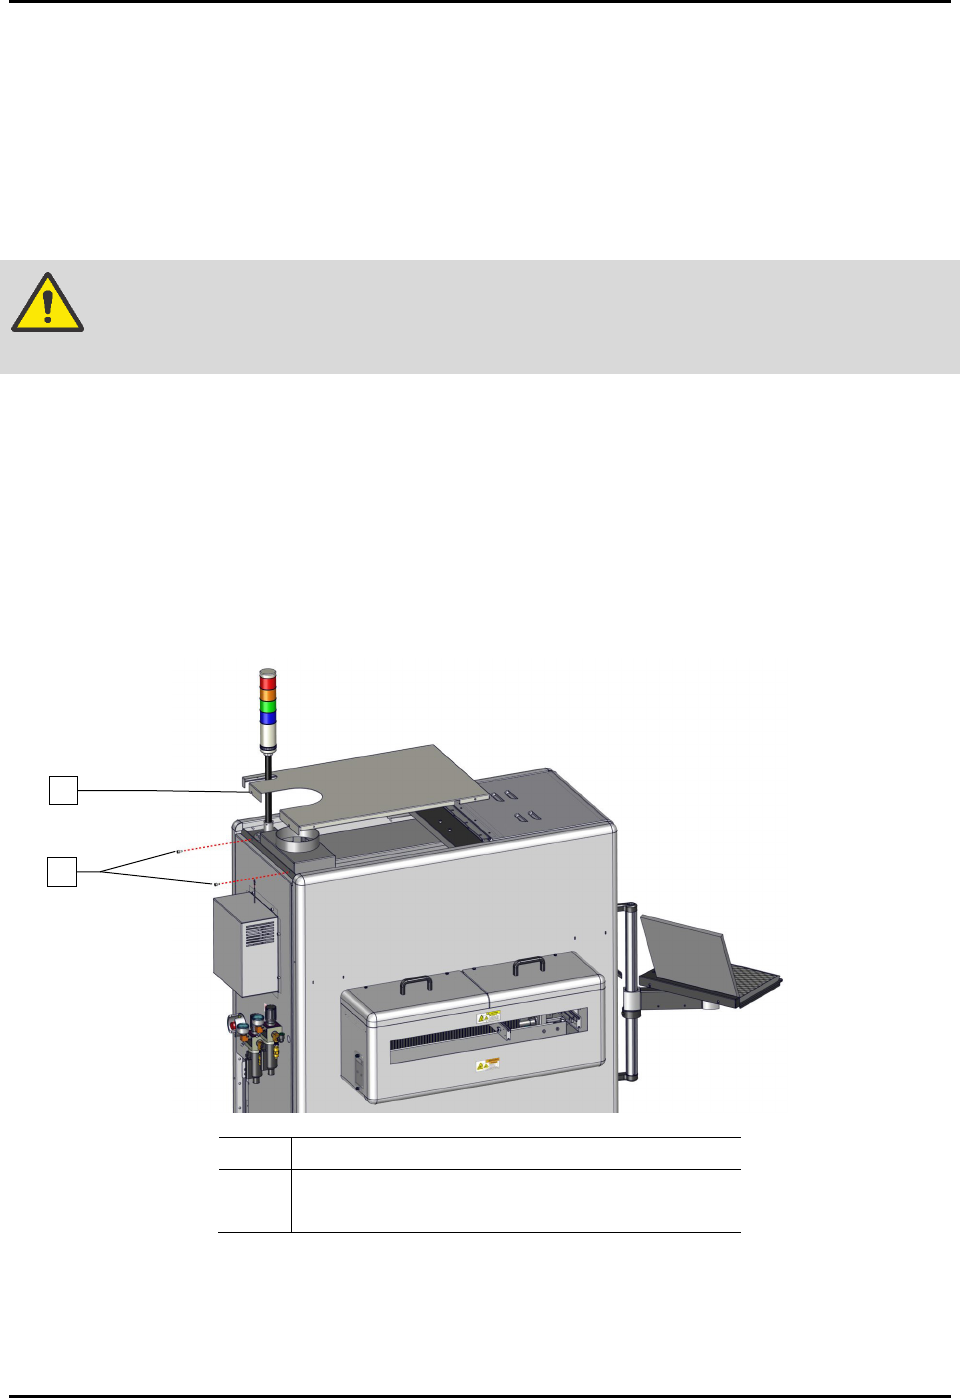
To remove and install the top cover (Figure 8-1):
1. Perform a service shutdown, see 2.14 Service Shutdown.
2. Remove the two (2) screws securing the top cover to the dispensing system.
3. Remove the top cover from the dispensing system.
4. Align the top cover to the alignment holes on the dispensing system.
5. Install the two (2) screws securing the top cover to the dispensing system.
Item
Description
1 Top Cover
2
Screws (2)
Figure 8-1 Replacing and Installing the Top Cover
1
2