00198599-02_AI_Vacuumpump_X-Series-S-from-Hxxxx_DE_EN.pdf - 第184页
7 Appendix 7.3 Error message: 30356 Vacuum in holding circuit too low 184 Assembly Instructions / Montageanleitung SIPLACE X-Series S (from/ab Hxxxx) Option Vacuum Pump 02/2021 Solution A "replacement kit vacuum tub…
7 Appendix
7.3 Error message: 30356 Vacuum in holding circuit too low
Assembly Instructions / Montageanleitung SIPLACE X-Series S (from/ab Hxxxx) Option Vacuum Pump 02/2021 183
7.3 Error message: 30356 Vacuum in holding circuit too low
Error / problem
Error message 30356 Vacuum in holding circuit too low
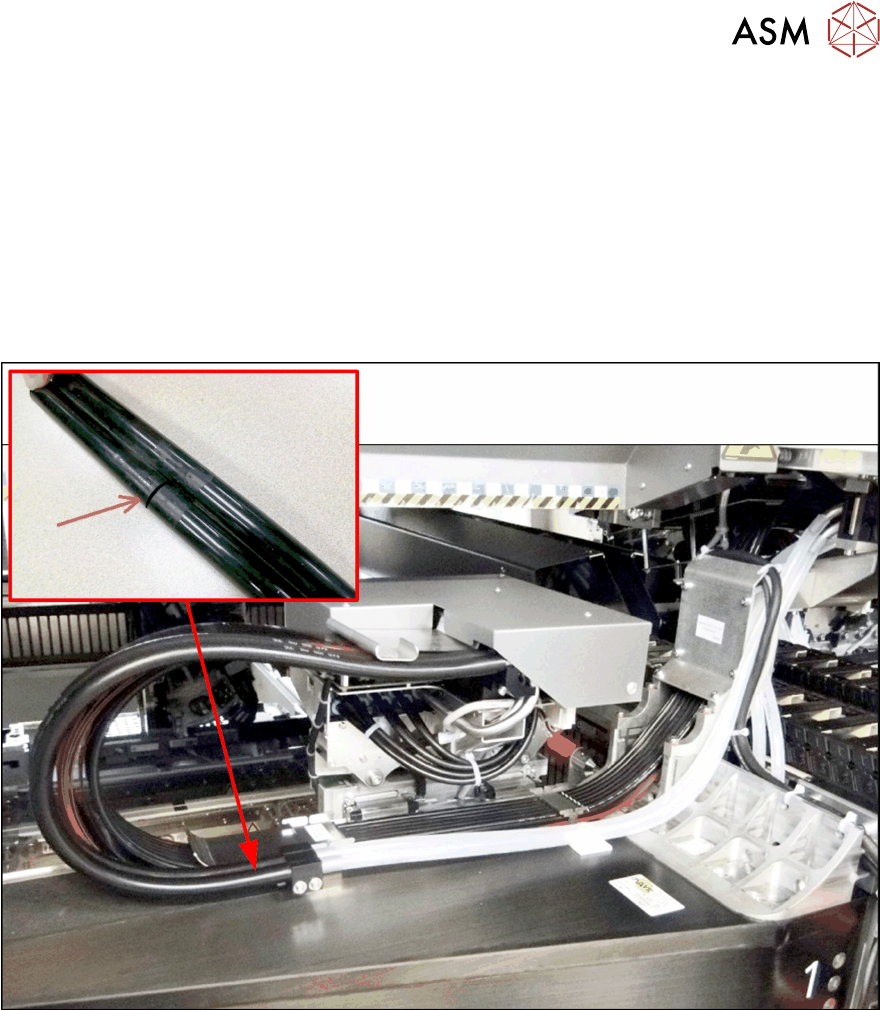
On machines of the SIPLACE X-Series S with vacuum pump, the additional vacuum tube on the
gantry can rupture.
Cause of Hazard
If the gantry with the placement head moves to the inner position very often, the tube is slightly fol-
ded at the interface to the gantry. In the long run, this can cause a rupture of the vacuum tube.
Fig.87: Rupture on a vacuum tube (old duo tube [03075472‑xx])

7 Appendix
7.3 Error message: 30356 Vacuum in holding circuit too low
184 Assembly Instructions / Montageanleitung SIPLACE X-Series S (from/ab Hxxxx) Option Vacuum Pump 02/2021
Solution
A "replacement kit vacuum tubing" [03123134‑xx] is available:
Fig.88: Replacement kit vacuum tubing [03123134‑xx]
1 1x foam rubber with adhesive tape
(attached to the gantry)
2 1x duo tube
3 1x Stabilizer damped 4 2x ISO7380-2-M3x6-A2-70
You need the following tools for the replacement:
●
Set of Allen keys
●
Set of torx screwdrivers
●
Snipe nose pliers straight, Festo ZRS [00381443‑xx]
●
3x Cable ties
●
2x Glue clamps
Overview of gantries
Fig.89: Standard gantry
X-Series S: Gantry 1, 2, 3, 4
X4iS: Gantry 1, 3
X series, D3: Gantry 1, 2, 3, 4
SX4/DX4: Gantry 1, 2, 3, 4
X4i Gantry 1, 3
Fig.90: Rotated gantry
X4iS: Gantry 2, 4
X4i: Gantry 2, 4
7 Appendix
7.3 Error message: 30356 Vacuum in holding circuit too low
Assembly Instructions / Montageanleitung SIPLACE X-Series S (from/ab Hxxxx) Option Vacuum Pump 02/2021 185
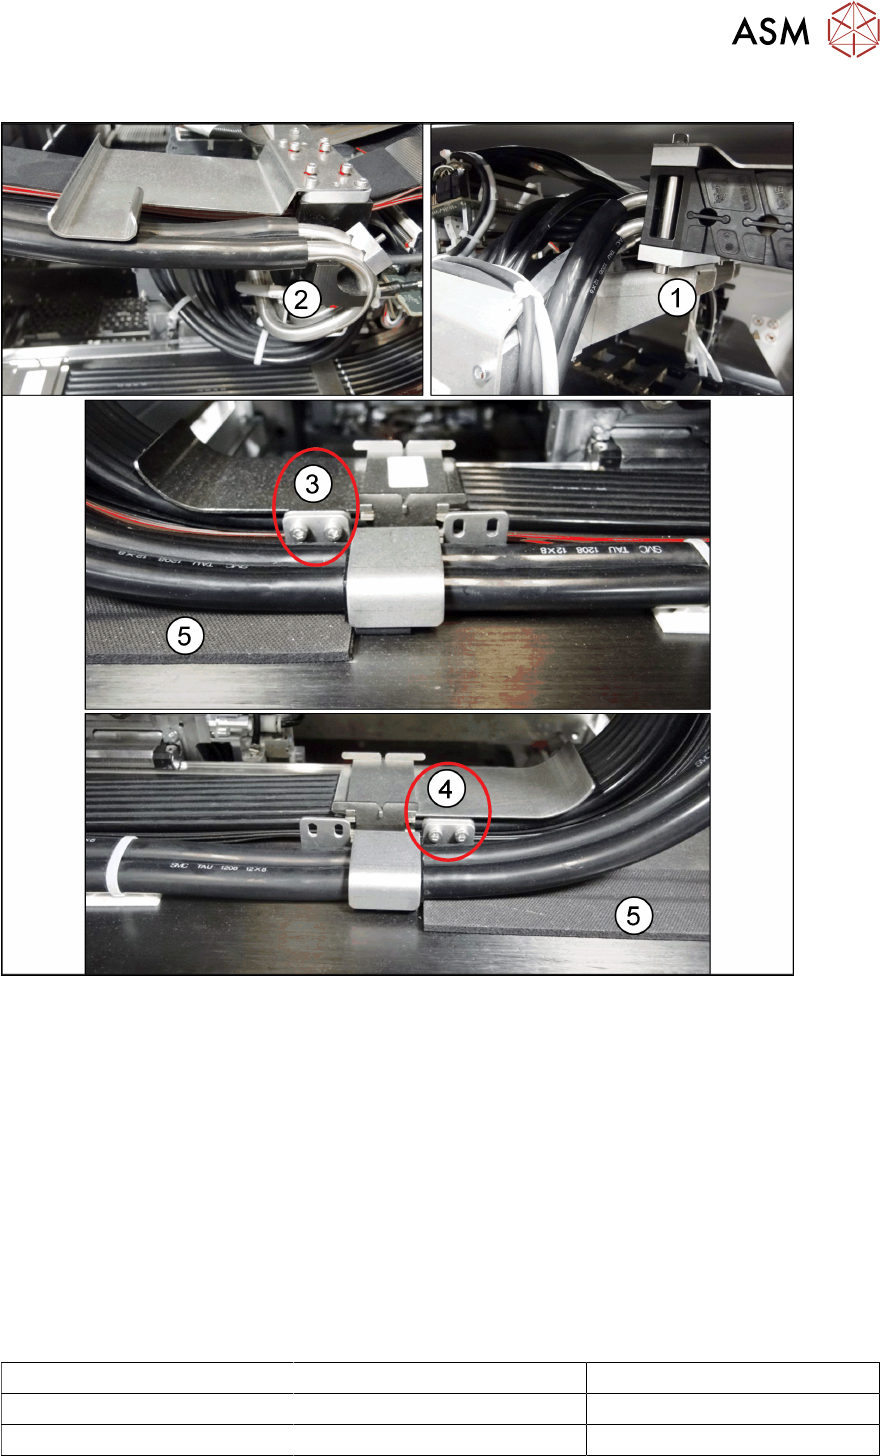
Procedure
Fig.91: Assembly
► Remove the old tube set between Y trailing cable and connection tube vacuum distributor X
axis. Remove the holder at the X trailing cable.
► The duo tube is fixed with an adhesive tape in the center. Plug the 500mm side of the duo
tube(B)
into the tube(2) for the head vacuum distributor.
► Fix the duo tube at the X trailing cable using the stabilizer. Depending on the gantry, there are
two assembly positions.
At gantries 2 and 4 on SIPLACE X4iS machines, the stabilizer is mounted as shown in fig-
ure(4)
, at all other gantries of the X4S, it is mounted as shown in figure(3).
The adhesive tape is located in the center below the stabilizer.
► Glue the foam rubber(5) to the gantry as shown in figures(3) and (4) so that the duo tube can
roll on it when the X-axis is moving.
► The side(A) is 630mm long and must be adapted to the gantry, if required. Use the snipe
nose pliers for this if possible.
Gantry 1 + 3 Gantry 2 + 4
X4S 540 630
X4iS 540 530
► Plug the "shortened" side of the tube(A) into the tube connection of the Y trailing cable(1).
Use cable ties to fix the tube at the gantry.