FLEXLINE-CAD_INM.pdf - 第69页
64 10 “Field Definition” screen × 11 “Field Translation” screen × - Component - All of section definition, field definition and field translation of “Component” hav e been completed. 12 “Section Definition” screen ○ 13 “…
63
7.8 “Move” dialog box
7.8.1 Overview
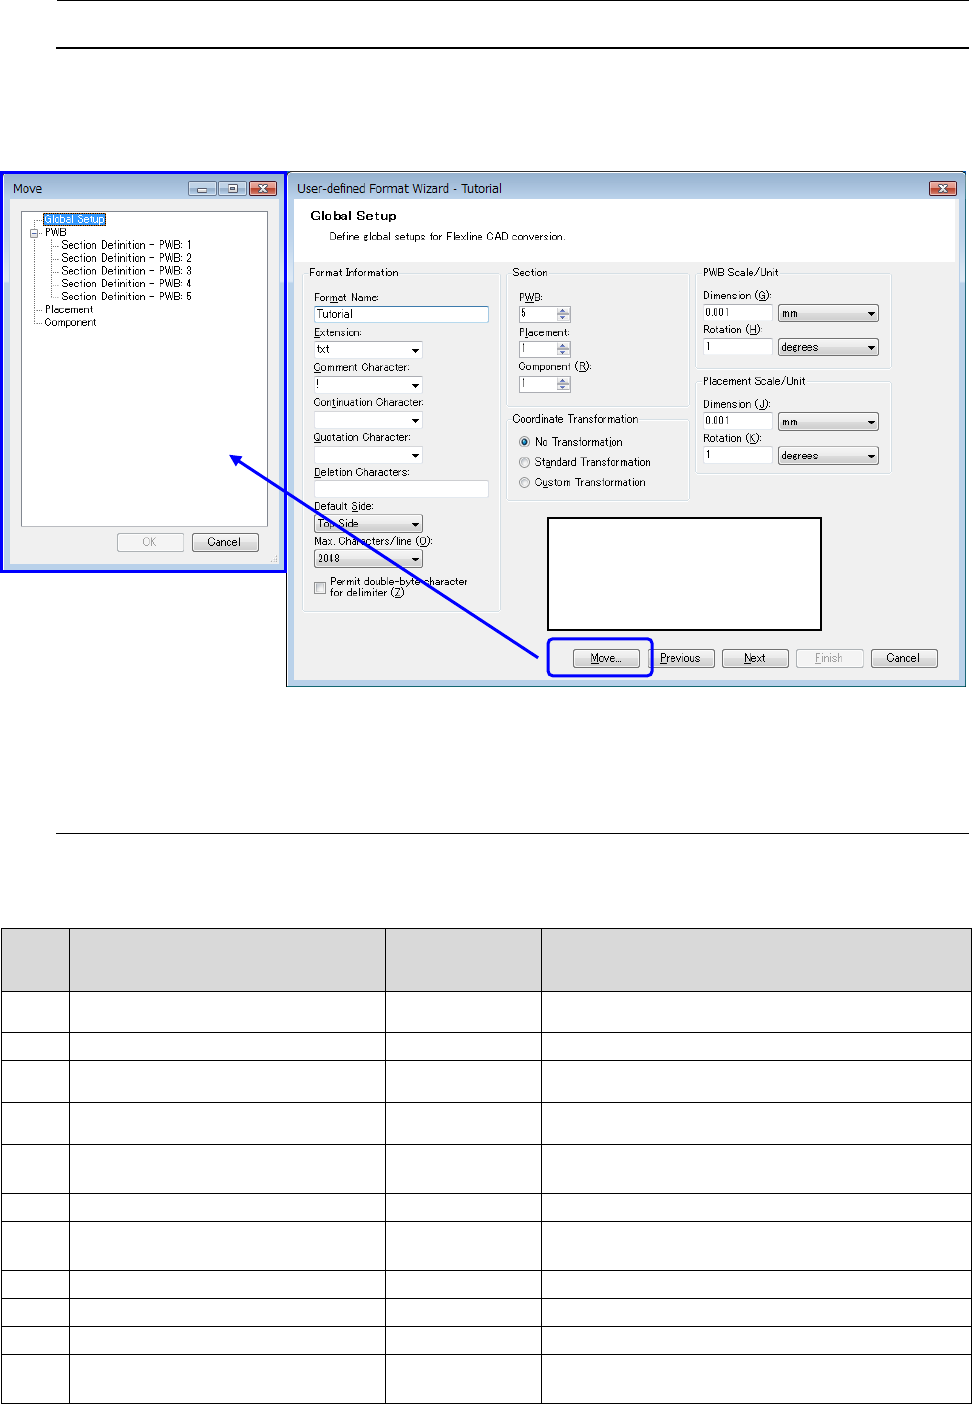
When you click the “Move” button on each screen of the “User-defined Format Wizard,” the “Move”
dialog box appears on the screen. This “Move” dialog box allows you to move (short-cut) to another screen
of the “User-defined Forma Wizard.”
Figure 7.8.1-1
“Move” dialog box
7.8.2 Screens you can move to
The screens to which you can move from the “Move” dialog box are shown below. Note that you cannot
move to any screen whose setting is not made completely although it is shown below. See the
“Requirement” column for details.
No. Screen name
Whether you
can move to the
screen or not
Requirement
1
User-defined Format Wizard start-up
screen
×
2 “Global Setup” screen ○ All settings have been made already.
3
“Standard Transformation Settings”
screen
-
4
“Custom Transformation Settings”
(PWB) screen
-
5
“Custom Transformation Settings”
(Placement)” screen
-
- PWB (n) - n = 1 to 30
6 “Section Definition” screen ○
All of section definition, field definition and field
translation of a “PWB (n)” have been completed.
7
“Field Definition” screen
×
8
“Field Translation” screen
×
-
Placement
9 “Section Definition” screen ○
All of section definition, field definition and field
translation of “Placement” have been completed.
* When you click the “Move”
button, the “Move” dialog box
appears on the screen.
64
10 “Field Definition” screen ×
11 “Field Translation” screen ×
- Component -
All of section definition, field definition and field
translation of “Component” have been completed.
12
“Section Definition” screen
○
13
“Field Definition” screen
×
14
“Field Translation” screen
×
15
“User-defined Format Wizard
finishes” screen
×
○
: You can move to this screen from the “Move” dialog box.
×: You cannot move to this screen from the “Move” dialog box.
7.8.3 Operating the “Move” dialog box
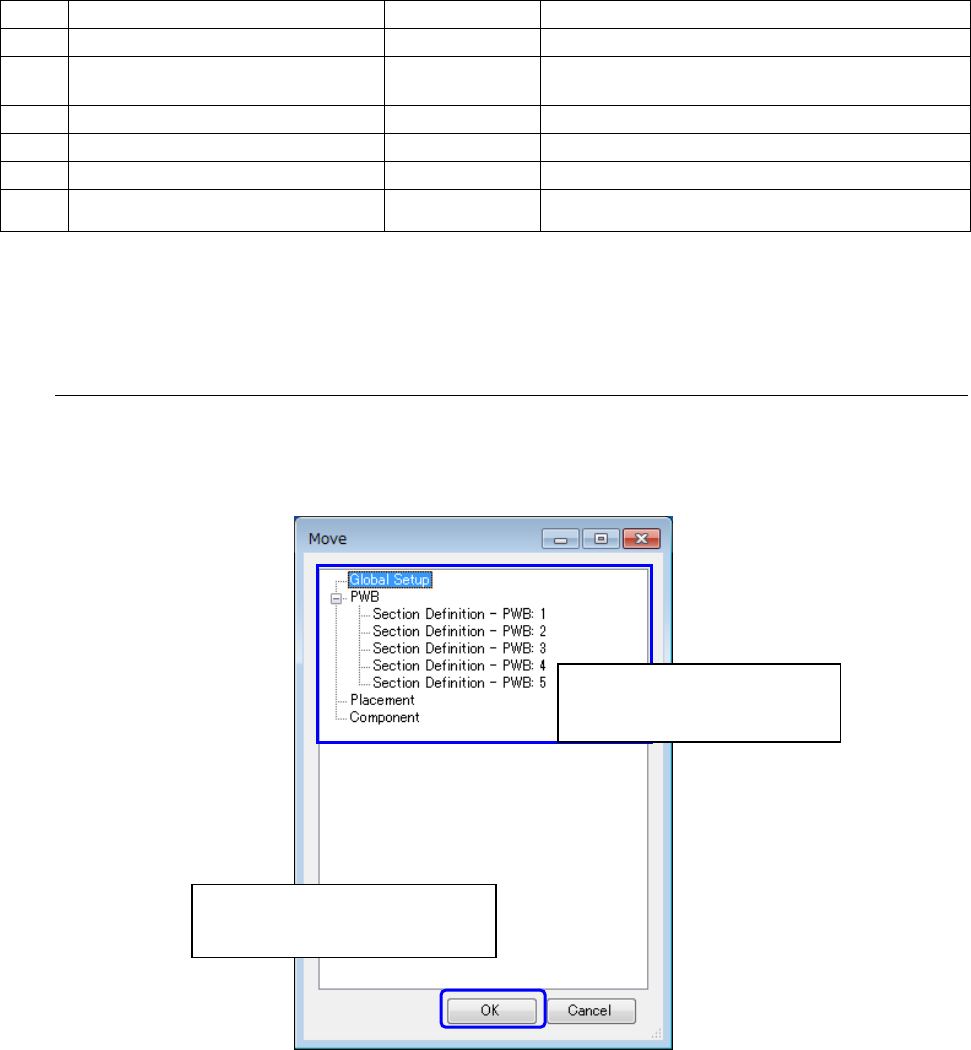
When you select the screen to which you want to move on the “Move” dialog box and click the
“OK” button, you can move to the selected screen. If you do not move to the selected screen,
click the “Cancel” button.
Figure 7.8.3-1
Operating the “Move” dialog box
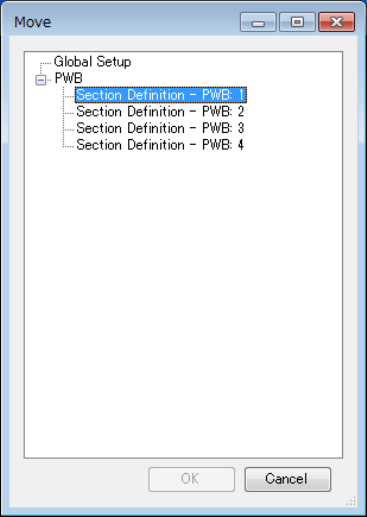
If any of the screens is not set up completely, you cannot move to the corresponding next
screen of the User-defined Format Wizard. For example, if you display the “Move” dialog box
after setting the PWBs “1 to 5” on the “Global Setup” screen and making settings of the PWBs
“1 to 4” completely, you cannot move to any of the following screens: “PWB 5,” “Placement”
and “Component.” In this case, the “Move” dialog box is displayed as shown in Figure 7-8-3-2
““Move” dialog box displayed if any of the screens is not set up completely.”
①
Select the screen to which you
want to move.
②
Select the screen to which you
want to move. Click the “OK”
65
Figure 7.8.3-2
“Move” dialog box displayed
if any of the screens is not set up completely
When you increase the number of PWBs on the “Global Setup” screen, it is also supposed
that there is a screen whose setting is not made completely. For example, if you perform the
following operations, the PWB “5” is not set up completely in Step 5, and you cannot move to
any of the screens: “PWB 5,” “Placement” and “Component.” In this case, the screen
described above appears also.
1 Specify “4” in the “PWB” field, “1” in the “Placement” field, and “1” in the “Component” field
on the “Global Setup” screen.
2 Click the “Next” button on the “Field Translation – Component” screen to display the “User-
defined Format Wizard finishes” screen.
3 Display the “Move” dialog box on the “User-defined Format Wizard finishes” screen, and
then move to the “Global Setup” screen.
4 Change the setting of the “PWB” field to “5” on the “Global Setup” screen.
5 Display the “Move” dialog box on the “Global Setup” screen.