YST15_Users_E.pdf - 第140页
1-2 1 Overview 1.2 Maintenance items n NOTE Maintenance period should be 1 year for machines which operate 8 hours a day in normal condition. It is recommended to adjust the maintenance period depending on the machine op…
1-1
1
Overview
1. Overview
The first requirement is to use the machine in a good environment so that its performance can keep well.
It is also important to securely perform periodic maintenance.
1.1 Macnine size, power and environmental requirement
n
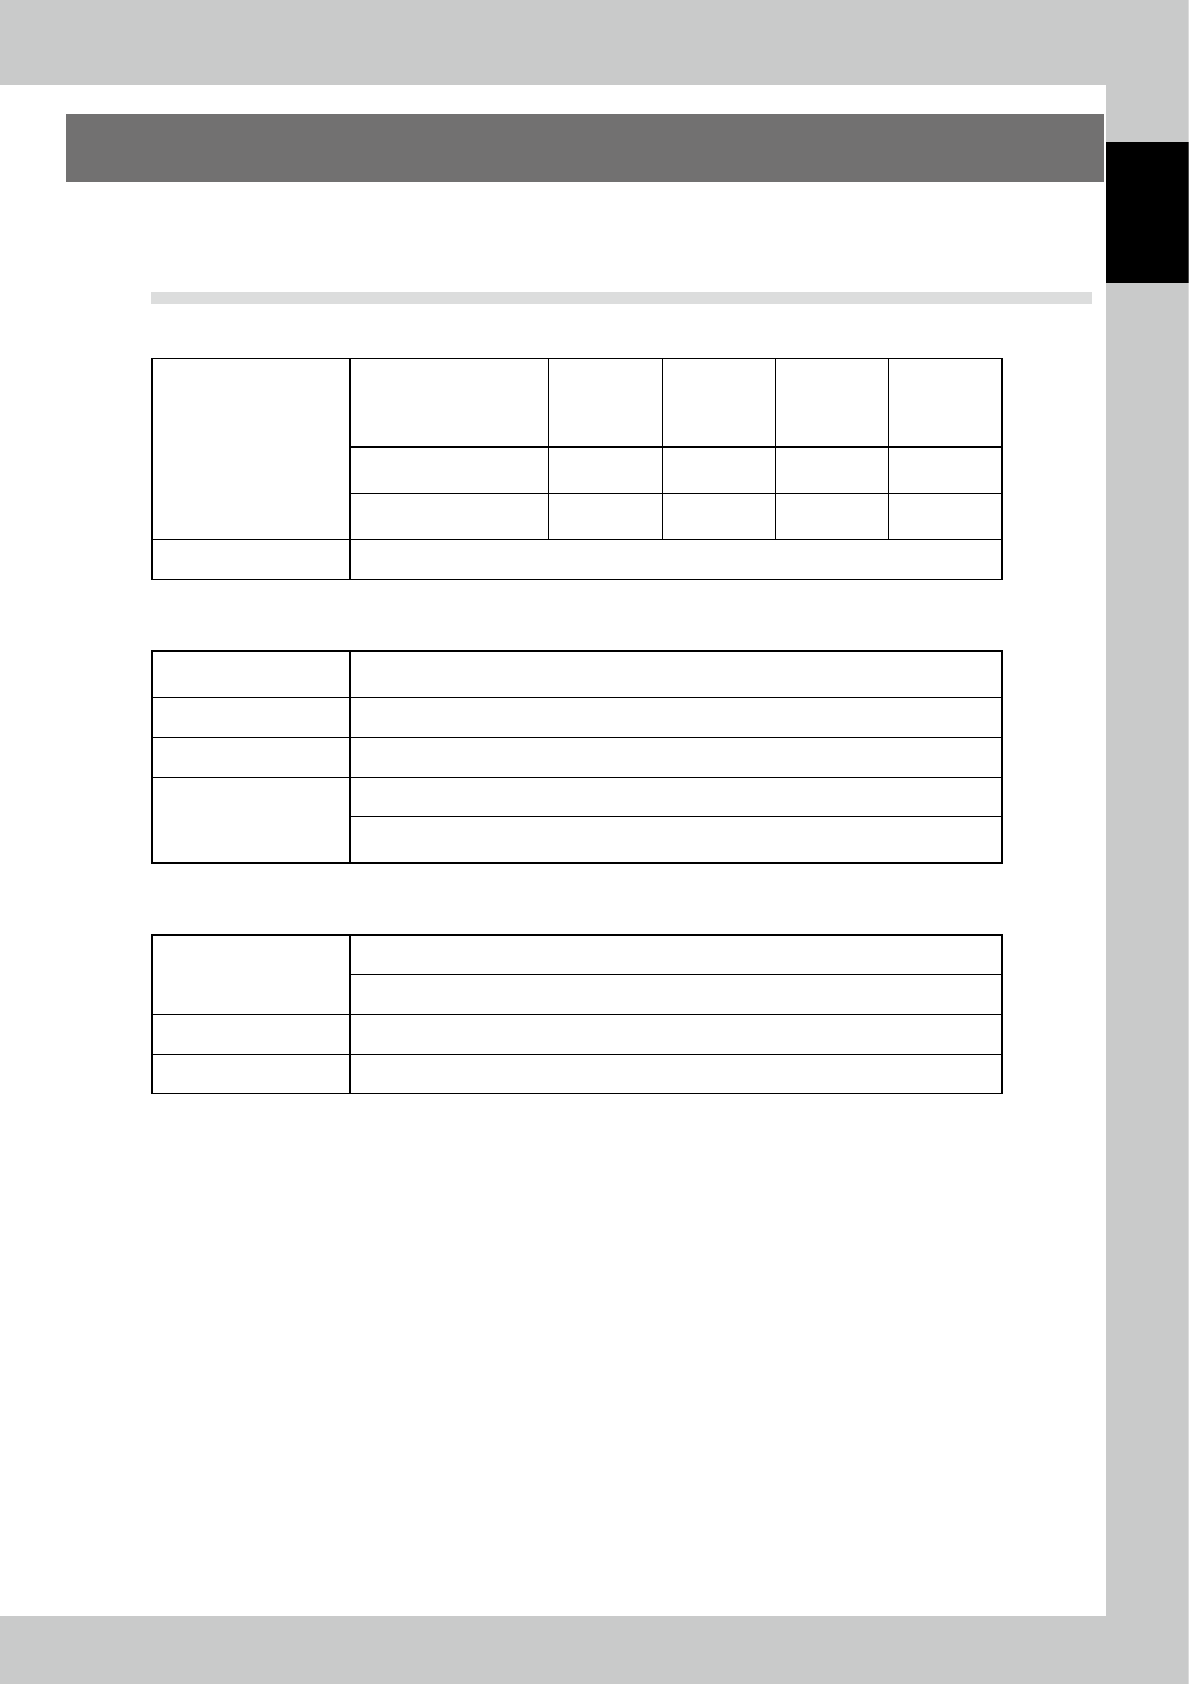
Machine dimensions and weight
Dimensions
*Excluding tower signal
Width mm Depth mm Height mm
Extended
type height
EXT 750 (top
extension)
Small/Standard/Mix type
(incl. dehumidifiers)
2590 1473 2470 3220
Wide type
(incl. dehumidifiers
2590 1633 2470 3220
Weight Standard : 1,100 kg / Extension : 1,500kg
n
Power supply
Power supply
Single phase 200 to 240VAC (+/-10%), 50/60 Hz or Single phase 100 to 120VAC (+/-10%),
50/60 Hz
Power capacity 1.1kVA (incl. dehumidifiers)
Power consumption 0.71 kW
Power supply cable
Copper cross section is 2.5 mm2 or more
Three wires of L, N, and GND are connected to the terminal block in the main control panel
at front left of the machine.
n
Environmental requirement
Environment
Function guaranteed: 10°C to 30°C
Surrounding humidity: 20% to 80%
Inner temperature 10°C to 43°C
Noise level around 78 dB or less
1-2
1
Overview
1.2 Maintenance items
n
NOTE
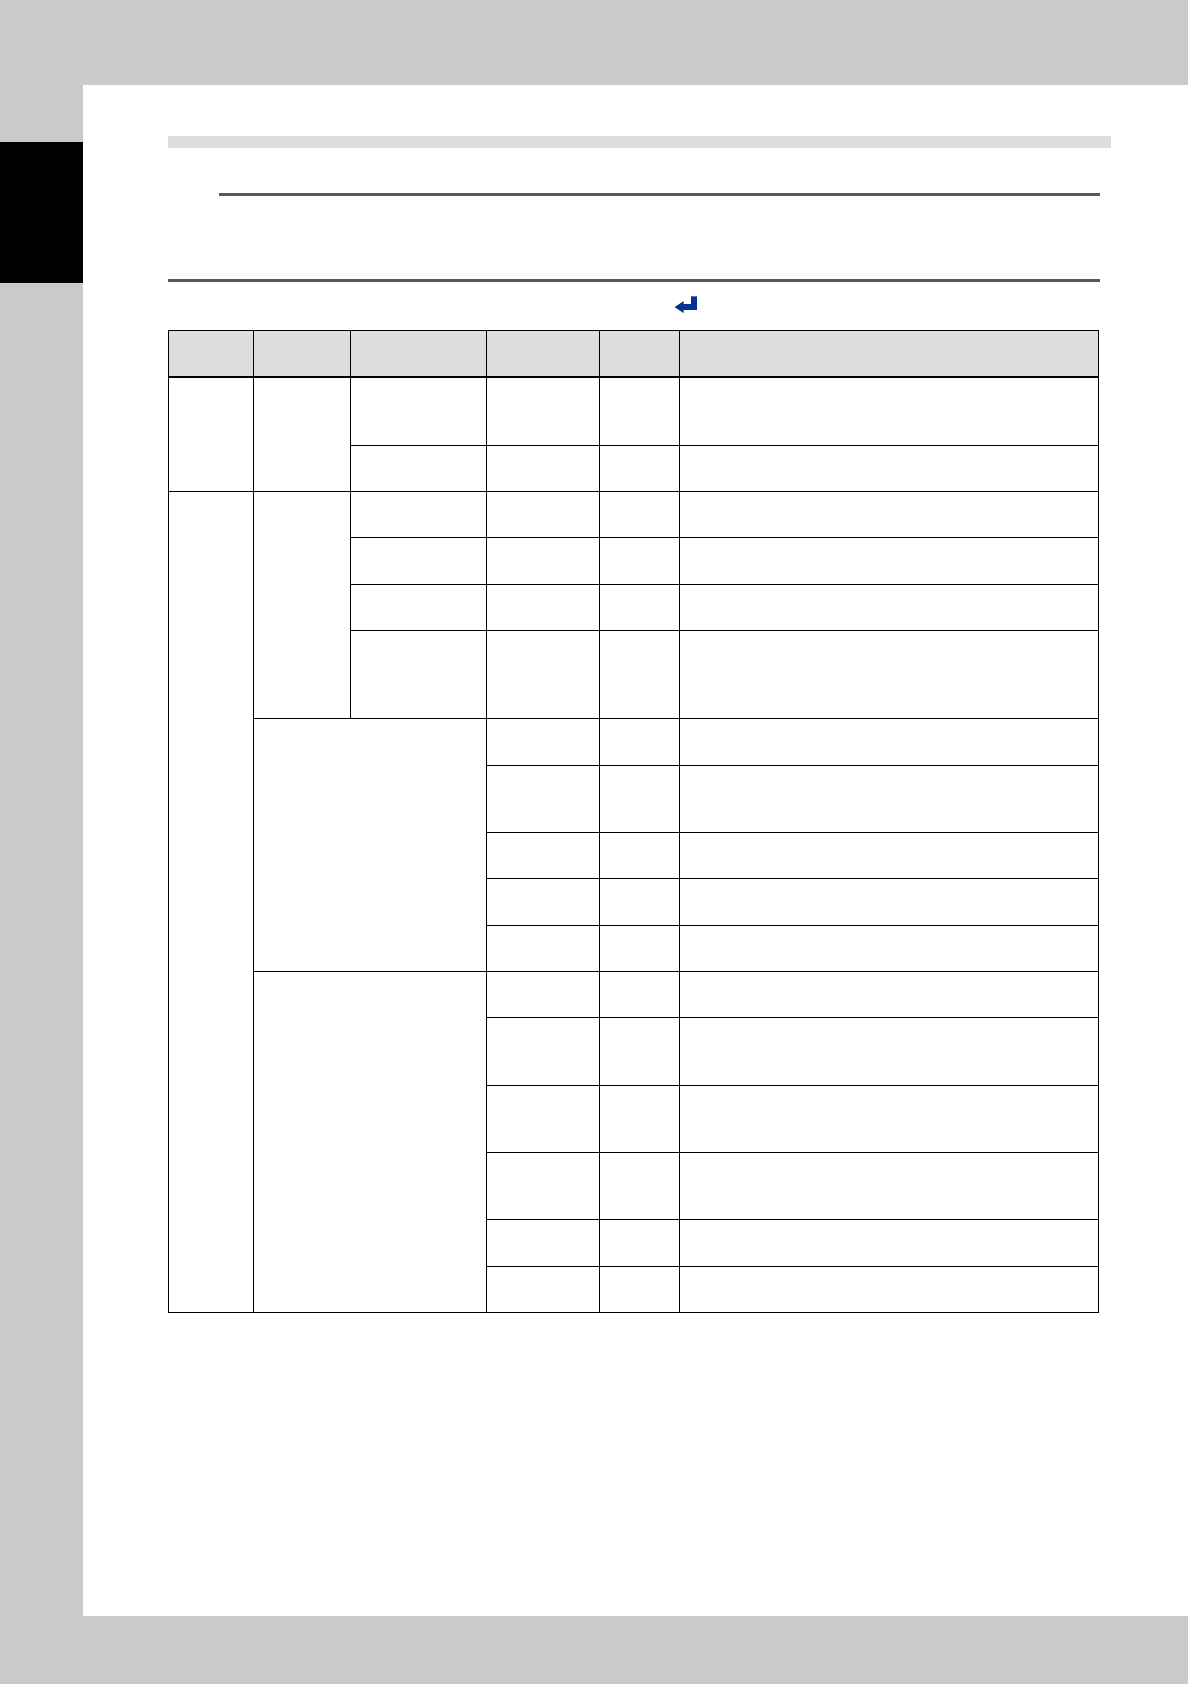
Maintenance period should be 1 year for machines which operate 8 hours a day in normal condition.
It is recommended to adjust the maintenance period depending on the machine operating time and the environ-
ment.
* Jump to desired page by clicking the section in "Page" column.And click " " on bottom left of the page to return here.
Period Equipment Part
Maintenance
item
Page Work detail
Everyday Main unit
Tower signal and
Operator area
indicator
Lighting
Chapter 2
"1.1"
Check if the tower signals and operator area indicators work
properly.
Dehumidifier Operation
Chapter 2
"1.2"
Check the dehumidifier condition in "Environment Condition"
screen, and confirm it works properly.
1 year
Main unit
Inside machine Cleaning
Chapter 3
"1.1"
Visually check the shelves and floor inside the machine, and
clean them with a vacuum cleaner.
Loading/Unloading
area
Reel detection
sensor
Chapter 3
"1.2"
Use dry soft cloth to clean two reel detection sensors and
two reflectors. Don't use alcohol.
Main control panel Cables
Chapter 3
"1.3"
Check if cables on all boards are connected properly.
Side door Interlock
Chapter 3
"1.4"
Check if the machine doesn't perform initialization even with
pushing [initialize] button when a door opens.
Check if the machine performs initialization with pushing
[initialize] button when the doors close.
X-axis
Rail
Chapter 3
"2.1"
Use cleaning wiper with IPA (or absolute alcohol) to clean
the stainless rail of X-axis.
carrier wheel
Chapter 3
"2.2"
Use cleaning wiper with IPA (or absolute alcohol) to clean
four carrier wheels of X-axis. Be careful not to put alcohol
on the bearing parts of wheels.
Belt
Chapter 3
"2.3"
Check if the belt of X-axis is parallel to the frame of X-axis.
Otherwise, adjust the belt tension.
Horizontality
Chapter 3
"2.4"
Check if the distance between the handler and the shelves
at both ends of X-axis.
Cables
Chapter 3
"2.5"
Check if the cables of the motor and the encoder are
connected properly.
Y-axis
Rail
Chapter 3
"3.1"
Use cleaning wiper with IPA (or absolute alcohol) to clean
two stainless rails Y X-axis.
Carrier wheel
Chapter 3
"3.2"
Use cleaning wiper with IPA (or absolute alcohol) to clean
the carrier wheels of Y-axis (four for each side) . Be careful
not to put alcohol on the bearing part of the wheels.
Operation
Chapter 3
"3.3"
Check if the nuts fixing wheels are tightened without any
gaps. If there are some gaps, fix the eccentric wheels again,
then check if the Y-axis moves smoothly.
White belt
Chapter 3
"3.4"
Check if the white belts of both side of Y-axis is fixed
securely. Check if the belt fixed blocks don't interfere with
the rail.
Drive belt
Chapter 3
"3.5"
Pinch and rotate the Y-axis drive belt to check if its tension
is appropriate. If the tension is low or high, adjust it.
Cables
Chapter 3
"3.6"
Check if the cables of the motor and the encoder are
connected properly.
1-3
1
Overview
Period Equipment Part
Maintenance
item
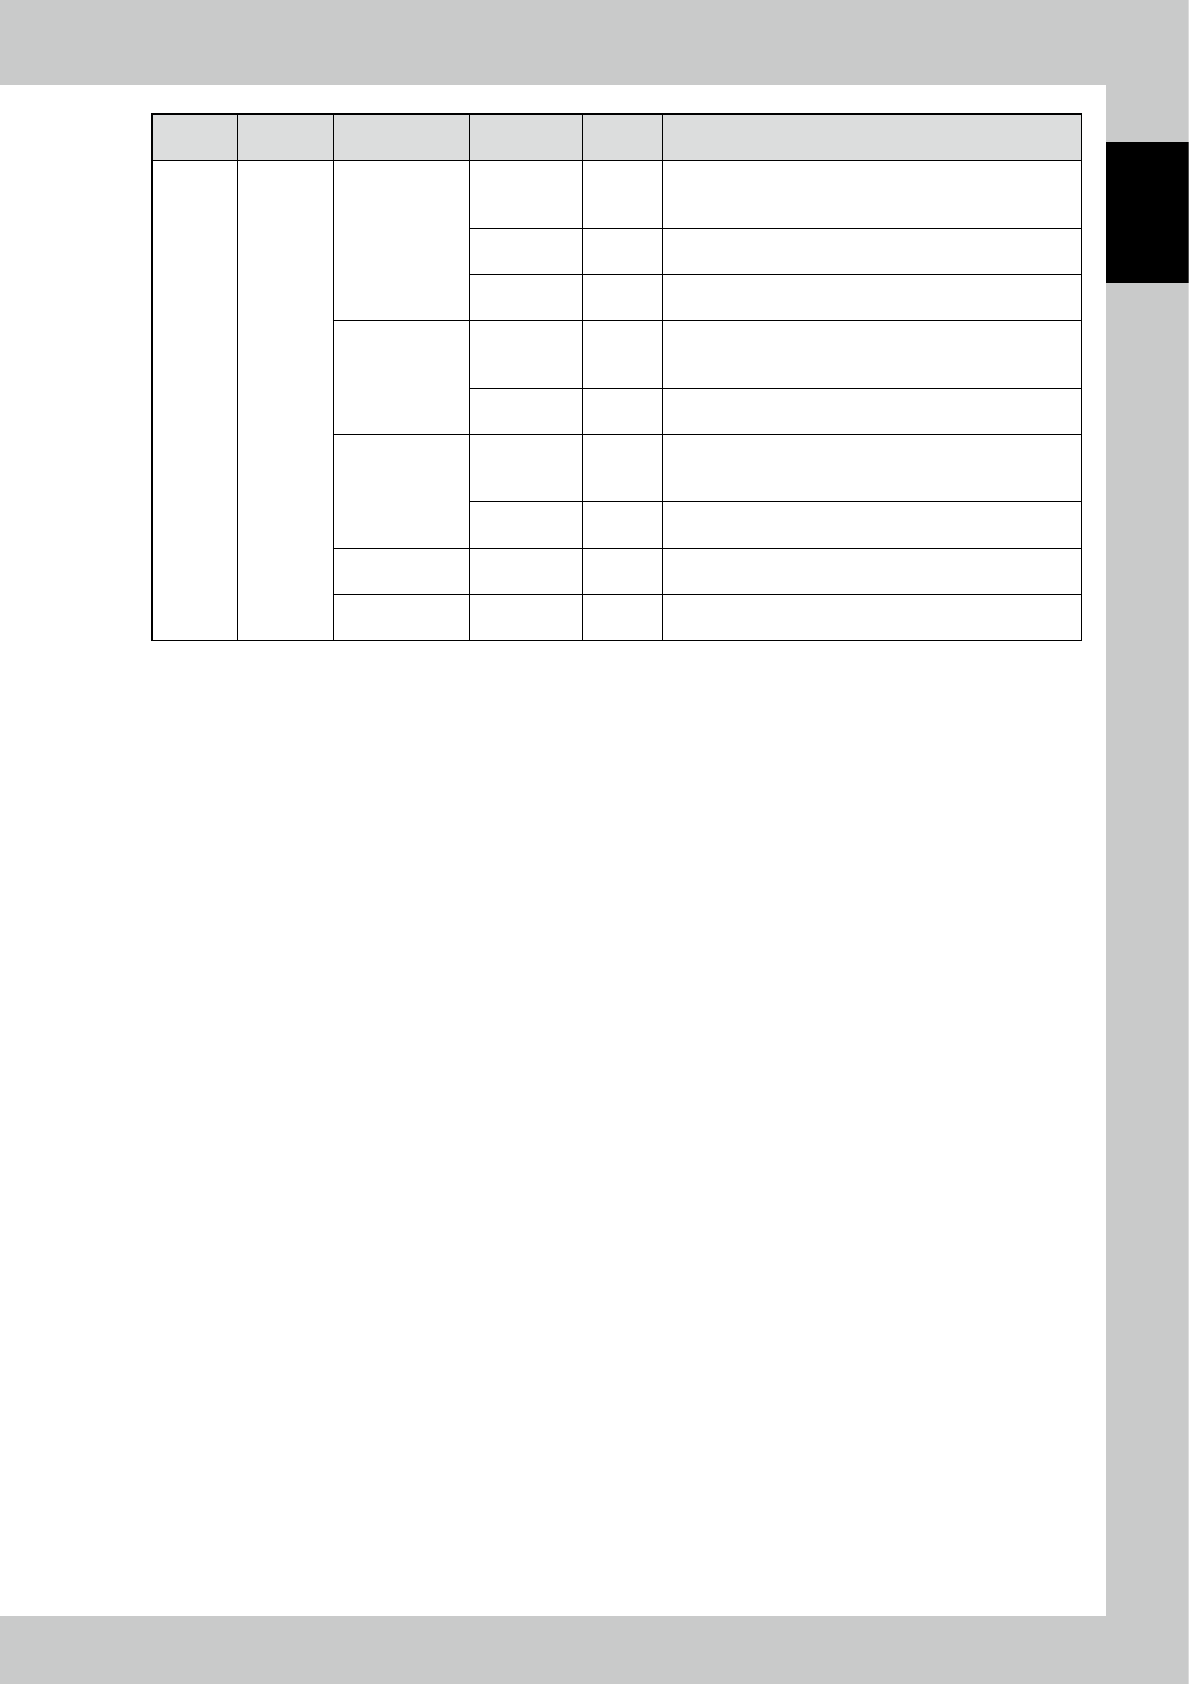
Page Work detail
1 year Handler
Forward/
Backward-axis
Guide
Chapter 3
"4.1"
Use cleaning wiper with IPA (or absolute alcohol) to clean
the guide. Apply the specified grease (AFB grease) on the
guide by hands.
Drive pulley
Chapter 3
"4.2"
Check if the setscrew fixing the motor and the drive pulley is
tighten securely.
Belt
Chapter 3
"4.3"
Push the belt softly to check if the belt moves 8 to 10 mm. If
it moves more or less than that, adjust the belt tension.
Open/Close-axis
Ball screw,
guide
Chapter 3
"4.4"
Use cleaning wiper with IPA (or absolute alcohol) to clean
the ball screw and the guide. Apply the specified grease (AFB
grease) on the guide by hands.
Ball screw
Chapter 3
"4.5"
Check if the setscrew fixing the motor and the ball screw is
tighten securely.
Rotation (Delta)
-axis
Gear
Chapter 3
"4.6"
Use cleaning wiper with IPA (or absolute alcohol) to clean
the gear. Apply the specified grease (AFB grease) on the
guide by hands.
Drive gear
Chapter 3
"4.7"
Check if the setscrew fixing the motor and the drive gear is
tighten securely.
Reel sensor Reel sensor
Chapter 3
"4.8"
Use dry soft cloth to clean three reel sensors. Don't use
alcohol.
Control board Cables
Chapter 3
"4.9"
Check if cables on the handler control board are connected
properly.