00198829-01_SM_X-Series-S_Hxxxx_EN.pdf - 第89页
5 Pneumatic System 5.6 Replacing the pressure regulator (location 1) Service Manual SIPLACE X-Series S (from Hxxxx) 01/2021 89 5.6 Replacing the pressure regulator (location 1) Parts, equipment and tools ● Pressure contr…
5 Pneumatic System
5.4 Sealing the Pneumatic Screwed Connections
88 Service Manual SIPLACE X-Series S (from Hxxxx) 01/2021
5.4 Sealing the Pneumatic Screwed Connections
NOTICE
Sealing the pneumatic screwed connections
If pneumatic screwed connections are loosened, these will need to be sealed again after-
wards. Always use the same sealing technique as was used before they were removed.
The following sealing techniques are available:
► Sealing ring (rubber or plastic)
These are either supplied or you can use the ones used before. Check the condition of
used sealing rings for damage.
► Sealant
There are several variants of this:
Loctite 567 [03097172-xx] and Loctite 55 [03092492-xx]
After loosening the pneumatic screwed connection, clean the screwed thread and seal
it with Loctite. The sealing thread for Loctite 55 must be wound on in the direction of
the screwed thread.
There may also already be a sealant on the screwed thread.
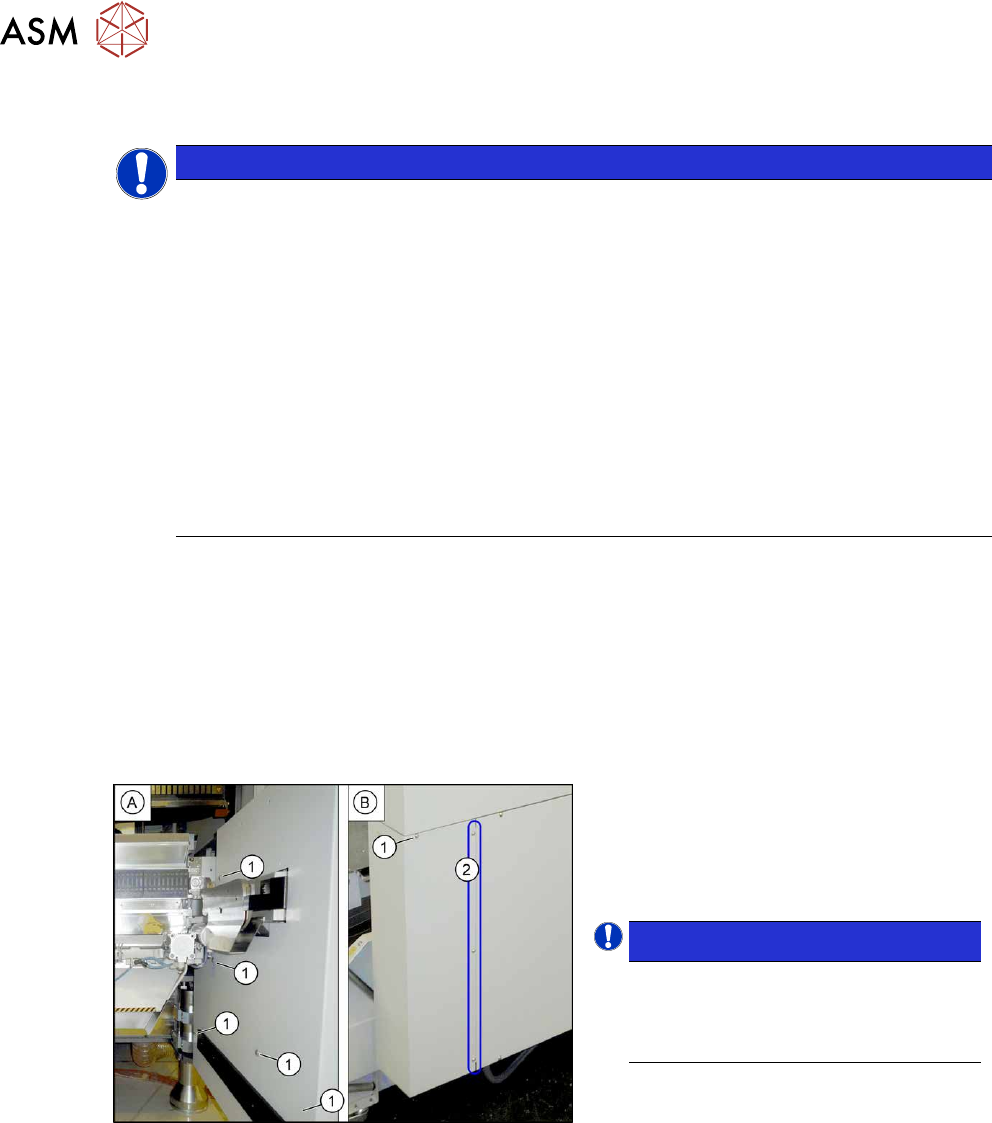
5.5 Dismantling the Lower Side Cover
Most tasks require that you dismantle the lower side cover (corner cover) from the location. This is
shown below using the example of location 2. The procedure is the same for other locations.
Parts, equipment and tools
●
Shortened Allen key, if required
Dismantling the side cover
Fig.103: Dismantling the lower side cover
► While unscrewing, always hold on to
the side cover, to prevent it falling off.
► Remove the six screws(1) fastening
the inner(A)
and outer side(B) of the
side panel.
NOTICE!
The three fastening screws (2) on the
outer side are loosened as a default.
The side cover can be pulled out here.
.
► Remove the side cover.
Fitting the side cover
► Assembly is performed by following the above instructions in the reverse order.
5 Pneumatic System
5.6 Replacing the pressure regulator (location 1)
Service Manual SIPLACE X-Series S (from Hxxxx) 01/2021 89
5.6 Replacing the pressure regulator (location 1)
Parts, equipment and tools
●
Pressure control valve G1/2 Mod112 (34203054) [03062103-xx]
●
Filter element M652AE433582001 [03172941‑xx]
●
Sealant (see 5.4 "Sealing the Pneumatic Screwed Connections" [}88])
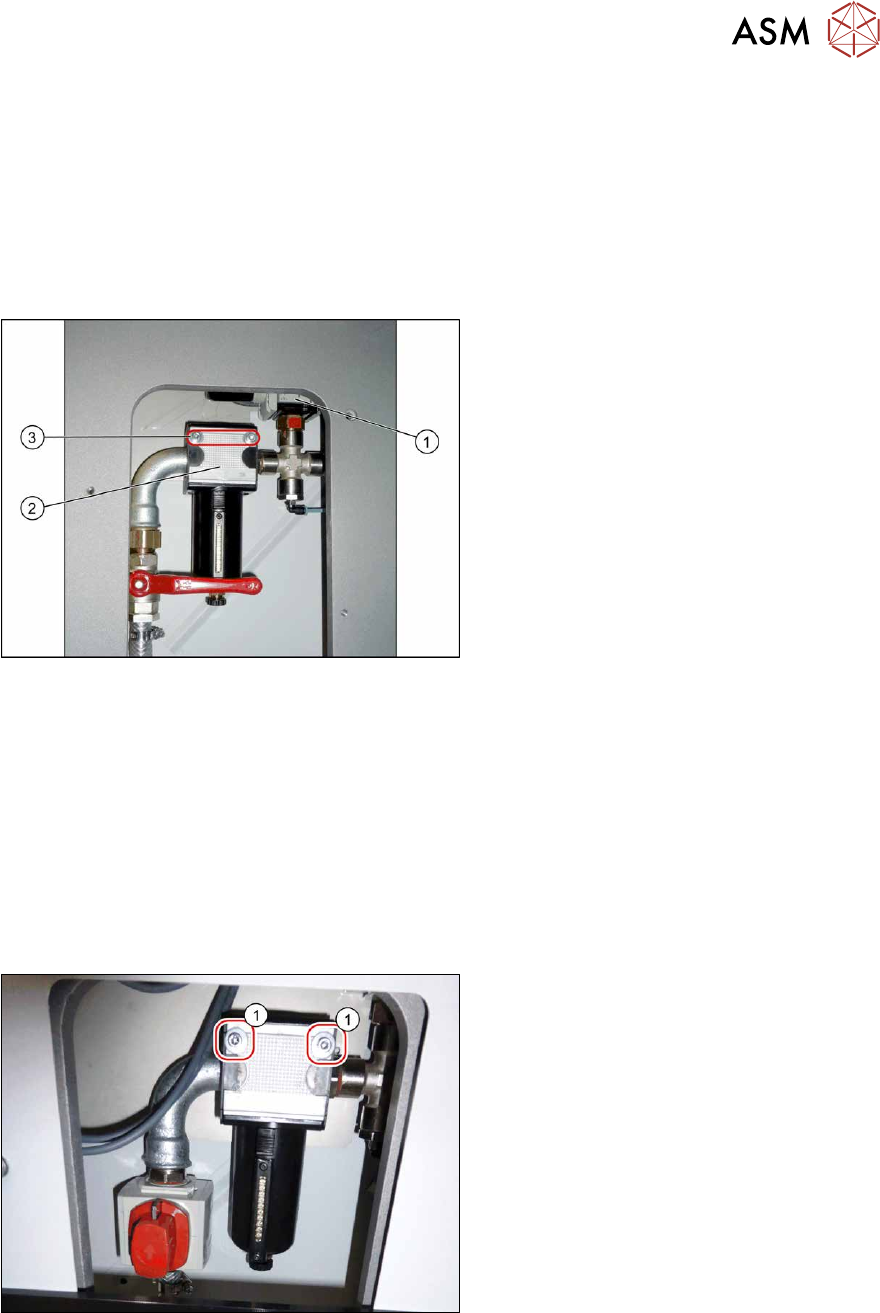
Overview
Fig.104: Overview of pressure control valve
1. Pressure control valve
2. Inlet filter housing
3. Screws fastening the inlet filter housing
Removal
► Switch off the machine, disconnect it from the power supply and secure it to prevent
unauthorized reactivation.
1.2 "Preparatory work..." [}16]
► Switch off the compressed air supply and then disconnect the machine from the compressed
air supply.
5.2 "Disabling the compressed air supply" [}86]
► To do this, remove the screws fastening the side cover and remove this cover.
5.5 "Dismantling the Lower Side Cover" [}88]
Fig.105: Screws fastening the inlet filter
► Remove the two screws (1) fastening
the inlet filter. This enables you to pull
the whole unit down a little and
provides better access.
5 Pneumatic System
5.6 Replacing the pressure regulator (location 1)
90 Service Manual SIPLACE X-Series S (from Hxxxx) 01/2021
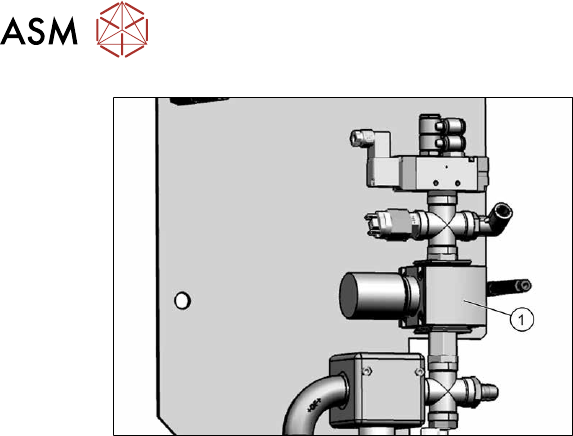
Fig.106: Pressure control valve
► Loosen the screwed clamps at the top
and bottom of the pressure control
valve.(1)
.
► Carefully remove the pressure control
valve.
Installation
Follow the removal instructions in reverse order for installation. Also observe the following instruc-
tions:
► Seal the compressed air system with sealant. Observe the instructions in section 5.4 "Sealing
the Pneumatic Screwed Connections" [}88] in connection with this.