MDS-C1-SPA Series INSTRUCTION MANUALib1500152(eng)a.pdf - 第26页
1. Installation 1 - 11 1-3-2 Spindle side detector When coupling the spindle side detector with spindle, a flexible coupling should be used to couple the spindle side detector with the spindle. Detector 0.02 0.02 Opposit…
1. Installation
1 - 10
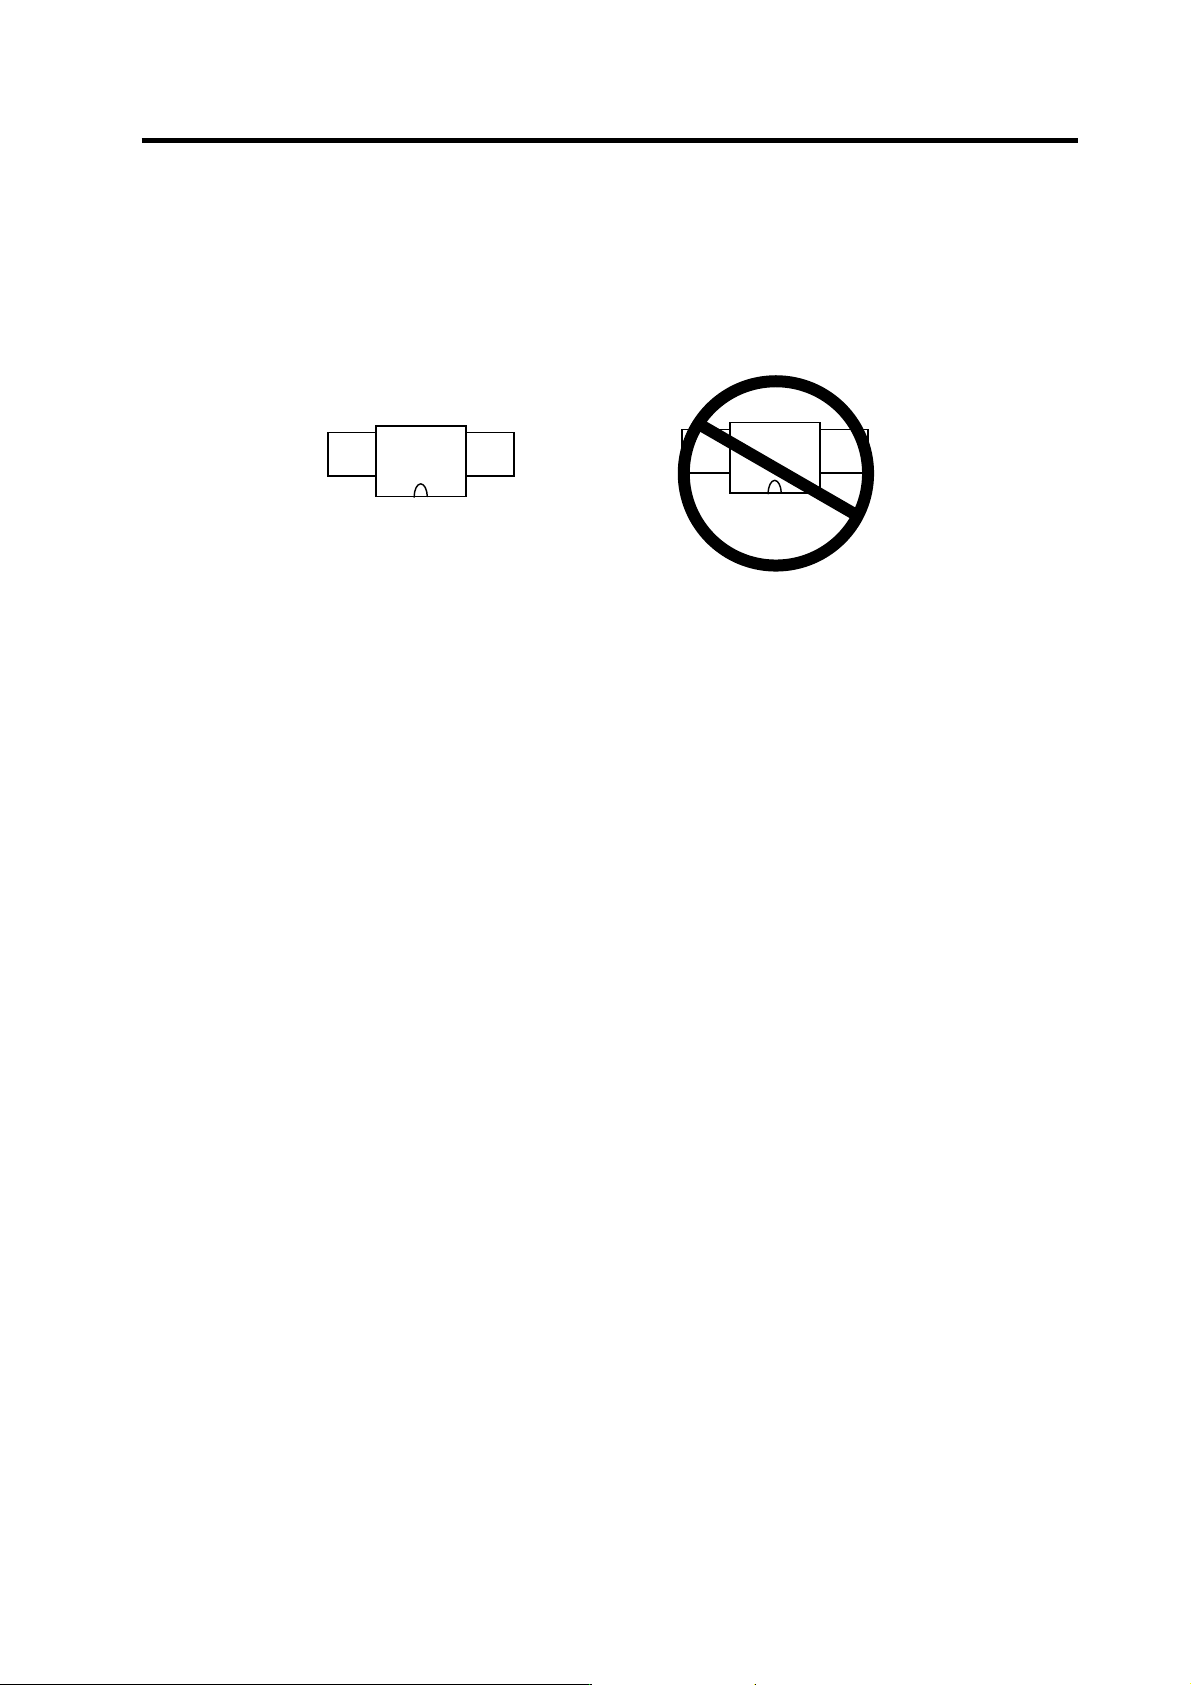
(3) Magnet and sensor installation directions
• Install so that the magnet's reference hole and sensor's reference notch are aligned.
(Standard/high-speed standards)
• Install so that the magnet's N pole comes to the left side when the sensor's reference notch is
faced downward. (High-speed compact/high-speed ring)
(4) Cautions
[1] Do not apply impacts on the magnet. Do not install strong magnets near the magnet.
[2] Sufficiently clean the surrounding area so that iron chips and cutting chips do not adhere to the
magnet. Demagnetize the round disk before installing.
[3] Securely install the magnet onto the spindle with an M4 screw. Take measures to prevent
screw loosening as required.
[4] Balance the entire spindle rotation with the magnet installed.
[5] Install a magnet that matches the spindle's rotation speed.
[6] When installing the magnet onto a rotating body's plane, set the speed to 6,000r/min or less.
[7] Install so that the center line at the end of the head matches the center of the magnet.
[8] The BKO-C1730 is not an oil-proof product. Make sure that oil does not come in contact with
BNO-C1730 or BKO-C1810.
[9] When connecting to the spindle drive unit, wire so that the effect of noise is suppressed.
N S
|
Reference notch
Sensor
Magnet
S N
|
Reference notch
Sensor
Magnet
1. Installation
1 - 11
1-3-2 Spindle side detector
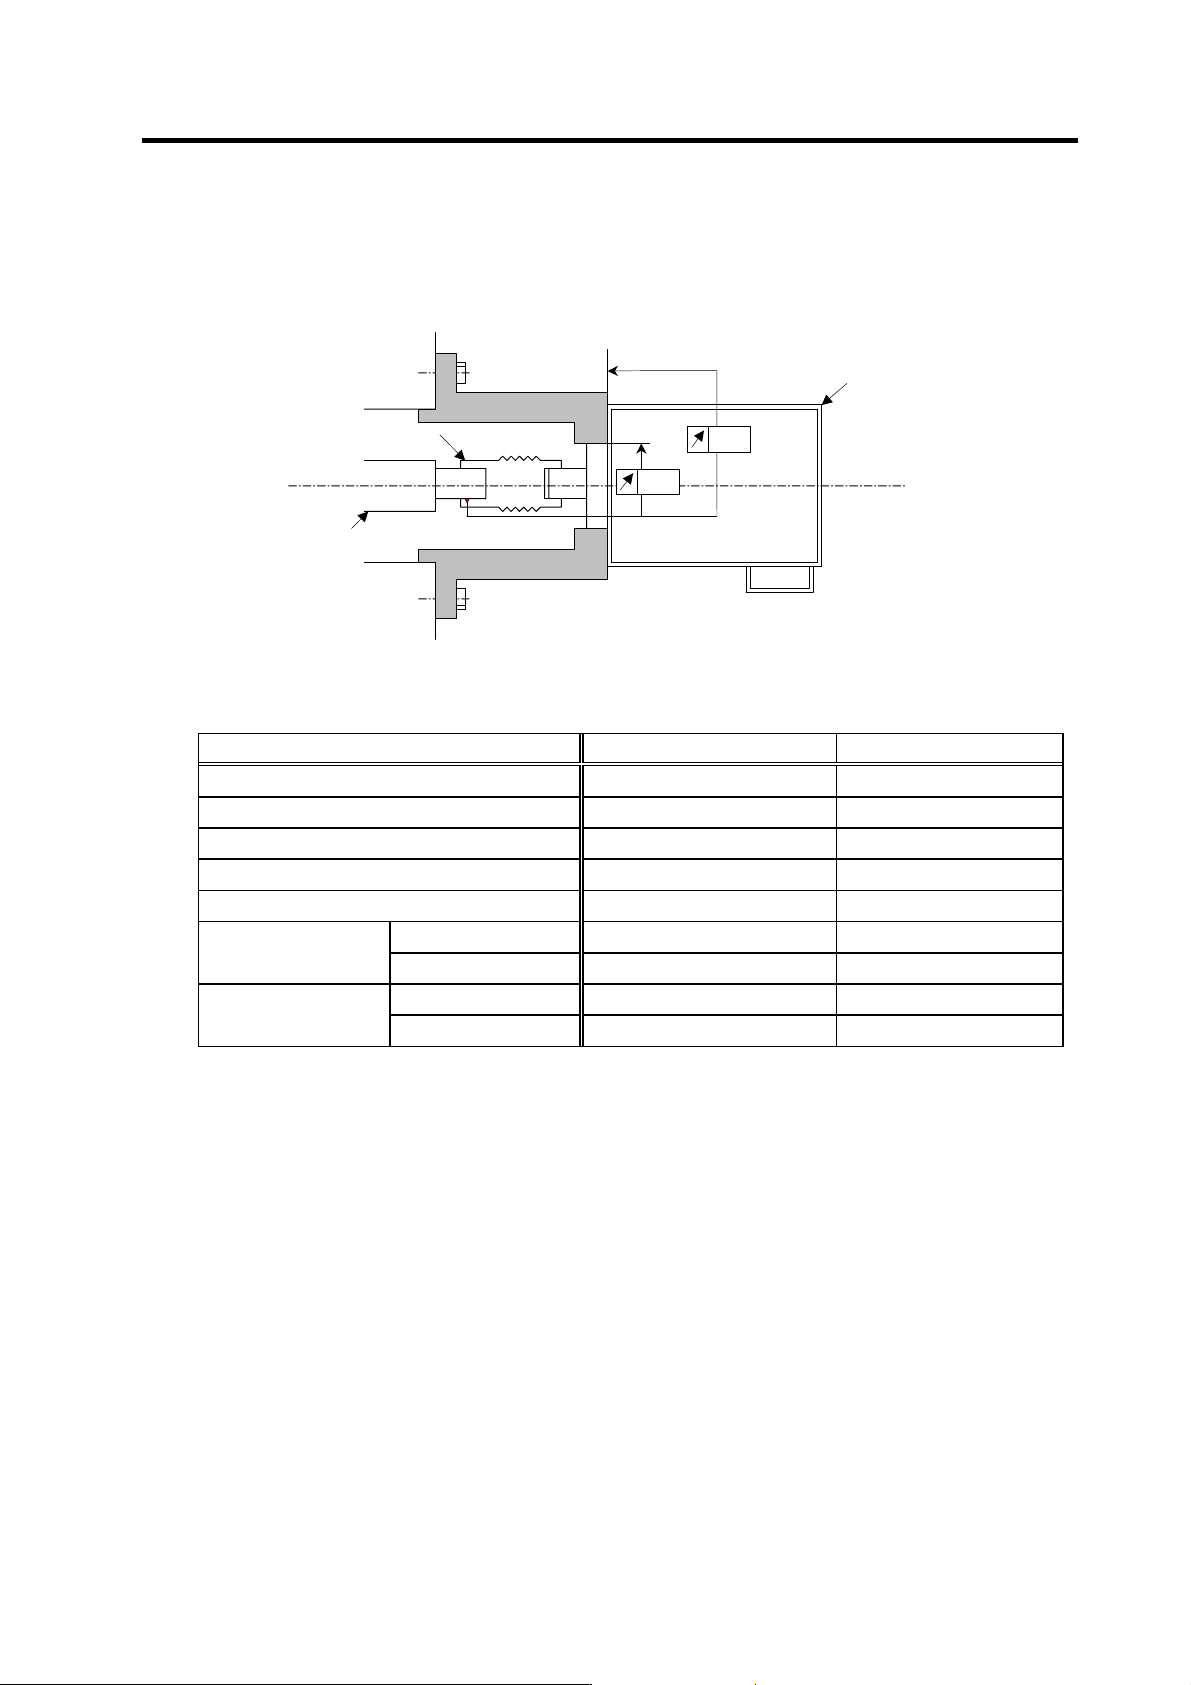
When coupling the spindle side detector with spindle, a flexible coupling should be used to couple the
spindle side detector with the spindle.
Detector
0.02
0.02
Opposite detector shaft
side
Flexible coupling
Detector and coupling installation accuracy
Recommended coupling
Recommendation 1 Recommendation 2
Manufacturer Tokushu Seiko Eagle
Model Model M1 FCS38A
Resonance frequency 1374Hz 3515Hz
Position detection error 0.8×10⁻³° 1.2×10⁻³°
Tolerable speed 20000r/min 10000r/min
Core deviation 0.7mm 0.16mm
Mis-alignment
Angle displacement
1.5° 1.5°
Max. length 74.5mm 33mm
Outline dimensions
Max. diameter
ø57mm ø38mm
Refer to the coupling catalog, etc., for details on the coupling.
1. Installation
1 - 12
1-4 Noise measures
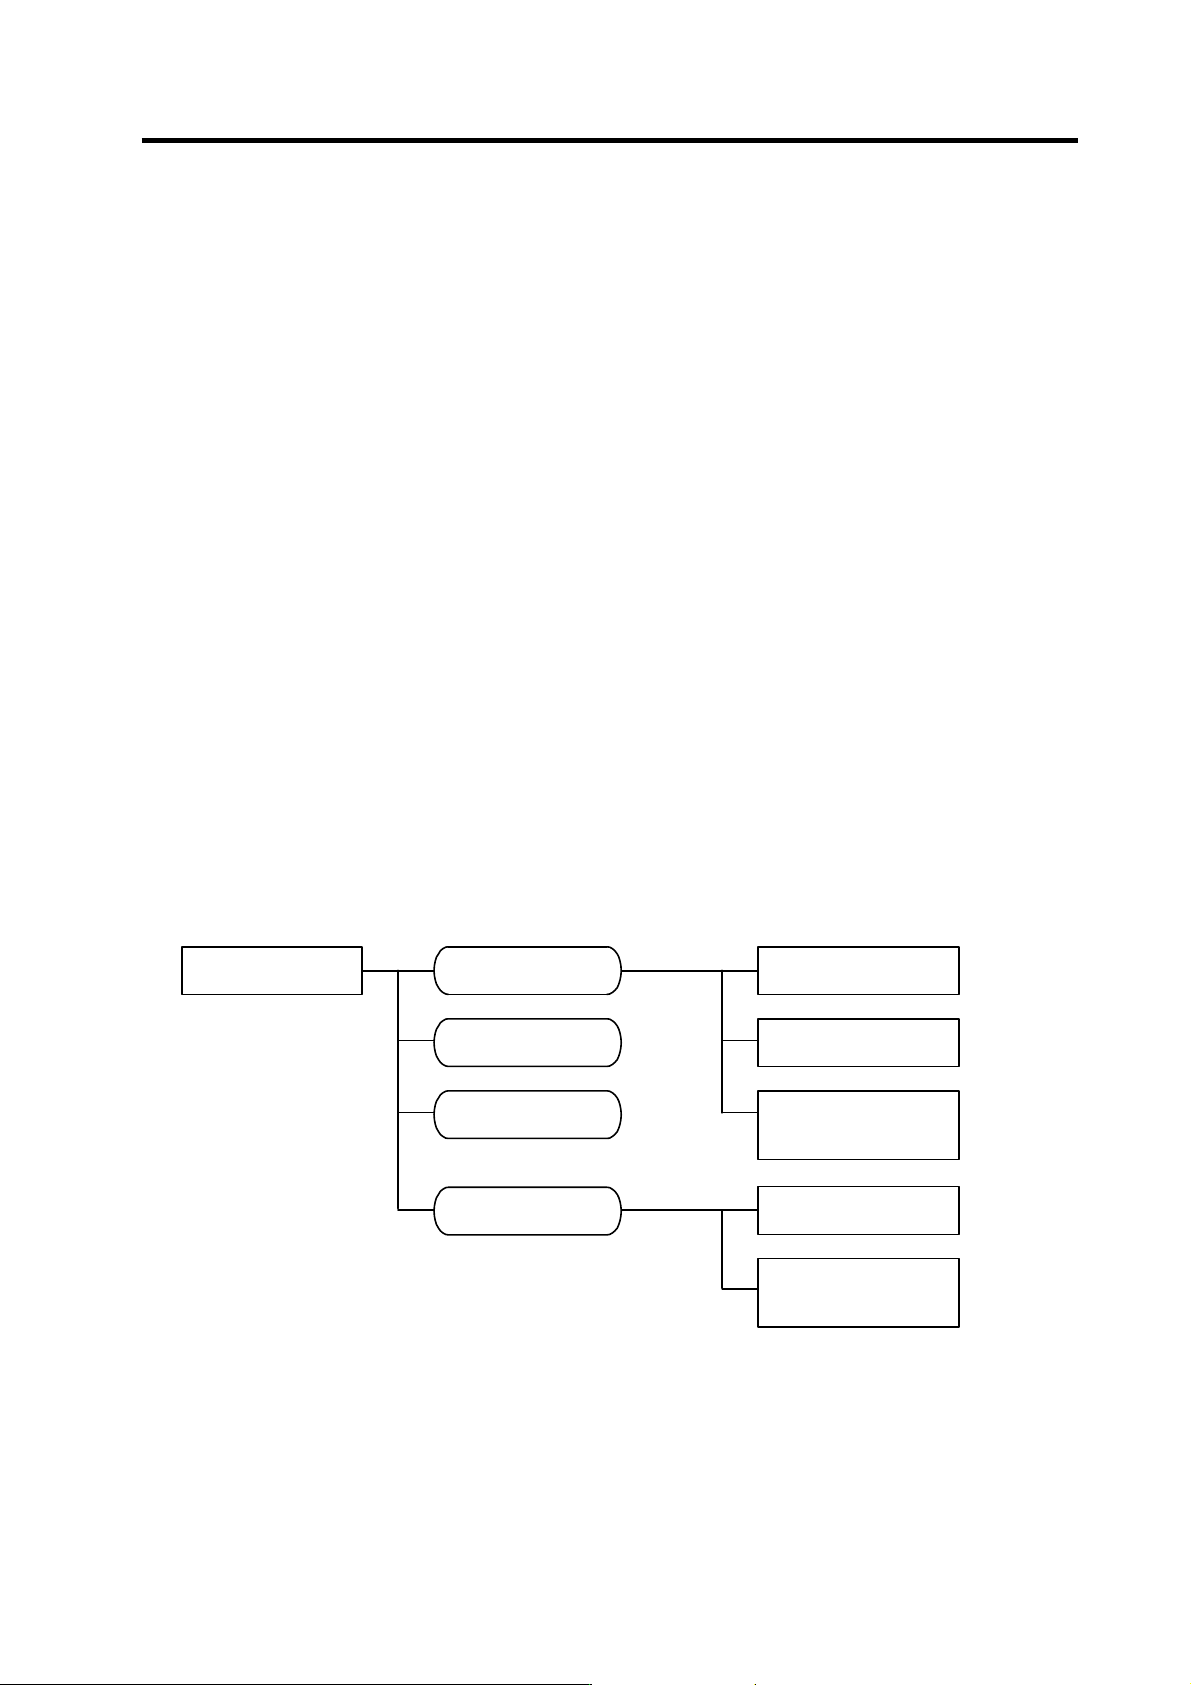
Noise includes "propagation noise" generated from the power supply or relay, etc., and propagated
along a cable causing the power supply unit or drive unit to malfunction, and "radiated noise"
propagated through air from a peripheral device, etc., and causing the power supply unit or drive unit to
malfunction.
Always implement these noise measures to prevent the peripheral devices and unit from malfunctioning.
The measures differ according to the noise propagation path, so refer to the following explanation and
take appropriate measures.
(1) General noise measures
• Avoid laying the drive unit's power line and signal wire in a parallel or bundled state. Always
separate these wires. Use a twisted pair shielded wire for the detector cable and signal wires
such as the communication cable connected with the NC, and accurately ground the devices.
• Use one-point grounding for the drive unit and motor.
• Accurately ground the AC reactor.
(2) Propagation noise measures
Take the following measures when noise generating devices are installed and the power supply
unit or drive unit could malfunction.
• Install a surge killer on devices (magnetic contacts, relays, etc.) which generate high levels of
noise.
• Install a power line filter in the stage before the power supply unit.
• Install a ferrite core on the signal wire.
• Ground the shield of the servo detector's cable with a cable clamp.
• Wire the spindle PLG detector cable away from other wires.
(3) Measures against radiated noise
The types of propagation paths of the noise and the noise measures for each propagation path are
shown below.
Noise generated from
drive un it
Noise direct ly radiated
from drive unit
Airborne
propagat io n noi se
Path [1]
Noise rad iat e d from
power line
Magnet ic i nduc tion
noise
Path [2]
Path [4]
and [5]
Noise rad iat e d from
spindle motor
Static ind uction
noise
Path [3]Path [6]
Noise pro pagated over
power line
Cable propagation
noise
Path [7]
Noise lead in from
grounding wire by
leakage current
Path [8]