LCX_UserManual_en_08_1.pdf - 第171页
Network operation and remote control R&S ® LCX Series 171 User Manual 1 179.2260.02 ─ 08 3. T urn VNC. 4. Select "VNC Port". An on-screen keypad opens. 5. Enter the port number . 6. Confirm with . The R&…
Network operation and remote control
R&S
®
LCX Series
170User Manual 1179.2260.02 ─ 08
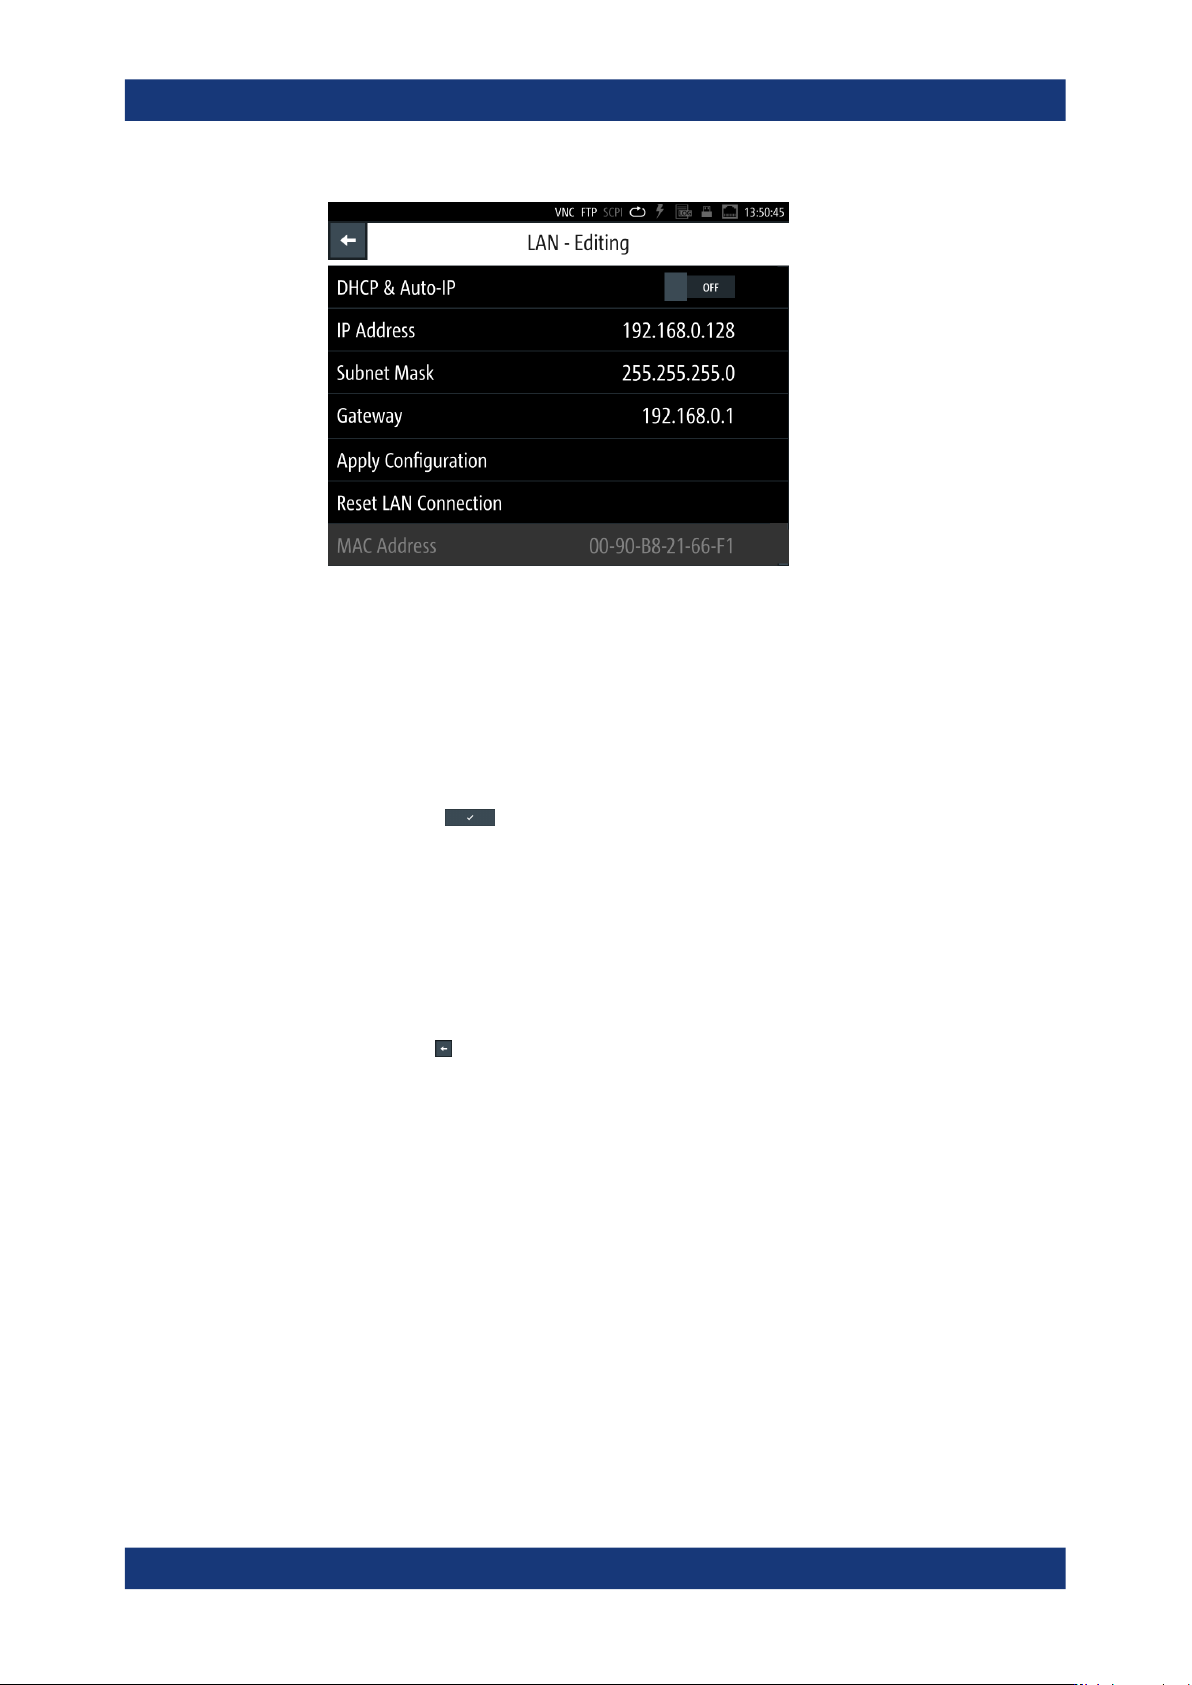
Figure 10-9: LAN settings
The R&S LCX enables edit mode.
4. Select the "IP Address".
The IP address consists of four blocks separated by dots. Every block contains 3
numbers at a maximum.
5. Enter the address, e.g. 123.123.1.123.
6.
Confirm with .
7. Set the "Subnet Mask" and "Gateway" in the same way.
8. Select "Apply Configuration".
The R&S LCX applies the modified settings.
9. To undo the changes, select "Reset LAN Connection".
Note: The MAC address is assigned statically and cannot be modified.
10.
Return with
.
When the connection is established successfully, the R&S LCX displays the white
network icon in the instrument status bar.
Assigning the VNC port manually
Using a VNC client, you can access the R&S LCX remotely over the VNC interface.
The controller addresses the instrument with the port address. The R&S LCX has the
factory-set address 5900, but you can adjust it manually according to your network
environment. It is assumed that you have established the connection, see "Establishing
the LAN connection" on page 24.
To set the VNC port manually:
1. To access the setting, press the [settings] key at the front panel.
2. In the device settings menu, select "Interfaces" > "Network" > "VNC".
Note: You can modify the settings only when VNC state is deactivated.
Adjusting interface addresses

Network operation and remote control
R&S
®
LCX Series
171User Manual 1179.2260.02 ─ 08
3.
Turn VNC.
4. Select "VNC Port".
An on-screen keypad opens.
5. Enter the port number.
6.
Confirm with
.
The R&S LCX changes the VNC port address accordingly.
Note: The VNC address settings are retained by an instrument preset, and also
when you recall previously saved instrument settings, see Section 9.12, "Save/
recall", on page 142.
However, a factory reset presets the VNC address to the default value, see "Reset-
ting the instrument to the initial factory settings" on page 145.
Assigning the FTP port address manually
Using an FTP application, the remote controller addresses the R&S LCX instrument
with the port address. The R&S LCX has the factory-set address 21, but you can adjust
it manually according to your network environment. It is assumed that you have estab-
lished the connection, see "Establishing the LAN connection" on page 24.
To set the FTP access settings manually:
1. Press the [settings] key at the front panel.
2. In the device settings menu, select "Interfaces" > "Network" > "FTP".
Note: You can modify the settings only when FTP is deactivated.
3.
Turn
"FTP".
4. Select "Port".
An on-screen keypad opens.
5. Enter the port number.
6. If necessary, assign an individual user name:
Initially, the assigned user name is the <instrument name>, e.g., "LCR200".
a) Select "User name".
b) Enter the user name, e.g., MyLCR Meter1. You can specify any sequence with
at least 1 letter and 1 digit.
c)
Confirm with .
7.
NOTICE! The password is required when you use the FTP function the first time,
and after changing the port and user name.
To change or confirm the password:
Initially, the assigned password is the <serial number> of the instrument, see the
label at the rear panel.
a) Select "Password".
b) Enter the password.
You can specify any sequence with at least one letter and one digit.
Adjusting interface addresses

Network operation and remote control
R&S
®
LCX Series
172User Manual 1179.2260.02 ─ 08
c)
Confirm with .
The R&S LCX changes the FTP port address accordingly.
Note: The FTP address settings are retained by an instrument preset, and also
when you recall previously saved instrument settings, see Section 9.12, "Save/
recall", on page 142.
However, a factory reset presets the FTP address to the default value, see "Reset-
ting the instrument to the initial factory settings" on page 145.
Assigning the SCPI raw port and hostname manually
To assign the socket port and the instrument name manually:
1. Access: see 159
2. Select "SCPI Raw Port".
The R&S LCX opens an on-screen keypad to enter the port number.
3. Enter the port number, e.g., 5025.
4.
Confirm with .
5. Proceed the same way to enter the hostname, e.g. LCX200-01.
Assigning the IP address manually on the controller PC
► Obtain the necessary information from your network administrator. If you use more
than one LAN connector, you need separate address information for each connec-
tor.
For information on how to configure the LAN settings, refer to the documentation of
the operating system the PC uses.
Selecting the USB communication class protocol
A USB connection requires the VISA library to be installed. VISA detects and config-
ures the R&S instrument automatically when the USB connection is established. You
do not have to enter an address string or install a separate driver. It is assumed that
you have connected controller PC and the instrument, see "Establishing a USB remote
control connection" on page 168.
To install the driver and select the USB class:
1. Press the [settings] key at the front panel.
2. In the device settings menu, select "Interfaces" > "USB Class".
A selection dialog opens.
3. Select the communication protocol for the USB interface, e.g. "CDC".
4. Confirm your selection.
If you have changed the USB class, the R&S LCX displays a message that
prompts you to reboot.
Adjusting interface addresses