YV180X_Mainte_E.pdf - 第146页
6 -8 Service Manual Chapter 6 SED8013110 6 Conveyor unit and air supply unit adjustment 5 Raise the entrance stopper . 1. On the OUTPUT MONITOR screen, move the cursor to “ T1925 ” (ENT . CONVEYOR STOPPER). 2. Press the …
6
-7
SED8013110
Service Manual
Chapter 6
6
Conveyor unit and air supply unit adjustment
1 Adjust the conveyor width according to the size of the
PCB.
To adjust the conveyor width, the <3/4A0 CONVEYOR UNITS> - ”CONV.
WIDTH” command will prove convenient.
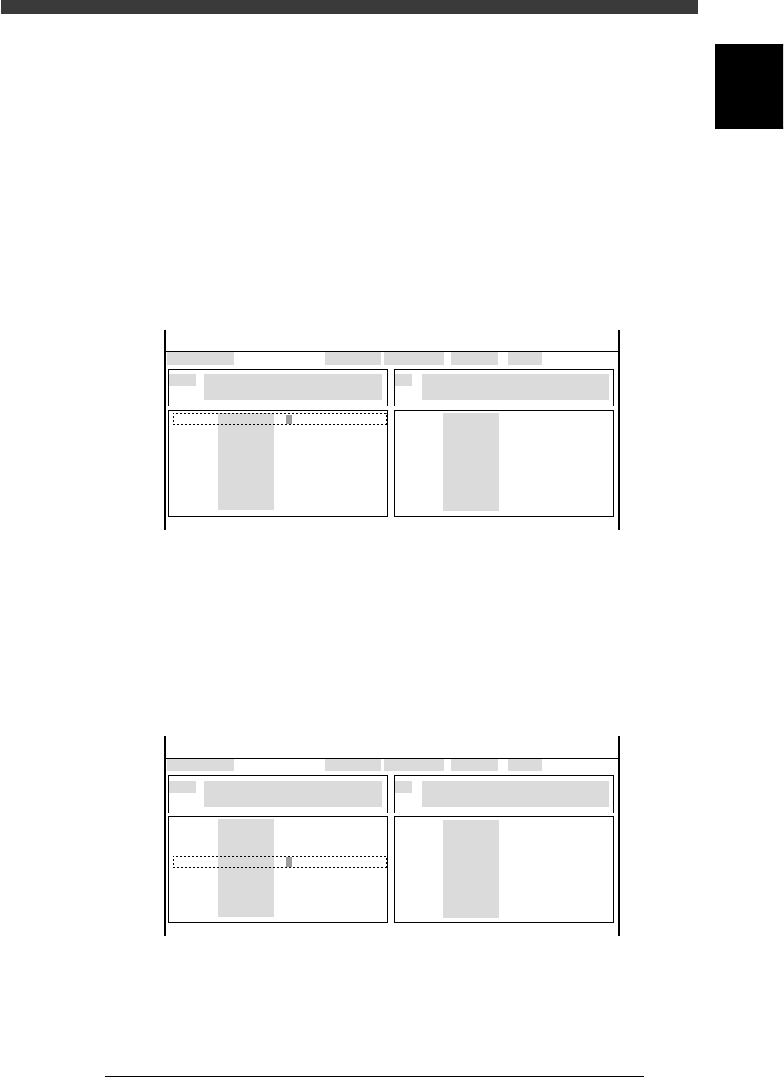
2 Open the output monitor screen and turn on the conveyor.
1. Select <3/4/A1 INPUT/OUTPUT MONITOR> - “SELECTION” -
“CONVEYOR” and press the [ENTER] key.
2. Use the arrow keys to line up the cursor with “T1834” (ENT. CON-
VEYOR ON).
3. Press the [ENTER] key to turn on the conveyor.
The output monitor digit for “T1834" reads “1” when the conveyor is
on and reads “0” when it is off.
47602-D8-00
CONV
CONV
CONV
CONV
CONV
CONV
CONV
CONV
OUT
0
0
0
0
0
0
0
0
0
0
0
0
0
0
0
0
IN
T1834
T1860
T1863
T1835
T1861
T1864
T1925
T1926
N1113
N1117
N1115
N1120
N1116
N1030
N1121
N1123
I/O MONITOR DISP. TYPE SELECTION
ENT.CONVEYOR1 ON
OFF 0 / ON 1
BUSY IN (GATE IN)
NOT DETECT 0 / DETECT 1
CONV
CONV
CONV
CONV
CONV
CONV
CONV
CONV
OBJECT CONV
<<<APPLICATION>>> 3/MAINTE/M
<<MODE>> 4/MANUAL
↑
↓↓
3 While running the conveyor, switch the speed.
1. Use the arrow keys to line up the cursor with “T1835” (ENT. CON-
VEYOR SPEED CHANGE) .
2. Press the [ENTER] key and check the conveyor speed.
The output monitor digit for “T1835" reads “1” when the conveyor is at
low speed, and reads “0” when at high speed.
Switching the conveyor speed
47603-D8-00
CONV
CONV
CONV
CONV
CONV
CONV
CONV
CONV
OUT
0
0
0
0
0
0
0
0
0
0
0
0
0
0
0
0
IN
T1834
T1860
T1863
T1835
T1861
T1864
T1925
T1926
N1113
N1117
N1115
N1120
N1116
N1030
N1121
N1123
I/O MONITOR DISP. TYPE SELECTION
CONVEYOR1 SPEED LOW
HIGH 0 / LOW 1
BUSY IN (GATE IN)
NOT DETECT 0 / DETECT 1
CONV
CONV
CONV
CONV
CONV
CONV
CONV
CONV
OBJECT CONV
<<<APPLICATION>>> 3/MAINTE/M
<<MODE>> 4/MANUAL
↑
↓↓
4 Adjust the high speed.
While running the carry-in conveyor at high speed, adjust the speed by
turning the “H” screw.
Do not set the speed too high, as this may hamper switching response.
Position the “H” screw at a point slightly slower than the maximum speed.

6
-8
Service Manual
Chapter 6
SED8013110
6
Conveyor unit and air supply unit adjustment
5 Raise the entrance stopper.
1. On the OUTPUT MONITOR screen, move the cursor to “T1925” (ENT.
CONVEYOR STOPPER).
2. Press the [ENTER] key to raise the entrance stopper.
The output monitor digit for “T1925” reads “1” when the entrance
stopper is raised, and reads “0” when it is lowered.
6 Adjust the low speed.
While running the carry-in conveyor at low speed and carrying in a PCB,
adjust the speed by turning the “L” screw. Adjust the “L” screw so that the
PCBs are not subjected to a strong impact when they hit the entrance
stopper.
7 Adjust the carry-out conveyor speeds in the same way.
The output monitor codes used to adjust the carry-out conveyor speeds are
as follows.
“T1826” (EXIT CONVEYOR ON)
“T1827” (EXIT CONVEYOR SPEED CHANGE)
“T1926” (EXIT CONVEYOR STOPPER)
8 Quit the adjustment.
After pressing the emergency stop button, remove the PCB from the
conveyor. (There is no machine data to be saved in this adjustment.)
6
-9
SED8013110
Service Manual
Chapter 6
6
Conveyor unit and air supply unit adjustment
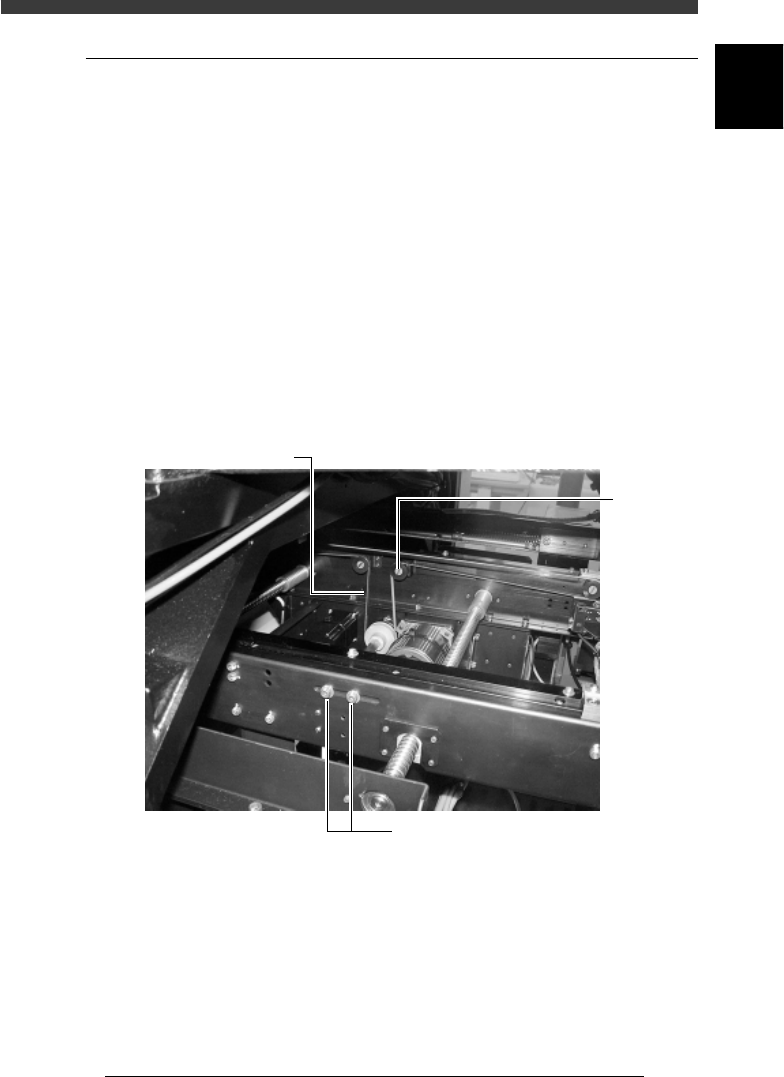
1.3 Adjusting the conveyor belt tension
The carry-in and carry-out conveyors move by belt drive to transfer PCBs.
If the conveyor belts are too loose, they may slip on the pulleys causing
unstable transfer. If the belts are too tight, they may wear excessively or
break. The tension of each belt on the fixed and movable rails should be
adjusted evenly. If necessary, adjust the tension as follows.
e
1 Press the emergency stop button.
2 Loosen the tension adjusting bolts.
The tension adjusting bolts are located on the side of the W-axis ball screw
of the carry-in and carry-out conveyors and used to secure the idler stay.
Use a hex wrench to loosen the bolts (but do not remove them).
3 Adjust the belt tension.
Slide the tension adjusting bolts (the idler stay) towards the outer or inner
side of the machine to adjust the tension.
Adjustment of conveyor belt tension
43612-D8-00
Conveyor belt
Idle
r
Tension adjusting bolts
4 Retighten the tension adjusting bolt.
Check the tension by hand, then run the conveyor belt and check that the
motor pulley does not slip.