YV180X_Mainte_E.pdf - 第17页
1 -7 SED8013110 Service Manual Chapter 1 1 Inspection and maintenance Camera lens Check for dirt and grime on the camera lens, half-mirror and lighting unit. T o clean, use a cleaning stick supplied with the machine or s…

1
-6
Service Manual
Chapter 1
SED8013110
1
Inspection and maintenance
Nozzle leaf spring
If the nozzle lead springs cannot hold the nozzle securely, this adversely
affects all pickup, recognition and mounting operations. Check the leaf
springs for fatigue, gaps between the spring and nozzle, and excessive
deformation. If a leaf spring is worn, replace it with a new one
Nozzle leaf spring check
43104-C0-00
Should be no gap
Should not be deforme
d
Nozzle holder
Just as with the spring-action type nozzles, check the nozzle holder spring-
action. If the return operation is not smooth, clean it with alcohol and then
apply machine oil.
Nozzle holder check
43105-C0-00
Apply machine oi
l
Apply alcohol
and clean

1
-7
SED8013110
Service Manual
Chapter 1
1
Inspection and maintenance
Camera lens
Check for dirt and grime on the camera lens, half-mirror and lighting unit.
To clean, use a cleaning stick supplied with the machine or similar cotton
swab, slightly moistened with alcohol, and gently wipe the surface of the
lens or mirror. If component chips or debris are on the lens or half-mirror,
remove them.
c
CAUTION
Do not apply excessive force to the camera as this may adversely affect the optical axis,
making the vision parameter settings unreliable.
Feeder
Check that all feeders are securely set on the feeder plate. For daily
inspection of feeders, see the FEEDER user’s manual.
Feeder plate
Check that no chips, debris and solder are on the feeder plate. Clean the
feeder place if necessary.
1
-8
Service Manual
Chapter 1
SED8013110
1
Inspection and maintenance
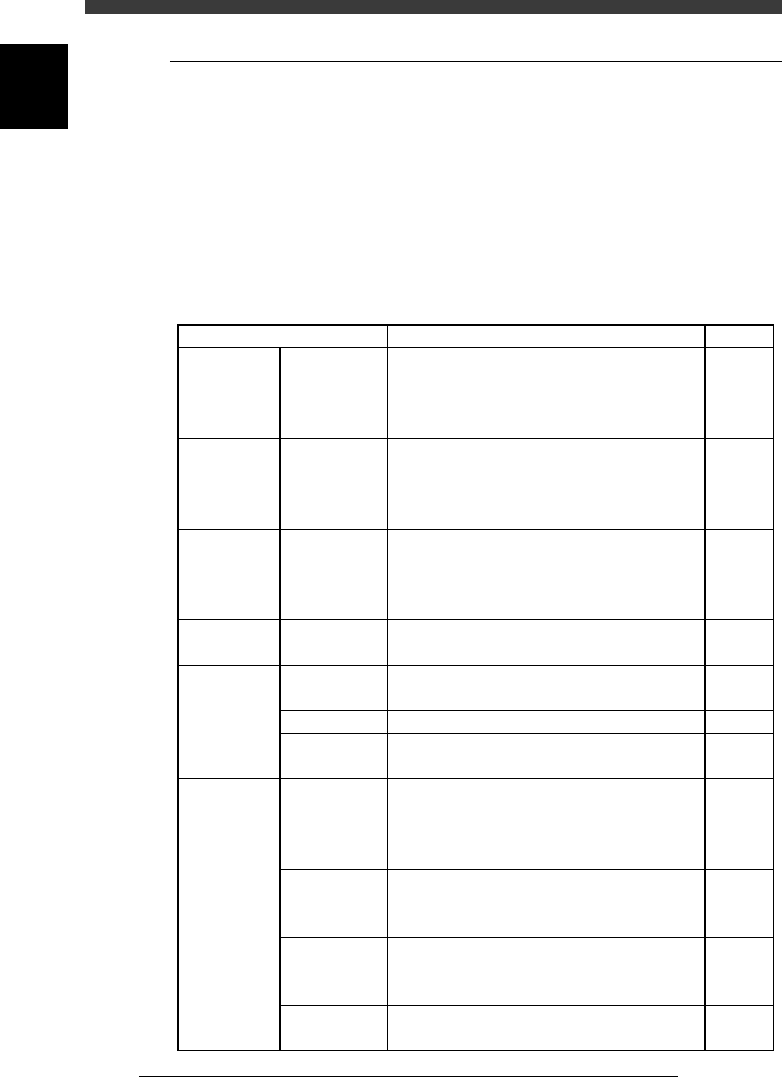
2.2 Periodic inspection
In addition to daily inspections, periodic inspections (weekly, monthly and
every 6 months) are essential to ensure safe and efficient use of the ma-
chine. We recommend setting an earlier inspection interval if parts are
subject to frequent usage. For detailed information on inspection methods,
refer to the separate Maintenance Guide (Basic).
2.2.1 Weekly inspection
Weekly checkpoints
45101-D8-00
Air supply unit
Moving
camera
Multi-view
camera
X, Y, W axes
Feeder plate
Nozzle and
peripherals
Mist filter
Air filter
Lighting uni
Lens
Half-mirror
Lighting unitt
Ball screw
Linear guide
Air valve
Air joint
Nozzle
Leaf spring
(Heads 1, 3,
5, 7)
Nozzle holder
FNC (Heads
2, 4, 6, 8)
2.1 in
Chapter 1
2.1 in
Chapter 1
2.1 in
Chapter 1
Check for oil and water deposits in the filter cup.
Drain if found.
Check for dust or impurities trapped by the air filter.
If found, use an air gun to blow them away.
Check for dust and grime on the lighting unit and
lens tube. Clean if necessary.
Check to see if each LED illuminates sufficiently. I
not, replace the whole LED unit.
Check for dust and grime on the lens, half-mirror
and lighting unit. Clean if necessary.
Check for chips and debris on the camera unit.
Remove if found.
Check for chips and debris on the ball screw.
Remove if found.
Check for hardened grease, chips and debris on
the linear guide. Remove if found.
Check that the air valves work normally.
Check for air leak by wear of the O-ring or Y-
packing. Replace if necessary.
Check for wear or damage to the nozzle tip, and for
any solder adhering. Replace or clean if necessary.
Check for the spring-action movement. Clean if
not smooth.
Check that the leaf springs are correctly attached.
Replace if deformed or fatigued.
If the leaf spring screw is loosened, retighten it.
Check for the spring-action movement. Lightly
apply lubricant if movement is not smooth.
If the holder screw is loosened, retighten it.
Check for chips and debris adhering to the gear parts
or positioning pin holes. Remove if found.
Checkpoints Check items Notes
ESD8_CH3(01-09)