YV180X_Mainte_E.pdf - 第159页
7 -5 SED8013110 Service Manual Chapter 7 7 T roubleshooting 2. Mounting err ors 2.1 Chip components 45703-D8-00 Refer to Mounter operation manual 3.4 in Chapter 4 AMF manual 3.2 in Chapter 4 Mounter operation manual Moun…
7
-4
Service Manual
Chapter 7
SED8013110
7
Troubleshooting
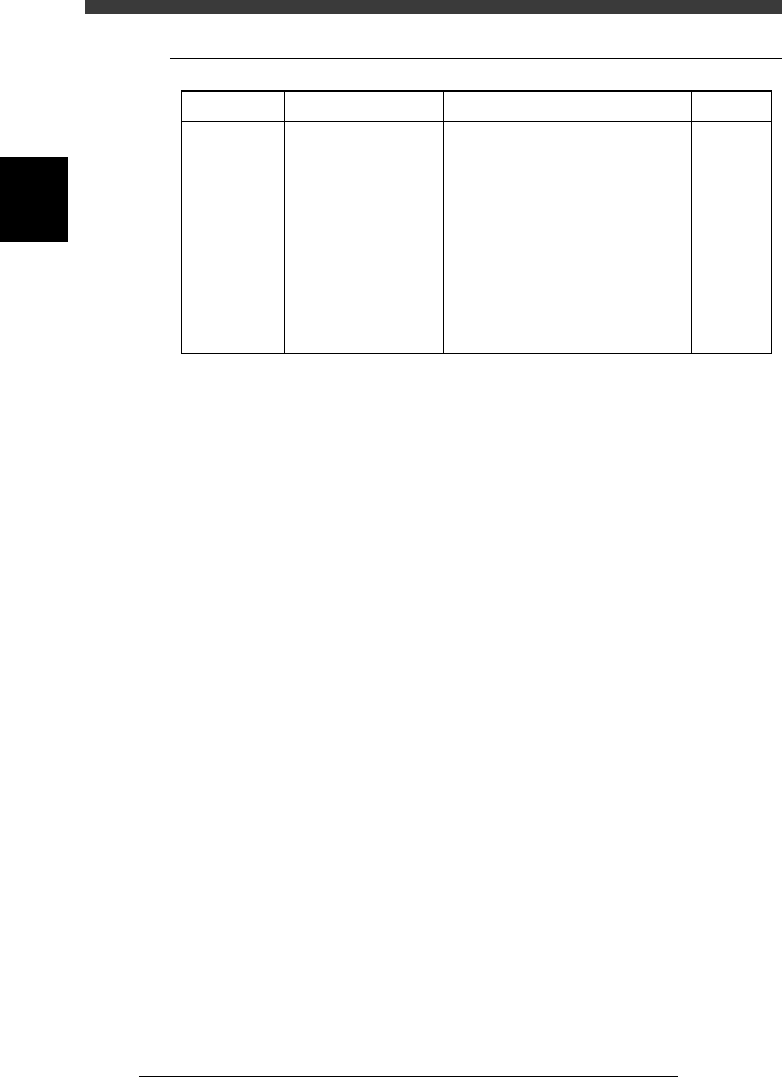
1.2 QFP components
45702-D8-00
The head is
picking up
components,
but "pickup
error" is
indicated.
Symptom Possible cause
Air leakage due to the
uneven surface of the
QFP, or "Vacuum
Check" of the PICK &
MOUNT INFO.
parameters in the
component information
is set to "SPECIAL
CHK" and the vacuum
pressure does not meet
the "Pick Vacuum"
setting level.
Corrective action
Reduce the "Pick Vacuum" pressure
setting in the component information.
Refer to
Mounter
operation
manual
7
-5
SED8013110
Service Manual
Chapter 7
7
Troubleshooting
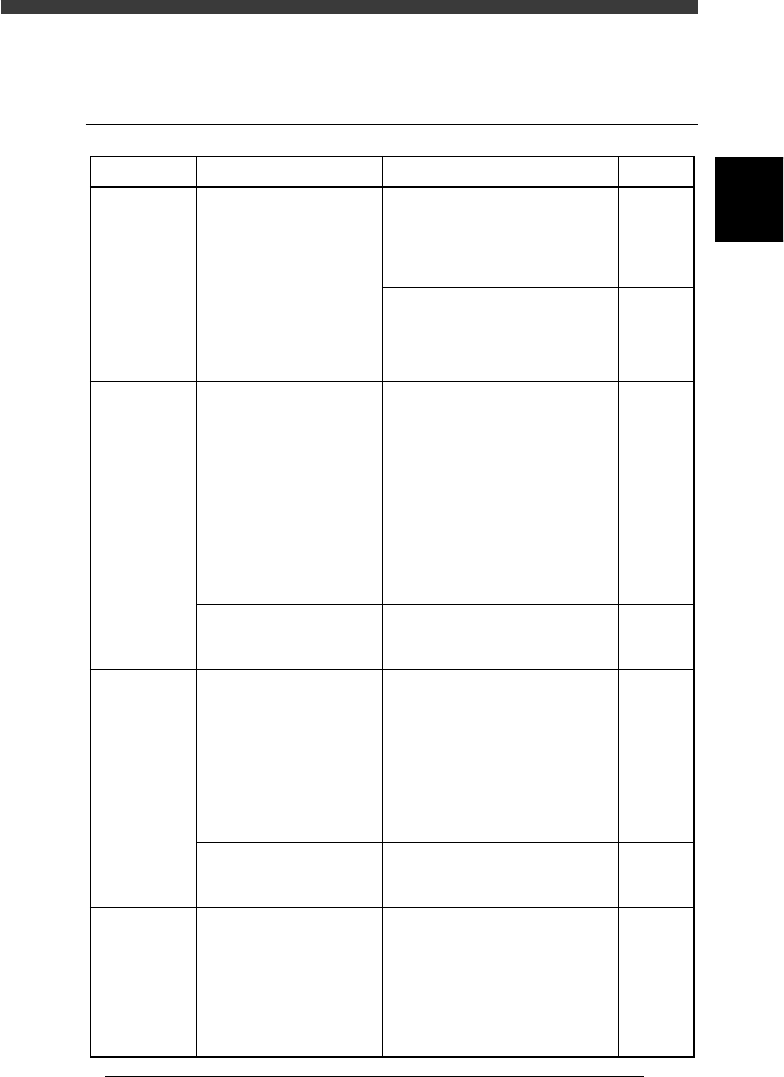
2. Mounting errors
2.1 Chip components
45703-D8-00
Refer to
Mounter
operation
manual
3.4 in
Chapter 4
AMF
manual
3.2 in
Chapter 4
Mounter
operation
manual
Mounter
operation
manual
Mounter
operation
manual
Mounter
operation
manual
Symptom
All mounted
components
shift in the
same
direction
when a
fiducial mark
is used.
Mounting
status is not
stable.
A particular
chip shifts
from
mounting
position.
Chip
mounting
errors occur
frequently.
Possible cause
The coordinates of the
fiducial mark or moving
camera are incorrect, or
the PCB is not properly
clamped in the mounting
position.
The "X-CompPitch" or
"Y-CompPitch" of the
TRAY INFO. parameters
in the component
information is incorrect.
The machine data is
incorrect so that
components cannot reach
the PCB surface or are
pressed excessively onto
solder at the instant of
mounting.
There is also the
possibility that
components might be
blown away immediately
after they have been
mounted.
The PCB is not properly
clamped on the conveyor.
The component does not
reach the PCB surface
when mounted, which is
probably caused by
incorrect parameter
settings.
The PCB is not properly
clamped on the conveyor.
The mount information
data or component
information data is not
appropriate. For example,
the mount data is
incomplete or set to "skip".
Corrective action
Check the fiducial mark
coordinates, mark data parameters
and block repeat coordinates. Also
check that the PCB is properly
clamped in place.
If no problem with the above
parameter settings, re-execute the
Moving Camera Scale command
and then test-mount components.
Slow down the mount speed and
check the instant at which a
component is mounted. If there is
any problem, adjust the "PCB
Height" parameter setting on the
Position screen.
If the component is blown away
immediately after it has been
mounted, reduce the air blow
timer setting on the Position
screen.
Adjust the height and position of
push-up pins so that the PCB does
not warp.
Slow down the mount speed and
check the instant at which the
component is mounted. If it does
not reach the PCB surface
properly, check "Body Size Z" of
the SHAPE INFO. parameters or
"Mnt Height" of the PICK &
MOUNT parameters in the
component information, and make
the corrections.
Adjust the height and position of
push-up pins so that the PCB does
not warp.
Check that the mount information
data is appropriate. Also check the
"Body Size Z" value in the
SHAPE parameters and the "Mnt
Height" value of the PICK &
MOUNT parameters in the
component information. Make
corrections as necessary.
7
-6
Service Manual
Chapter 7
SED8013110
7
Troubleshooting
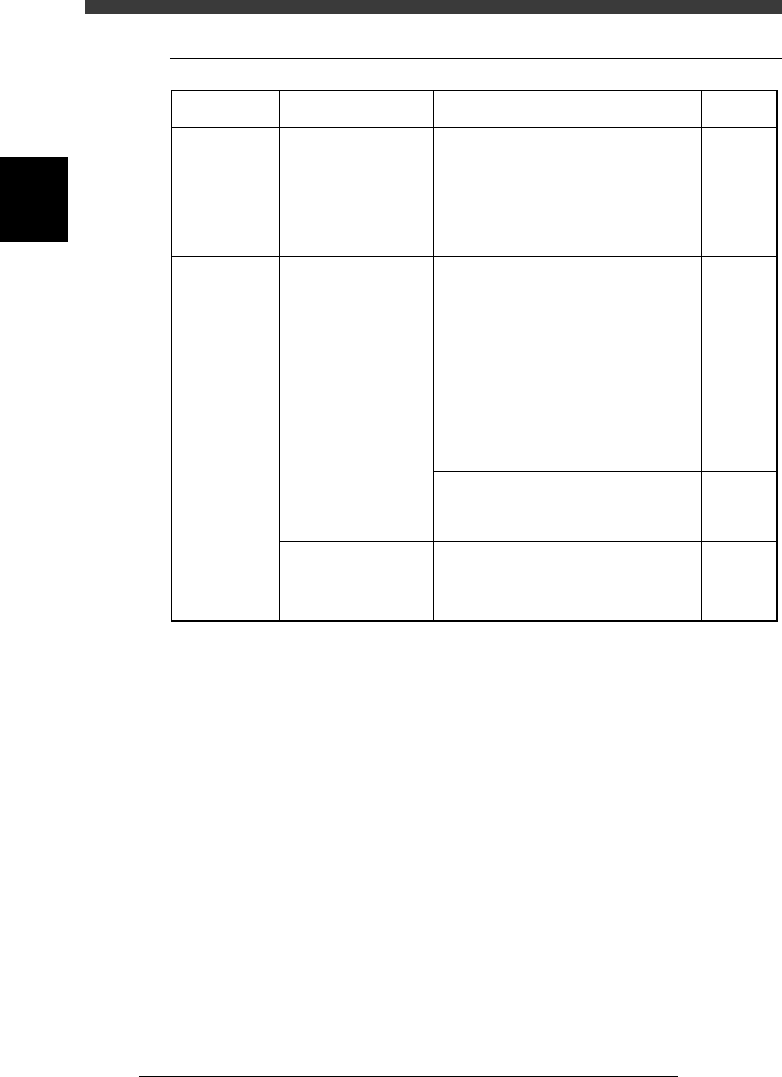
2.2 QFP components
45704-D8-00
Symptom
Mounted
components
always shift
in the same
direction.
Mounting
status is
unstable.
Possible cause
The machine data for
the mount coordinates
(X, Y), moving
camera scale or vision
camera scale is
incorrect.
The components do
not reach the PCB, or
they are excessively
pressed and displaced
on solder.
There are also cases
where the mounting
speed is too fast or
the nozzle is not
securely attached.
The PCB is not
properly clamped on
the conveyor.
Corrective action
Check the mount data. If no problem,
recalibrate the scale of the moving
camera or multi-vision camera and then
perform test-mounting of the
components.
If there is any problem at the instant of
mounting, check the "Body Size Z"
value of the SHAPE INFO. parameters
or the "Mnt Height" value of the PICK
& MOUNT INFO. parameters in the
component information, and make the
corrections if necessary. Also check
that the PCB is clamped in place. Good
results may be obtained by reducing the
"Mount Speed" of the PICK &
MOUNT INFO. parameters.
Also check that the leaf springs used to
hold the nozzle are properly fitted to the
nozzle shaft.
Adjust the height and position of push-
up pins so that the PCB does not warp.
Refer to
3.4&3.5 in
Chapter 4
Mounter
operation
manual
2.1 in
Chapter 1
Mounter
operation
manual