YCP10 Users_E.pdf - 第229页
7-19 7 Other functions n Manual axis movement T his section describes how to use the buttons on the "Move Axis" screen, using the [SY/SZ] tab and [CV] tab as an example. "Move Axis" screen [SY/SZ] tab…
7-18
7
Other functions
4.1 "Move Axis" screen
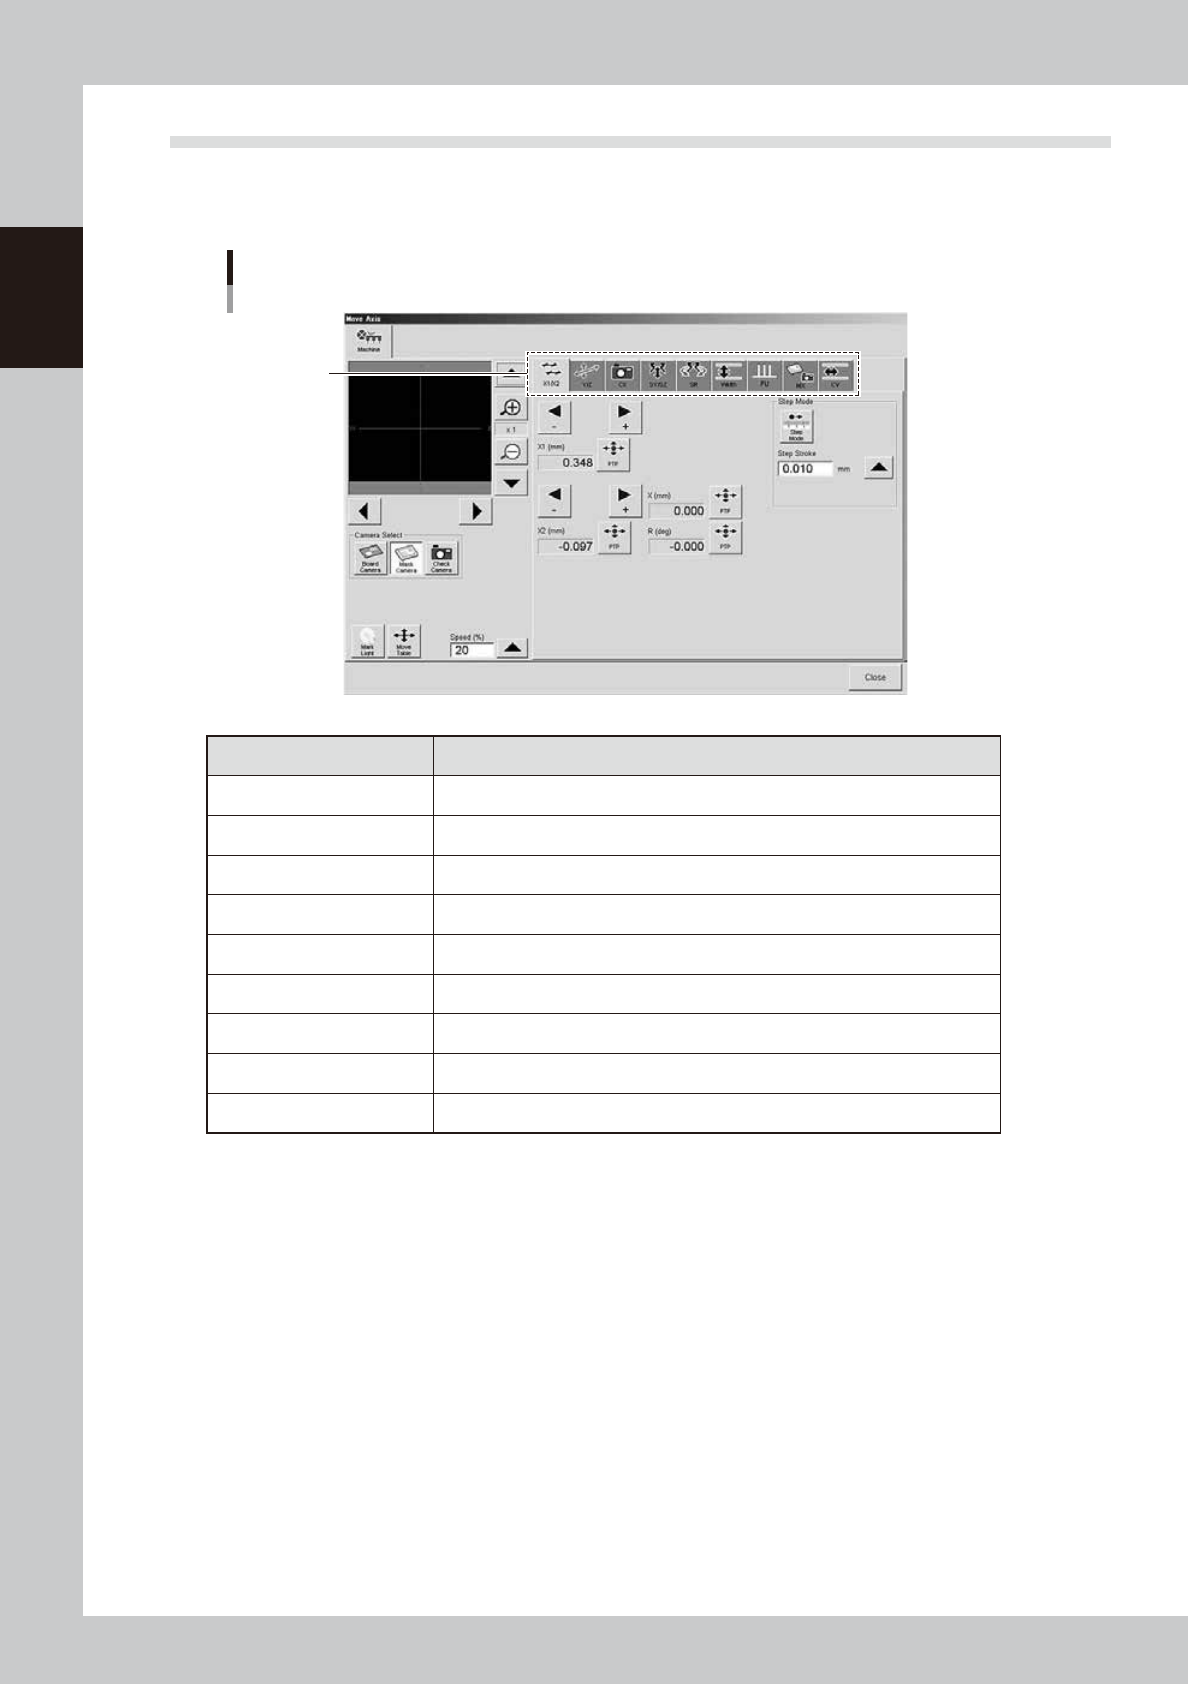
Pressing the [Axis] button on the Unit screen opens the "Move Axis" screen as shown below. The selecting tabs
"X1/X2", "Y/Z", "CX", "SY/SZ", and "SR",etc. are on the screen. The each axis can be operated manually with the
tabs.
"Move Axis" screen
Selection tab
64717-N1-00
Selection tab Function
X1/X2 Moves the board clamp table in the X direction.
Z/Y Moves the board clamp table in the Z (up/down) or Y direction.
CX Moves the board (print inspection) camera unit in the X direction.
SY/SZ Moves the squeegee head in the Y direction or moves it vertically.
SR Adjusts the 3S squeegee scraper angle. (3S squeegee only)
Width Adjusts the conveyor width.
PU Raises and lower the push-up plate.
MX Moves the mask camera along the board table in the X-direction.
CV Convey boards on the conveyor.
7-19
7
Other functions
n
Manual axis movement
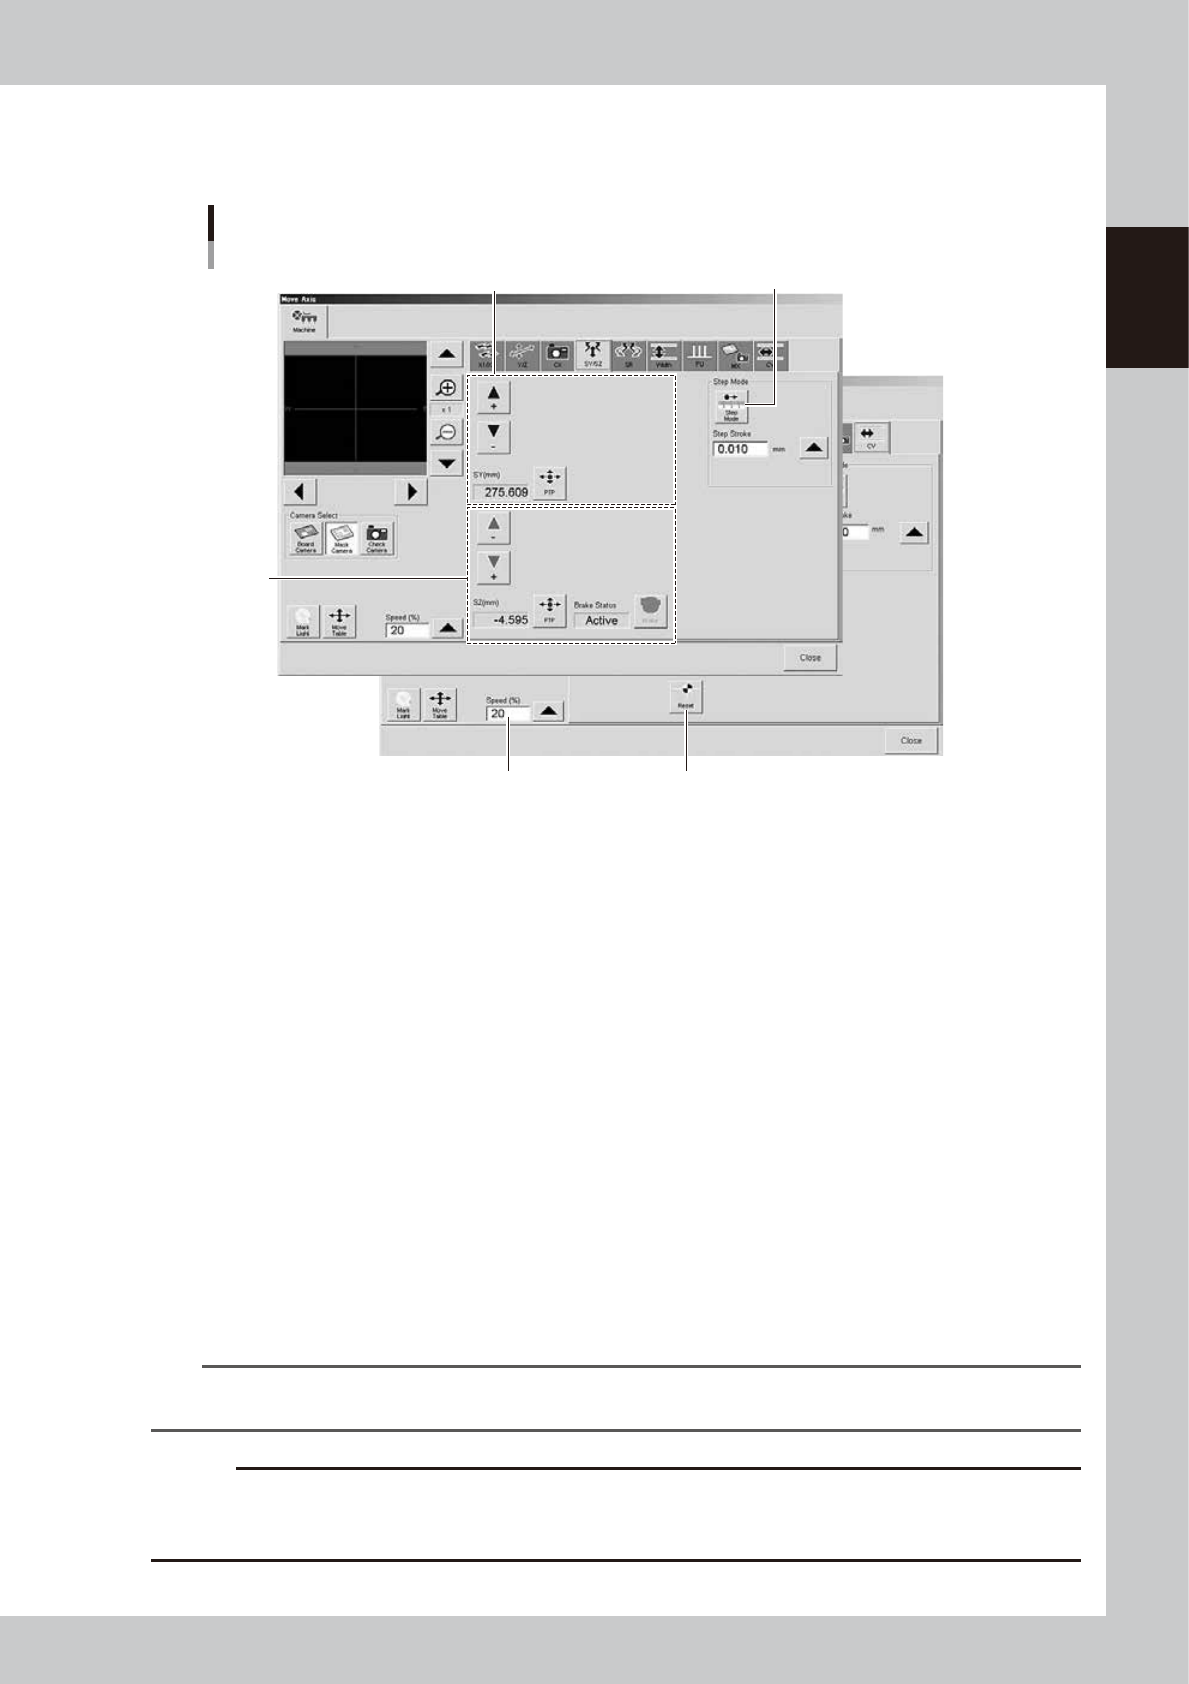
This section describes how to use the buttons on the "Move Axis" screen, using the [SY/SZ] tab and [CV] tab as an
example.
"Move Axis" screen
[SY/SZ] tab, [CV] tab
4
2
5
3
1
64718-N1-00
1. SY-axis movement buttons, [PTP] button
Pressing the arrow buttons moves the squeegee head in the Y direction. When the [Step Mode] button is in the depressed
state, the squeegee head moves at the specified step stroke each time the arrow buttons are pressed.
Pressing the [PTP] button displays the "PTP" screen. You can directly specify the position where you want to move the
squeegee head. The current position is displayed in the "SY (mm)" box.
2. SZ-axis movement buttons, [PTP] button, [Brake] button
Pressing the arrow buttons moves the squeegee head vertically. When the [Step Mode] button is in the depressed state,
the squeegee head moves at the specified step stroke each time the arrow buttons are pressed.
Pressing the [PTP] button displays the "PTP" screen. You can directly specify the position (height) where you want to
move the squeegee head. The current position is displayed in the "SZ (mm)" box.
The [Brake] button turns the SZ-axis brake on or off.
3. [Step Mode] button
Press this button to set axis movement to "step mode (inching mode)". (The button will remain depressed until you press
it again to exit "step mode".)
Specify the step stroke (inching stroke) with the arrow button or enter it directly in the "Step Stroke" box.
4. "Speed (%)" box
Select the speed to move the unit.
5. [Reset] button ( [CV] tub only)
Performs a CV axis zero reset.
TIP
Operation of buttons on other tabs is basically the same. The Z-axis of the [Y/Z] tab, the SZ-axis of the [SY/SZ] tab, and
the [SR], [Width], and [PU] tabs have a [Brake] button that turns on or off the motor brake.
c
CAUTION
The X-axis and R-axis operate while the X1-axis is synchronized with the X2-axis. Therefore, when each axis is
operated individually, this axis becomes difficult to move to the target position.
To move the X-axis and R-axis, use the [PTP] button.
7-20
7
Other functions
4.2 [Unit]-[Conveyor] tab screen
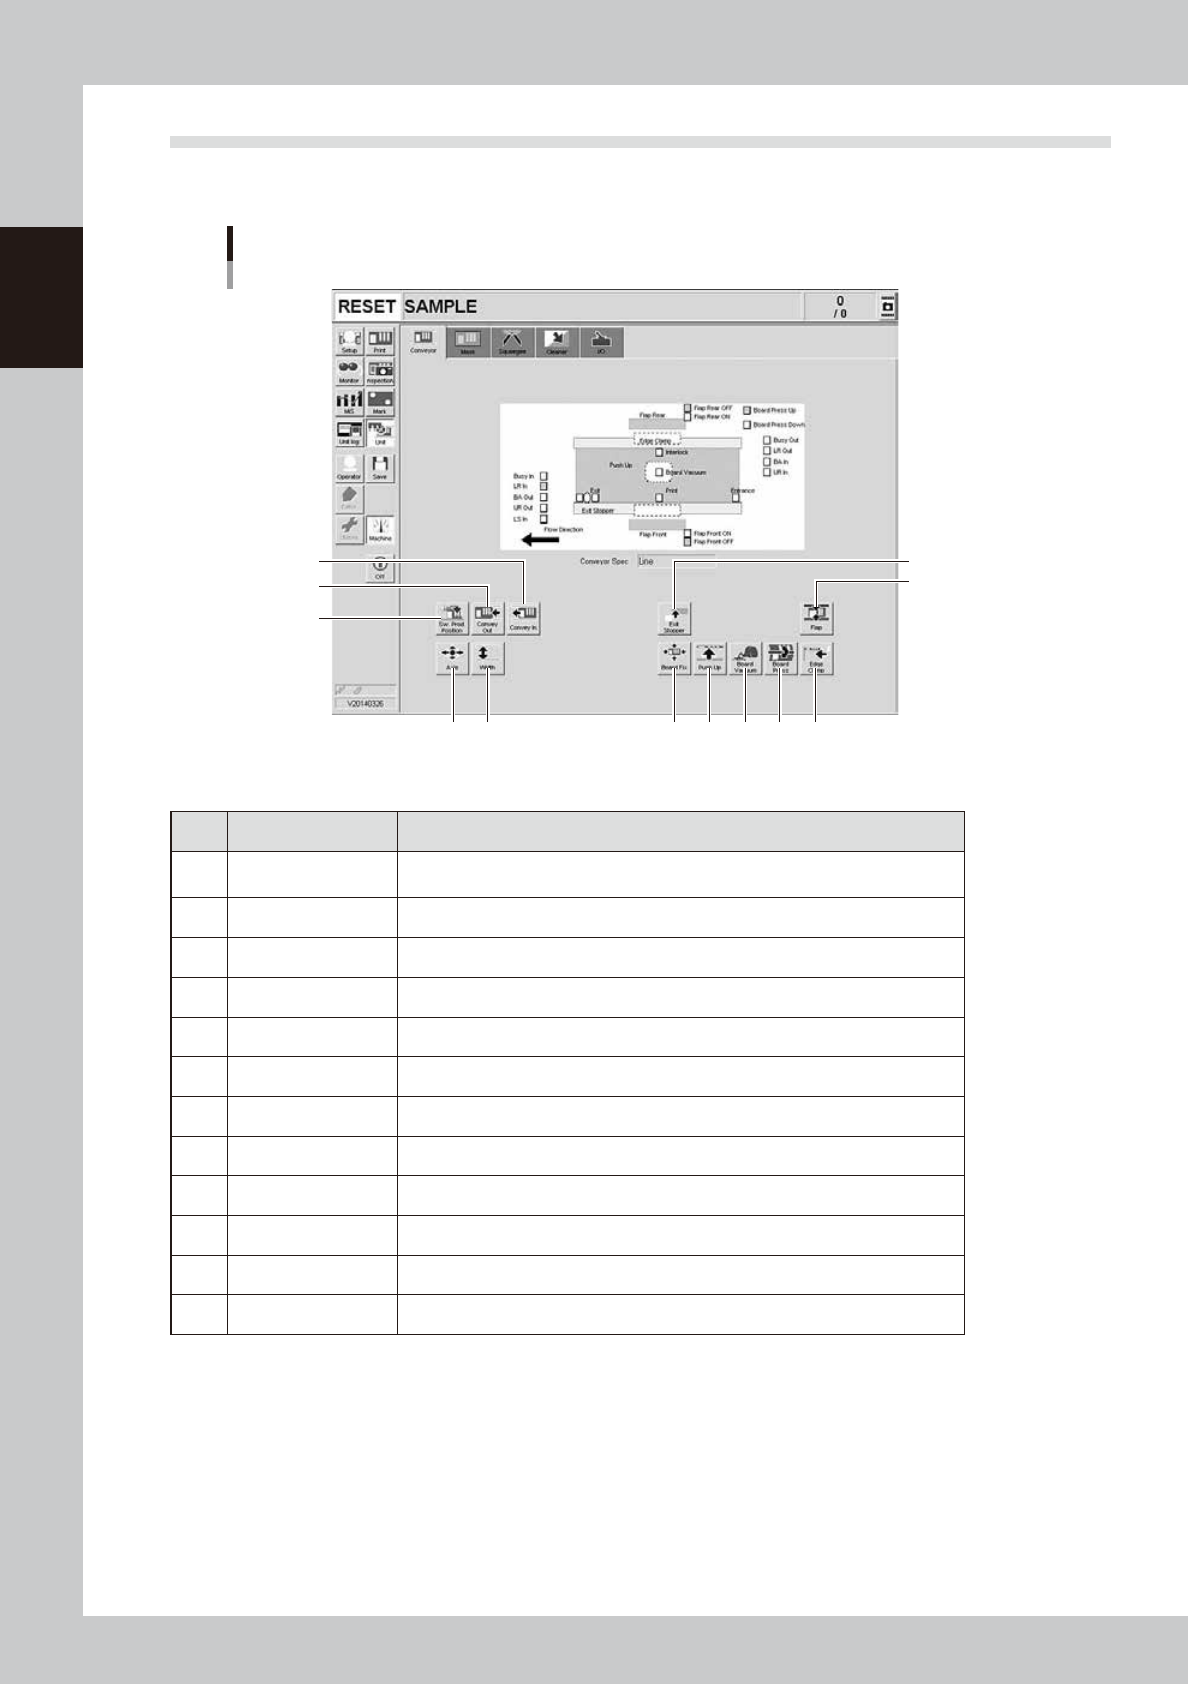
The [Unit]-[Conveyor] tab screen allows you to manually operate each conveyor unit and check the status of
the conveyor sensors and I/O signals on the graphic view. The function of each button is described below.
[Unit]-[Conveyor] tab screen
3
4 5
8 9 10 11
12
6
7
2
1
64719-N1-10
n
Operation buttons
Button name Function
1 SW. Prod. Position
Moves the board clamp table to the front and the squeegee head to the inner
side.
2 Convey-in Carries a board in on the board clamp table.
3 Convey-out Carries the board out from the board clamp table.
4 Axis Opens the "Move Axis" screen. (See "4.1 "Move Axis" screen" in this chapter.)
5 Width Changes the conveyor width.
6 Exit Stopper Stops a board at the conveyor exit when unloaded from the machine.
7 Flap Actuates the board flap.
8 Board Fix Actuates the effective board clamp units to clamp a board in print position.
9 Push Up Raises or lowers the push-up plate.
10 Board Vacuum Turns the vacuum board gripper on or off. (option)
11 Board Press Turns the board press unit on or off. (option)
12 Edge Clamp Turns the edge clamp on or off.