YCP10 Users_E.pdf - 第249页
2-2 2 Inspection and maintenance 1. Inspection and maintenance 1.1 Daily inspection T o prevent unwanted trouble, the follo wing points should be chec ked on a daily basis before and after using the machine. n Daily chec…

2-1
2
Inspection and maintenance
Before beginning work
In most cases, the maintenance work should be performed with the main power turned off.
However, some maintenance tasks are performed under emergency stop conditions with the power turned on.
In such cases, ensure adequate safety and press the emergency stop before beginning the maintenance work.
The power is turned on during maintenance where any servo-axis must be operated or machine operation
must be checked. In this case, also ensure adequate safety before beginning the maintenance.
When operating the machine, make sure the following conditions are satisfied.
n
Operating conditions
1. The supply air pressure is kept at its correct level.
2. All the safety covers are closed.
Be sure to observe the following precautions when performing the inspection or maintenance work.
n
Precautions
• Periodic inspection or maintenance work must be performed by or under the direction of person who has received
training from YAMAHA.
• Always turn off the power to the machine before inspecting mechanical components. If the power to the machine
needs to be turned on during inspection, make sure that no part of anyone's body comes within the machine movement
range.
• Be careful not to allow any foreign matter to enter the machine during inspection or maintenance work.
• Use only the lubricants and grease specified by YAMAHA or a YAMAHA sales representative.
• When replacing parts, always use parts approved by YAMAHA or a YAMAHA sales representative.
• Do not modify any parts in the machine. Modification may result in poor performance or threaten operator safety.
Be sure to observe the following precautions when replacing consumable parts.
n
Precautions
• Parts replacement must be performed by or under the direction of person who has received training from YAMAHA or a
YAMAHA sales representative.
• Always turn off the power to the machine before replacing consumable parts.
• Be careful not to allow any foreign matter to penetrate inside the machine during parts replacement.
• When replacing parts, always use parts approved by YAMAHA or a YAMAHA sales representative.
• Do not modify any parts in the machine. Modification may result in poor performance or threaten operator safety.
2-2
2
Inspection and maintenance
1. Inspection and maintenance
1.1 Daily inspection
To prevent unwanted trouble, the following points should be checked on a daily basis before and after using
the machine.
n
Daily checkpoints
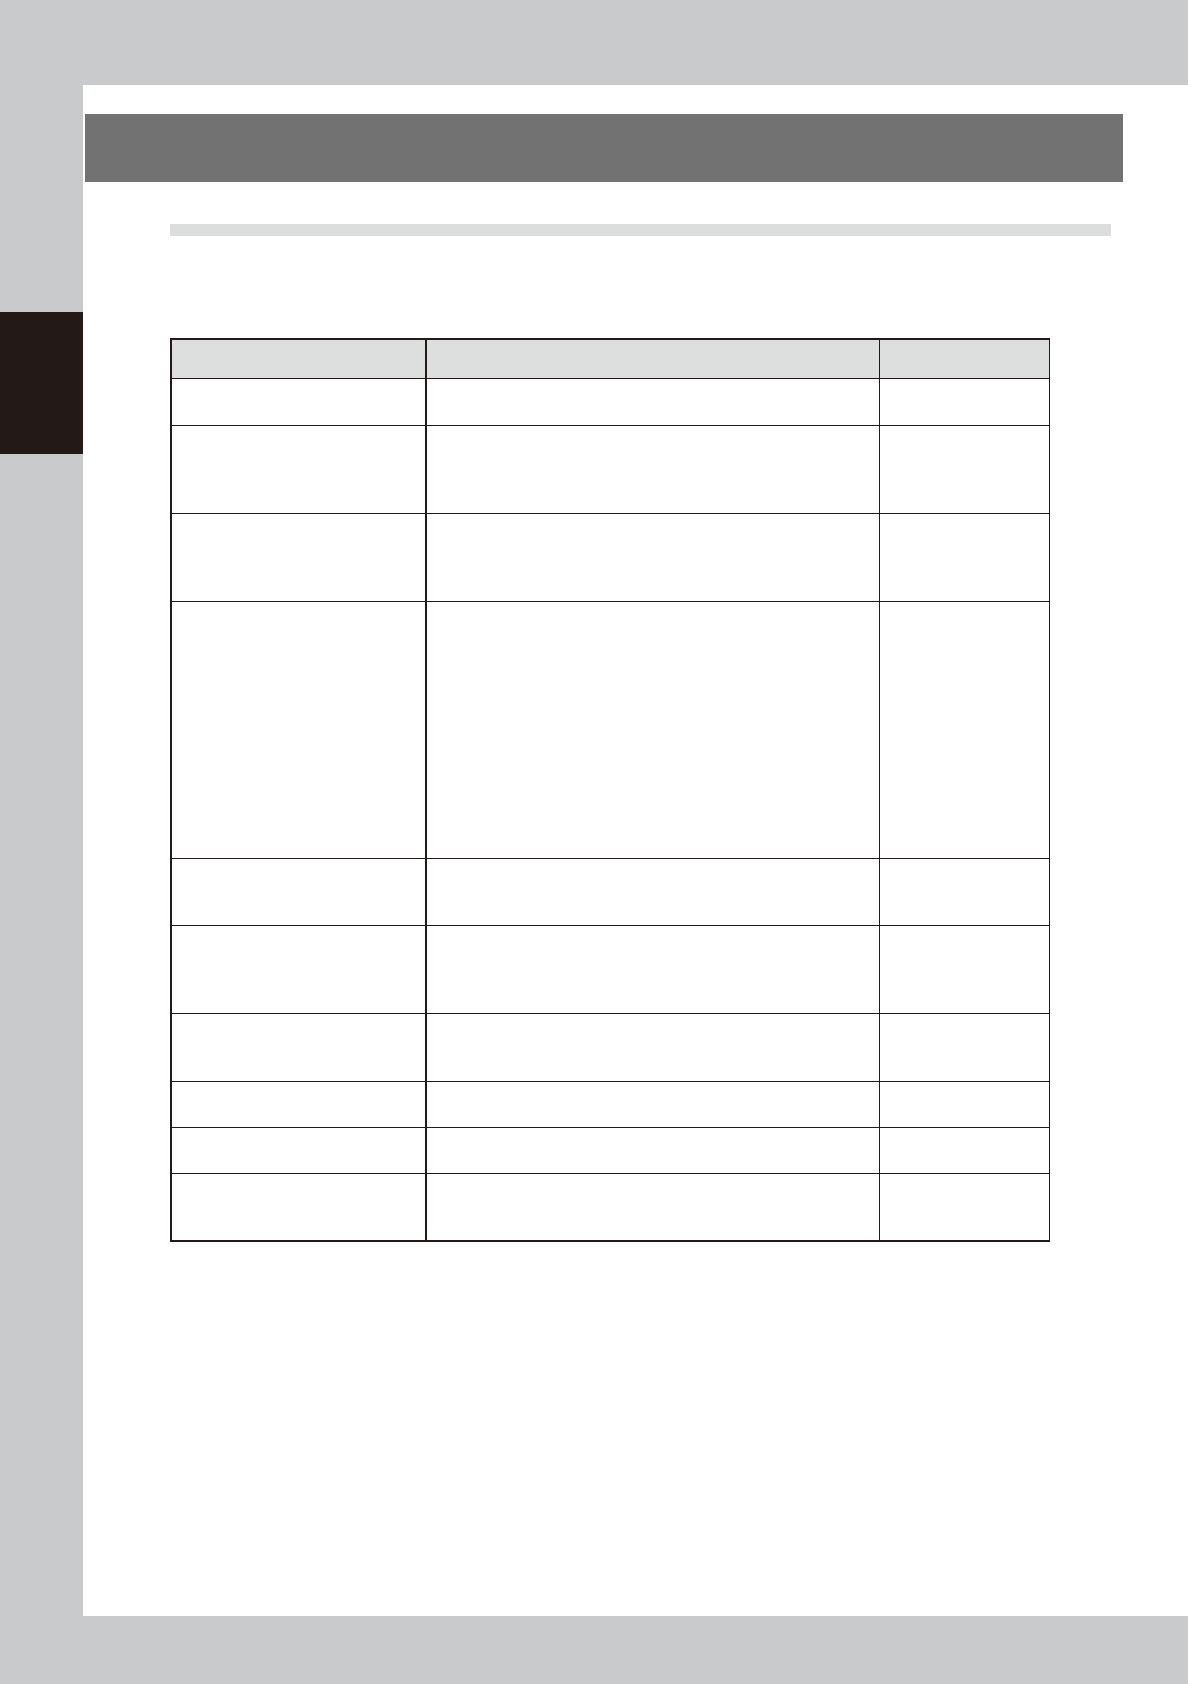
Checkpoints Check items Reference
Air pressure
Check that the air pressure display indicates the range from
0.40MPa to 0.41Mpa.
"1.1 Air regulator
unit" in Appendix
Temperature control unit
(option)
Check the drain tank once a day, especially in wet season with
high humidity, and drain the tank. When the tank is filled with
water, an alarm buzzer sounds and the Temperature control unit
will stop after 10 minutes if left undrained.
Conveyor unit
Check that no foreign matter, solder or debris is on the
conveyor rail, edge clamp, board flap, push-up jig (machine
using optional push-up jigs), push-up plate, etc.
Check that no matrix pins come loose from the push-up table.
“4. Conveyor unit”
in Chapter 1 of
Operator’s Manual
Squeegee and Squeegee head
Check that the mount knobs of the squeegee head are
tightened firmly.
Check that the squeegee is securely attached to the squeegee
holder. (The squeegee mount knobs are tightened firmly.)
Check that there are no scratches, nicks and wear on the
scraper.
Check that there are no foreign matter, debris and solder
adhesion.
Remove the squeegees after work and clean them with cleaning
paper or cloth. (When using a urethane squeegee, do not
immerse the squeegee in alcohol. The urethane scraper may
expand.)
“3. Printing section”
in Chapter 1 of
Operator’s Manual
Cleaning unit
Check that the cleaner gauze roll is set correctly. Check also
that the cleaner gauze is filled with cleaning alcohol.
“5. Cleaning section”
in Chapter 1 of
Operator’s Manual
Mask frame stopper pin position Check that the mask frame stopper pin position is correct.
“8.1 Mask size and
mask stopper pin
position” in Chapter 4
of Operator’s Manual
Mask clamp
Check that there are no foreign matter, debris and solder
adhesion.
“3. Printing section”
in Chapter 1 of
Operator’s Manual
Mask
Check that there are no foreign matter, debris, solder adhesion,
warp and scratches.
Mask manufacturer's
instruction manual
Solder
Check that solder has returned to room temperature and is well
agitated and rolled.
Solder manufacturer's
instruction manual
Operation display
(touch-panel)
Check that there are no scratches or grime on the screen
surface.
See "Precautions
when handling the
touch screen" below
l
Precautions when handling the touch screen
Take the following precautions when handling the touch screen.
• The touch panel surface is made of acrylic. Be careful not to damage the touch panel surface by a sharp or hard
object.
Be sure to use the touch pen to perform the touch operation.
• To clean the touch panel surface, wipe gently with a soft cloth moistened with synthetic detergent diluted with water
and then wrung-out well. Never use volatile chemicals such as benzine, thinner or alcohol.
• To prevent dust adhesion due to static electricity, we recommend using an anti-electrostatic agent.

2-3
2
Inspection and maintenance
1.2 Cleaning the camera protective glass
Dirt or dust particles sticking to the protective glass of the mask (stencil) camera unit may cause recognition
errors.
e
To ensure the safety, make sure that the emergency stop button is pressed or the machine power switch is
turned off before starting this work.
n
Items to be prepared
• Lens blower brush (option)
• Lint-free cleaning cloth or paper towel
• Lens cleaner (option)
1
Remove dust on the protective glass
with the lens blower brush.
53201-N1-00
TIP
The lens blower brush is an optional part.
2
Wipe the protective glass with a
lint-free cleaning cloth.
Apply a few drops of lens cleaner to a
lint-free cleaning cloth and wipe the
protective glass.
53202-N1-00
Blowing off dust with the blower brush
Step 1
Lens blower brushProtective glass
Wiping the protective glass with a lint-free cleaning cloth
Step 2
Lint-free cleaning cloth