00196625-03_AI_SX12_PCB_Barcode_de_en.pdf - 第161页
Setting up and Commissioning Configuration File Backup Installing the PCB Barcode Scanner PCB Barcode LP-Barcode 161 Fitting the ruler to the top position Fitting the ruler to the top position Legend ► Position the ruler…
Setting up and Commissioning
Installing the PCB Barcode Scanner Fitting the Ruler
160 PCB Barcode LP-Barcode
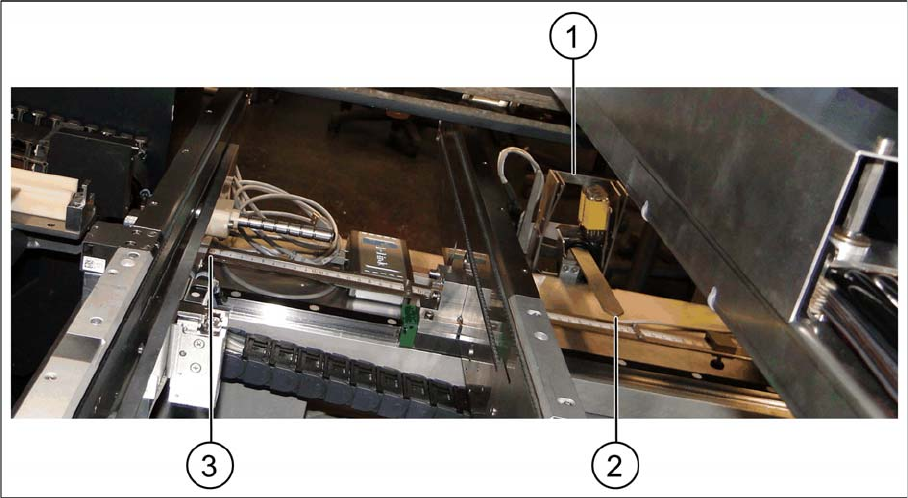
Fitting the ruler in the bottom position
Fitting the ruler in the bottom position
Legend
► Place the ruler above the conveyor control, with the zero point on the fixed conveyor side (3).
► Fix the ruler to the magnets above the conveyor control cover.
► Fit the pointer to the relevant recess on the PCB barcode scanner holder (2) and fix into place with
two socket-head screws.
1 PCB barcode scanner holder 2 Pointer
3 Zero point at the fixed conveyor rail
Setting up and Commissioning
Configuration File Backup Installing the PCB Barcode Scanner
PCB Barcode LP-Barcode 161
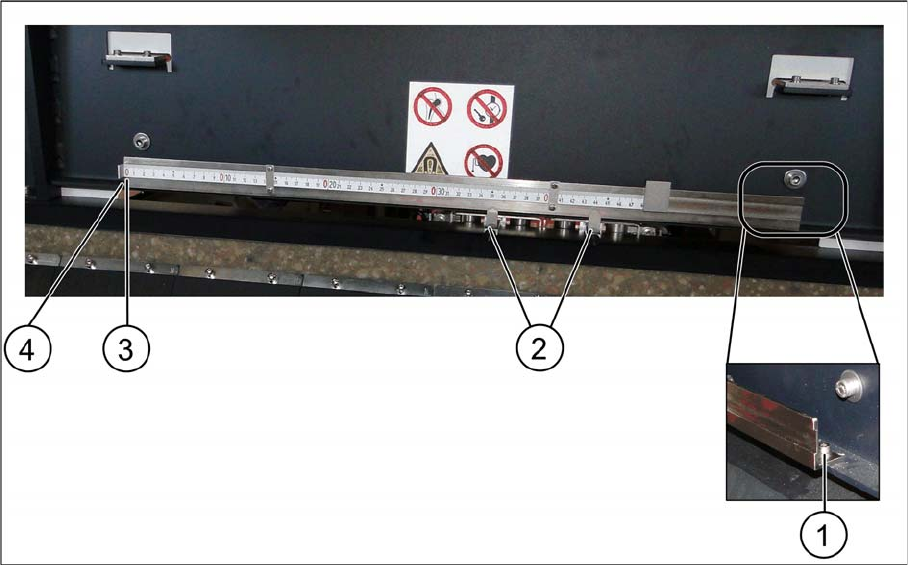
Fitting the ruler to the top position
Fitting the ruler to the top position
Legend
► Position the ruler inside the machine base, with the zero point on the fixed conveyor side (3).
► Fix the ruler to the machine base with two screws, to the positions (1) and (4).
► Fit the pointer to the relevant recess on the PCB barcode scanner holder (2).
3.2.9 Configuration File Backup
► Save the configuration files both on the station computer and on an external data carrier belonging
to the customer.
During a service visit, the configuration files should also be saved at "Account-Attachments" in
SISCOPE, with the following file name format:
Line_machine type_machine serial number._conveyor lane_installation position of scanner, e.g.:
Line 5_SX2_K163G-12039179_Lane 2_top.cfg
1 Fastening screw 2 Pointer
3 Zero point 4 Fastening screw
Setting up and Commissioning
Configuring the PCB Barcode Scanner 1D PCB Barcode Scanner
162 PCB Barcode LP-Barcode
3.3 Configuring the PCB Barcode Scanner
3.3.1 1D PCB Barcode Scanner
When first installing a 1D PCB barcode scanner, you need to also install the driver software for the
RS232/USB converter.
3.3.1.1 Installing the Driver Software
The driver software for the RS232/USB converter is supplied on a CD. It can also be downloaded from
the Download Center.
► Log into Windows at the station computer as an administrator.
After connecting the converter to the machine controller and before installing the driver software, a mes-
sage will appear in the Windows task bar, informing you that new hardware has been detected.
You may see a dialog appear several times, in which you will be asked to make the required files avail-
able.
► Cancel this dialog each time with Cancel
► Place the CD into the drive.
The installation program can be found at:
\\driver\windows\PL-2303 Driver Installer_JetCon_2.0.2.1
► Doubleclick on the installation program.
The Windows Installer will open.
► Follow the instructions of the installer and click on Finish to finish the installation.
► Briefly unplug the USB connection to the converter from the machine controller and then plug back
in again.
This ensures that the new hardware is detected and linked to the driver.
A message will appear in the Windows task bar, indicating that new hardware has been found and can
be used.
► Take the CD out of the CD drive.
► Check the driver installation and hardware detection in the Device Manager (Start – System Control
– System – Hardware – Device Manager).