00196625-03_AI_SX12_PCB_Barcode_de_en.pdf - 第174页
Setting up and Commissioning Configuring the PCB Barcode Scanner 1D PCB Bar code Scanner 174 PCB Barcode LP-Barcode "Edit Configuration" dialog – "Code Setup" tab "Edit Configuration" dialog…

Setting up and Commissioning
1D PCB Barcode Scanner Configuring the PCB Barcode Scanner
PCB Barcode LP-Barcode 173
"Edit Configuration" dialog – "Op-Mode" tab
"Edit Configuration" dialog – "Op-Mode" tab
In the Op-Mode tab you can
► Accept the values shown in the screenshot (1).
Setting up and Commissioning
Configuring the PCB Barcode Scanner 1D PCB Barcode Scanner
174 PCB Barcode LP-Barcode
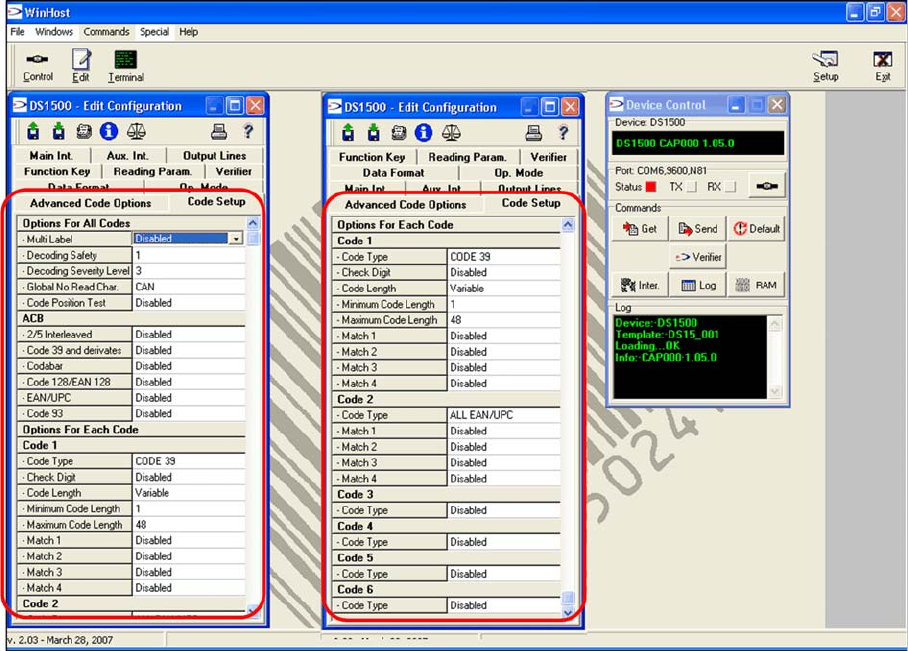
"Edit Configuration" dialog – "Code Setup" tab
"Edit Configuration" dialog – "Code Setup" tab
The settings for the barcode used by the customer can be defined in the Code Setup tab.
Various code types can be enabled. Only those types enabled here will be evaluated by the barcode
scanner. Frequently used codes include code 128, code 39, 2/5 interleaved.
Options for all codes:
"Multi-Label" (if present, multiple codes will be evaluated during each scan i.e. per board)
Options for each Code:
"Block Code 1", "Code 2" etc. will be filled out for each code type to be read.
► Click on the entry to the right of Code Type.
A drop-down selection list will appear.
► Select the required code. Other code-specific settings can be defined in the following lines, if re-
quired.
► Accept the values shown in the screenshot (1).
Transmitting configuration data to the barcode scanner
If configuration settings are changed, these need to be written back onto the barcode scanner.
► Go to the Device Control dialog and click on the RAM button.
This button will switch over to EEPROM.
► Click on Send, to transmit the data to the barcode scanner.
After a few seconds, you will see Configuration sent in the upper output line of the dialog.
Setting up and Commissioning
1D PCB Barcode Scanner Configuring the PCB Barcode Scanner
PCB Barcode LP-Barcode 175
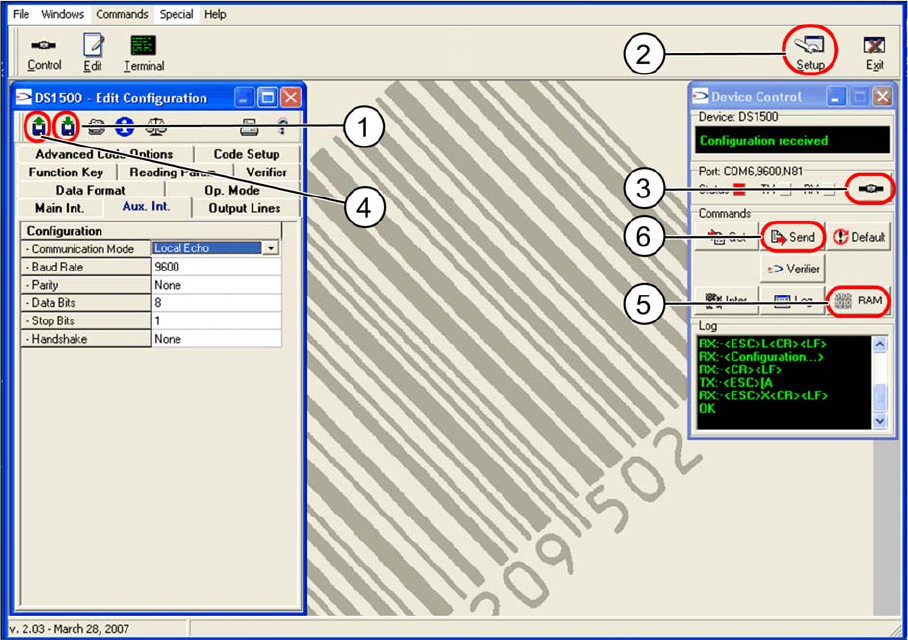
Saving and transmitting configuration data
Saving and transmitting configuration data
The barcode scanner configuration data can be saved in a file and transmitted to other connected scan-
ners.
Saving the configuration data
► Go to the "Edit Configuration" dialog and click on the "Save Configuration" (1) button.
► Specify the folder and name to be used for saving the file.
Transmitting configuration data to another barcode scanner
► Click on the Setup (2) button.
The Setup dialog will open.
► Go to Serial port settings and select the virtual COM port for the barcode scanner to be configured
from the Port list box. Confirm with OK.
► Go to the Device Control dialog and click on the Connect to device (3) button.
► Go to the Edit Configuration dialog and click on the Load Configuration (4) button.
► Select the configuration file to be loaded.
► Go to the Device Control dialog and click on the RAM (5) button.
This button will switch over to EEPROM.
► Click on Send (6), to transmit the data to the barcode scanner.
After a few seconds, you will see Configuration sent in the upper output line of the dialog.