YSD_Users_E.pdf - 第118页
3-5 3 Q & A 1.4 Other errors Possible cause and corrective action The number of coordinate data points resulted in error Cause There are too many coordinate data points. Action Check the mount, offset, fiducial and b…
3-4
3
Q & A
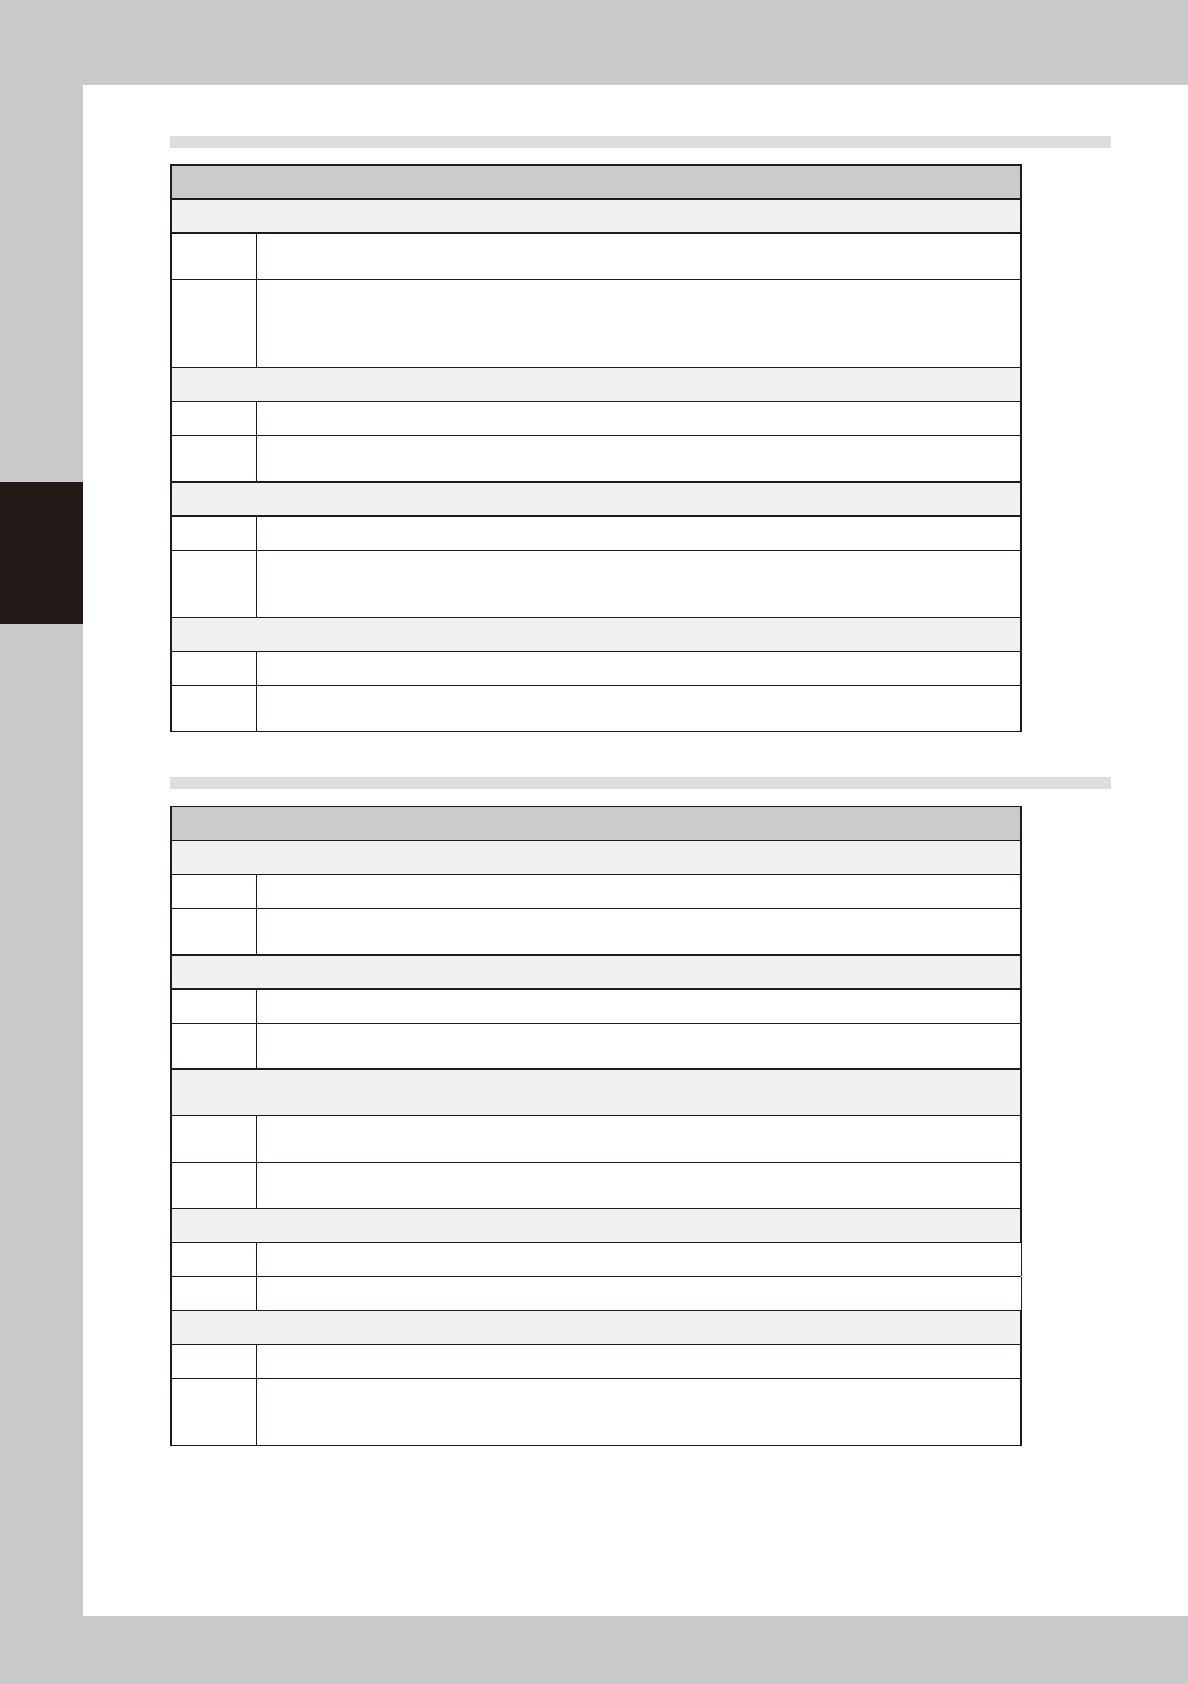
1.2 Mark recognition errors
Possible cause and corrective action
Fiducial mark cannot be recognized.
Cause
The board is not clamped securely, or the mark data is incorrect or the mark shape or size is outside the
specifications.
Action
Check that the board is clamped securely. If no problem, check the mark data and optimize the threshold level
using the Mark Adjust mode so that the mark can be clearly viewed. If there is any noise around the mark,
narrow the mark search area or cut the noise by adjusting the Cut Outer Noise parameter in the [Mark]-[Vision]
tab grid.
Fiducial mark recognition is not reliable.
Cause A solder leveler mark or low-contrast mark cannot be reliably recognized.
Action
Readjust the camera light levels in the [Mark]-[Vision] tab grid and then optimize the threshold level using the
Mark Adjust mode so that the mark can be clearly viewed.
In FINE mode recognition sequence, the recognition position cannot converge on the specified point.
Cause The convergence conditions are too strict.
Action
Open the VmSpec window with the [Machine] button and select "Position" to display the Position grid. Set
easier convergence conditions than those specified in the "Mark FINE mode" field.
As an alternative, set the "Sequence" parameter in the [Mark]-[Vision] tab grid to "Normal".
Fiducial mark recognition is not reliable.
Cause The fiducial correction function is not selected.
Action
Open the teaching window, press the [Setting] button and select the "Fiducial Correction" check box in the
dialog box that appears. Then perform fiducial mark recognition.
1.3 Conveyor operation errors
Possible cause and corrective action
The board hits hard against the main stopper when it is conveyed.
Cause The soft stop has little or no effect.
Action
Slightly reduce the conveyor speed. Open the [Board] - [Board] tab and set the "Conveyor Motor Speed"
parameter to a minus value.
The board does not reach the main stopper when it is conveyed.
Cause The soft stop has too much effect.
Action
Slightly increase the conveyor speed.
Open the [Board] - [Board] tab and set the "Conveyor Motor Speed" parameter to a minus value.
After the board has been conveyed to the mounting position, the board is not clamped. (The conveyor keeps
turning.)
Cause
The sensor at the board clamping position is defective or board has a cutout area just above the sensor so the
sensor cannot detect the board.
Action
Check the sensor operation in manual mode (input monitor).
If the sensor is defective, replace it. If sensitivity seems to be low, adjust the sensor installation height or angle.
The conveyor width cannot be changed.
Cause A board is still on the conveyor.
Action Remove the board and then change the conveyor width again.
Boards detectable before being transferred to the work position cannot be detected after transfer.
Cause The board is still in the work position on the conveyor, but is not being detected with the board sensor.
Action
Remove the board from the conveyor and adjust the position of the board sensor so that it detects the board
correctly. If the board still cannot be transferred properly, check the conveyor unit setups and/or board data
settings and make corrections as needed.

3-5
3
Q & A
1.4 Other errors
Possible cause and corrective action
The number of coordinate data points resulted in error
Cause There are too many coordinate data points.
Action Check the mount, offset, fiducial and badmark data, and reduce the number of data points.
3-6
3
Q & A
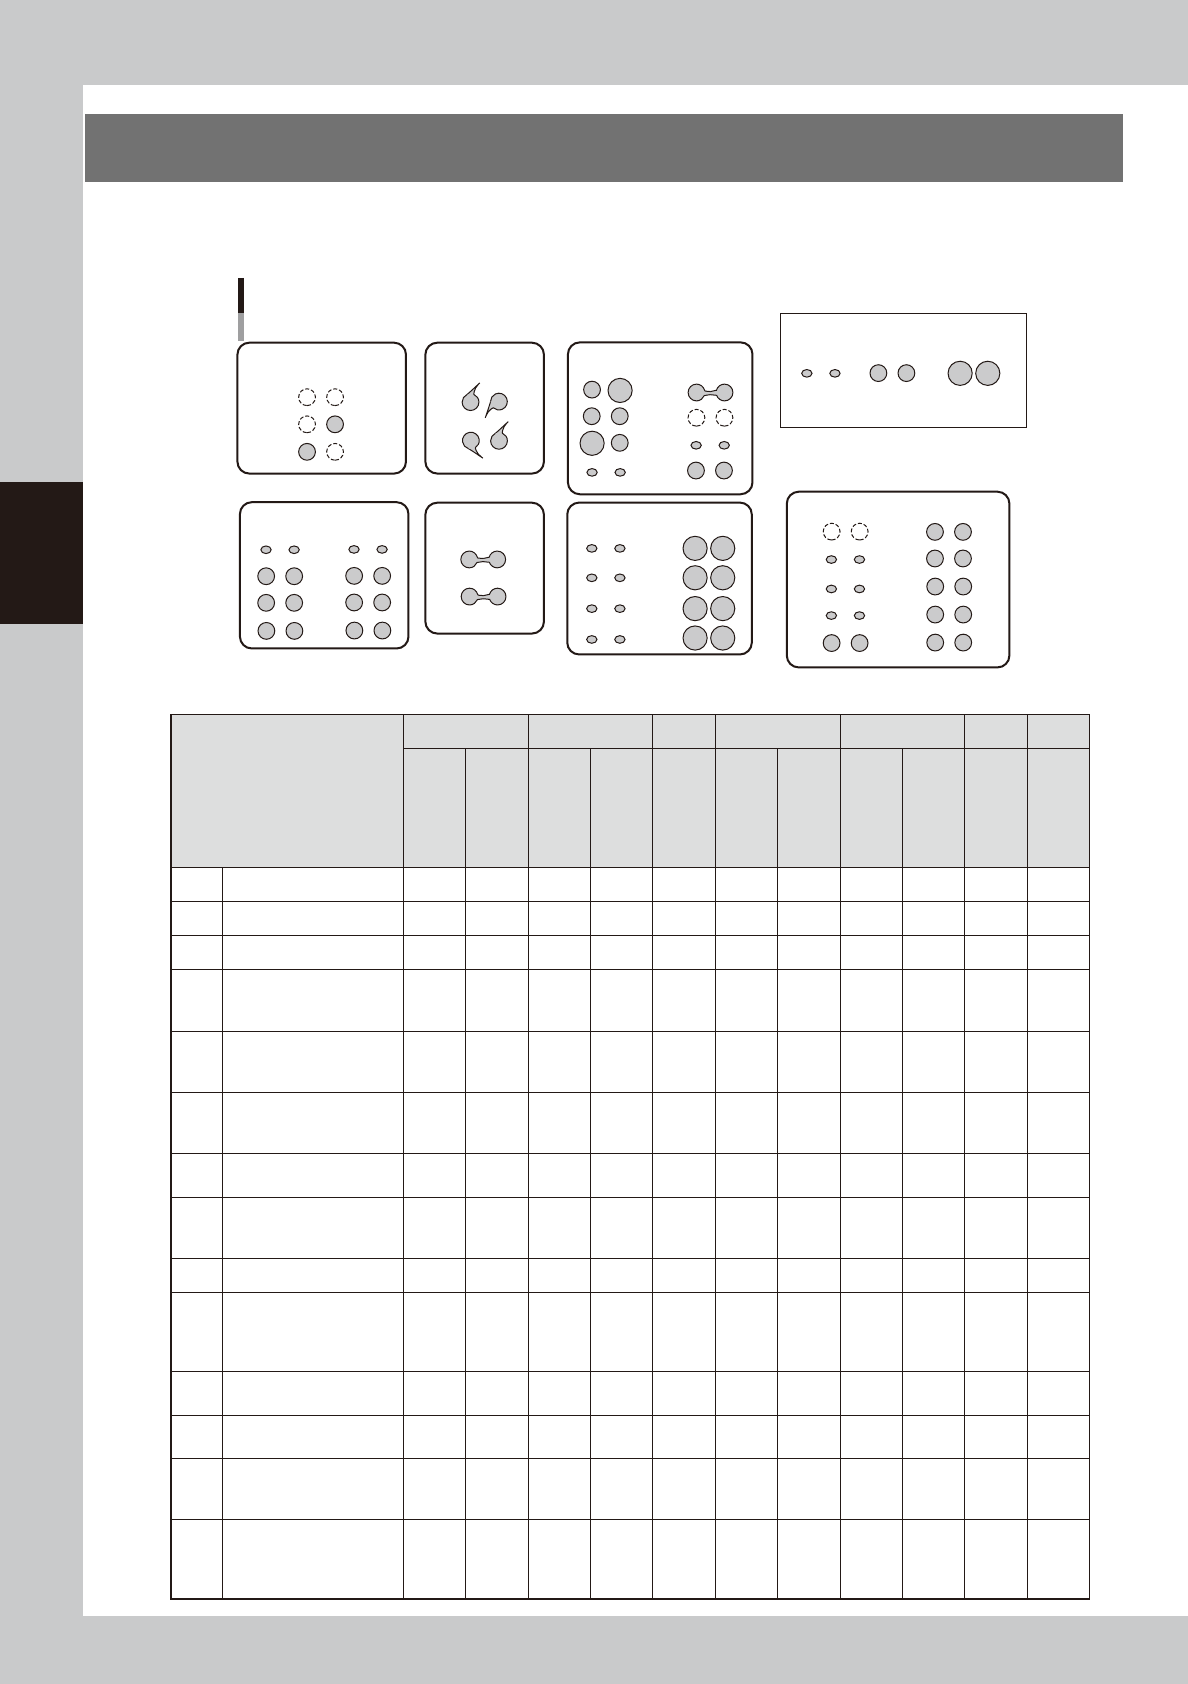
2. Handling dispensing errors
If the dispensing errors shown in the figure below occur during production, troubleshoot by doing the tasks in
the appropriate box in the table.
Typical dispensing errors
Too little Standard
[Sample dispensing quantities]
Too much
A: No dispensing or
dispensing only one dot
C: Cobwebbing
D: Bridges
B: Too little dispensing
at initial points
E: Irregular dispensing
F: Overall amount too
small or too large
G: Unstable dispensing after stopping
63300-N7-00
Troubleshooting/
Error description
A B C D E F G
No dispensing
Dispensing only
one dot
Too little
dispensing at
initial points
Too little after
moving long
distance
Cobwebbing
Bridges
(partial)
Bridges
(all)
Irregular
dispensing
(overall)
Irregular
dispensing
(designated
points)
Overall
dispensing
amount too small
or too large
Unstable
dispensing
after stopping
machine
[1] Bleed the nozzle air 2 1 1 2
[2] Clean nozzle 3 2 2 3
[3] Increase back-up pins 4 3 2 2 3 1
[4]
Run dispensing test
to check and adjust
dispensing pressure
1 1 1 1 2
[5]
Increase dispensing
quantity at designated
points
2 1 2
[6]
Add predispensing
immediately before
actual dispensing
3 2 6 3 3
[7]
Check the dispensing
temperature
1 3 2 4 4
[8]
Check the standard
area and predispensing
values
4 3 5
[9] Perform predispensing 1 1
[10]
Check remaining
quantity
* Readjust low-liquid
sensor
5 5 4
[11]
Change the dispensing
sequence
3 5 4 4
[12]
Use the spare
correction table
4
[13]
Set the minimum &
maximum correction
values
6
[14]
Make overall
adjustments with
the nozzle data &
coefficients
5 7 5