YSD_Users_E.pdf - 第180页
4-52 4 Making the dispensing stable 2 Edit the dispense sequence. Dispense sequence 1 11 12 13 14 15 16 17 18 19 20 2 3 4 5 6 7 8 9 10 64452-N7-00 1. Min Unit Set the minimum liquid quantity to be used for the dispensing…
4-51
4
Making the dispensing stable
6. Editing a dispense sequence
If the diameter of dots dispensed on the board is not constant or if adhesive stringing occurs or dots are
slanted, you must edit the dispense sequence to perform stable dot dispense.
This section explains how to edit the dispense sequence.
6.1 Performing a predispensing test
Dispensing dot conditions usually differ depending on the type of adhesive. To maintain optimum dispensing,
we recommend performing a predispensing test with the default settings and then check the current conditions
regarding the following points.
• Does the stopper make proper contact with the board?
• Does adhesive stringing occur when the nozzle moves up?
• Are dispensed dots uniform in size and shape?
If any of the above symptoms occur, edit the dispense sequence. This will enable stable dispensing operation.
6.2 Editing the dispense sequence
The dispense sequence is used to eliminate variations in dispensing that occurs due to component and adhesive
type or to improve cycle time by changing the dispense timing and ascent speed. This will allow the machine
to perform stable dispensing on the board.
n
NOTE
Before editing, we recommend making a system backup or making a note of the settings so that you can restore
them when needed.
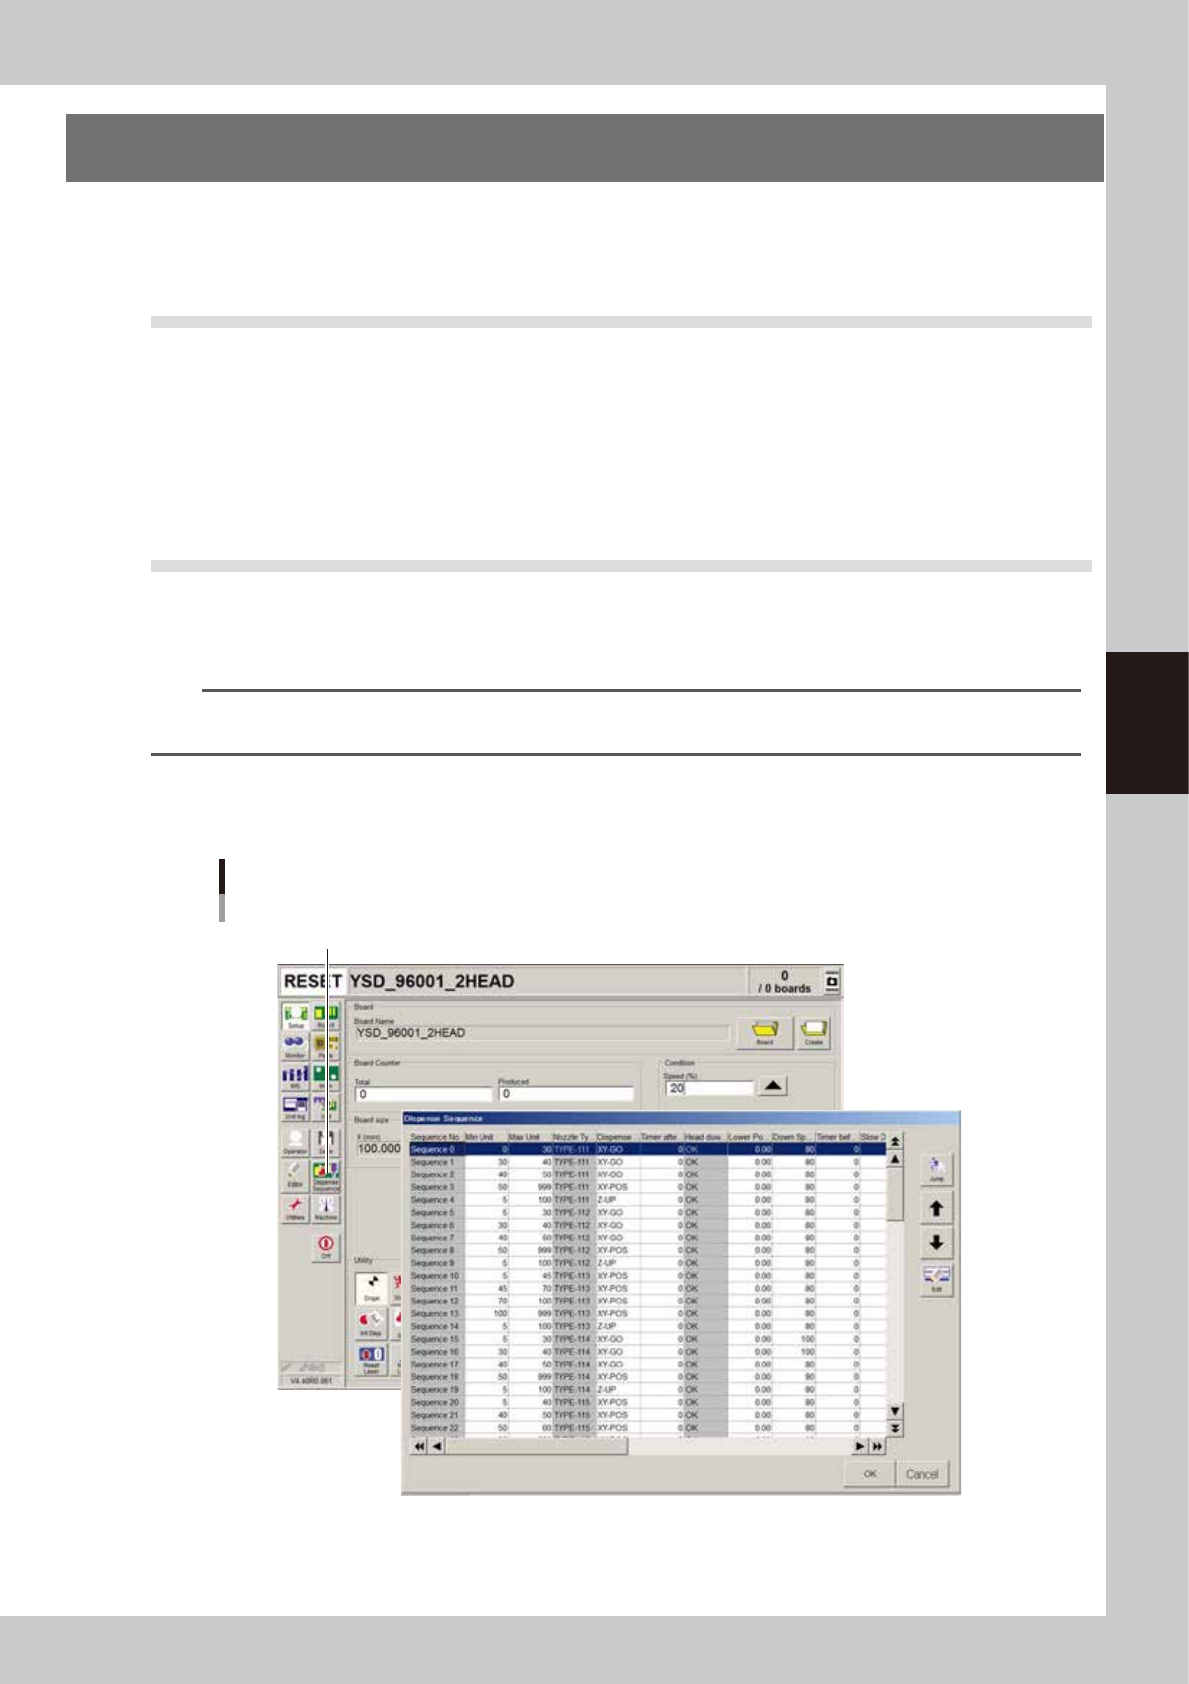
1
Open the dispense sequence edit screen.
Press the [Dispense Sequence] button on the Setup screen.
Setup screen
[Dispense Sequence] button
64451-N7-00
4-52
4
Making the dispensing stable
2
Edit the dispense sequence.
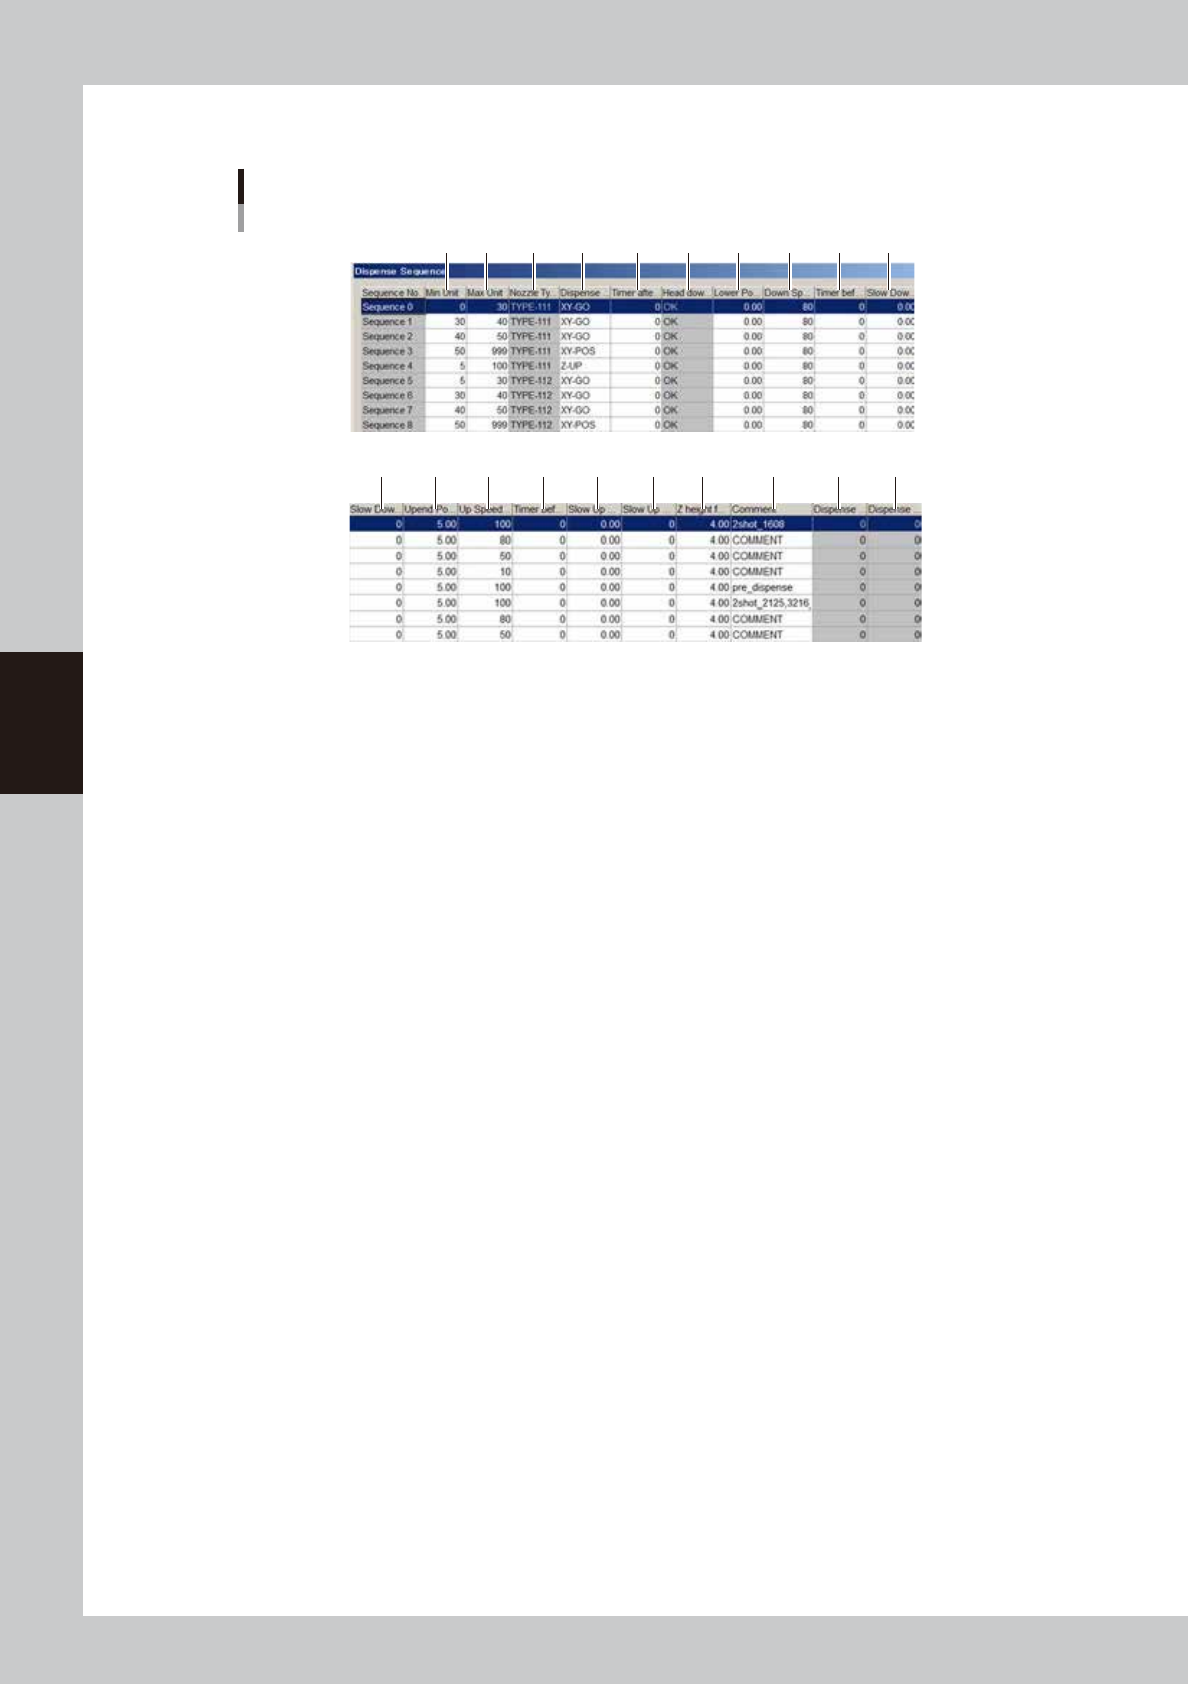
Dispense sequence
1
11 12 13 14 15 16 17 18 19 20
2 3 4 5 6 7 8 9 10
64452-N7-00
1. Min Unit
Set the minimum liquid quantity to be used for the dispensing action of this sequence number.
2. Max Unit
Set the maximum liquid quantity to be used for the dispensing action of this sequence number.
3. Nozzle Type
Specify the nozzle type to be used for sequence dispense.
4. Dispense start trigger
Set the operating timing of the valve used to dispense adhesive.
Five kinds of timing can be set (XY-GO, XY-POS, Z-DOWN, Z-LOW, Z-UP).
4-53
4
Making the dispensing stable
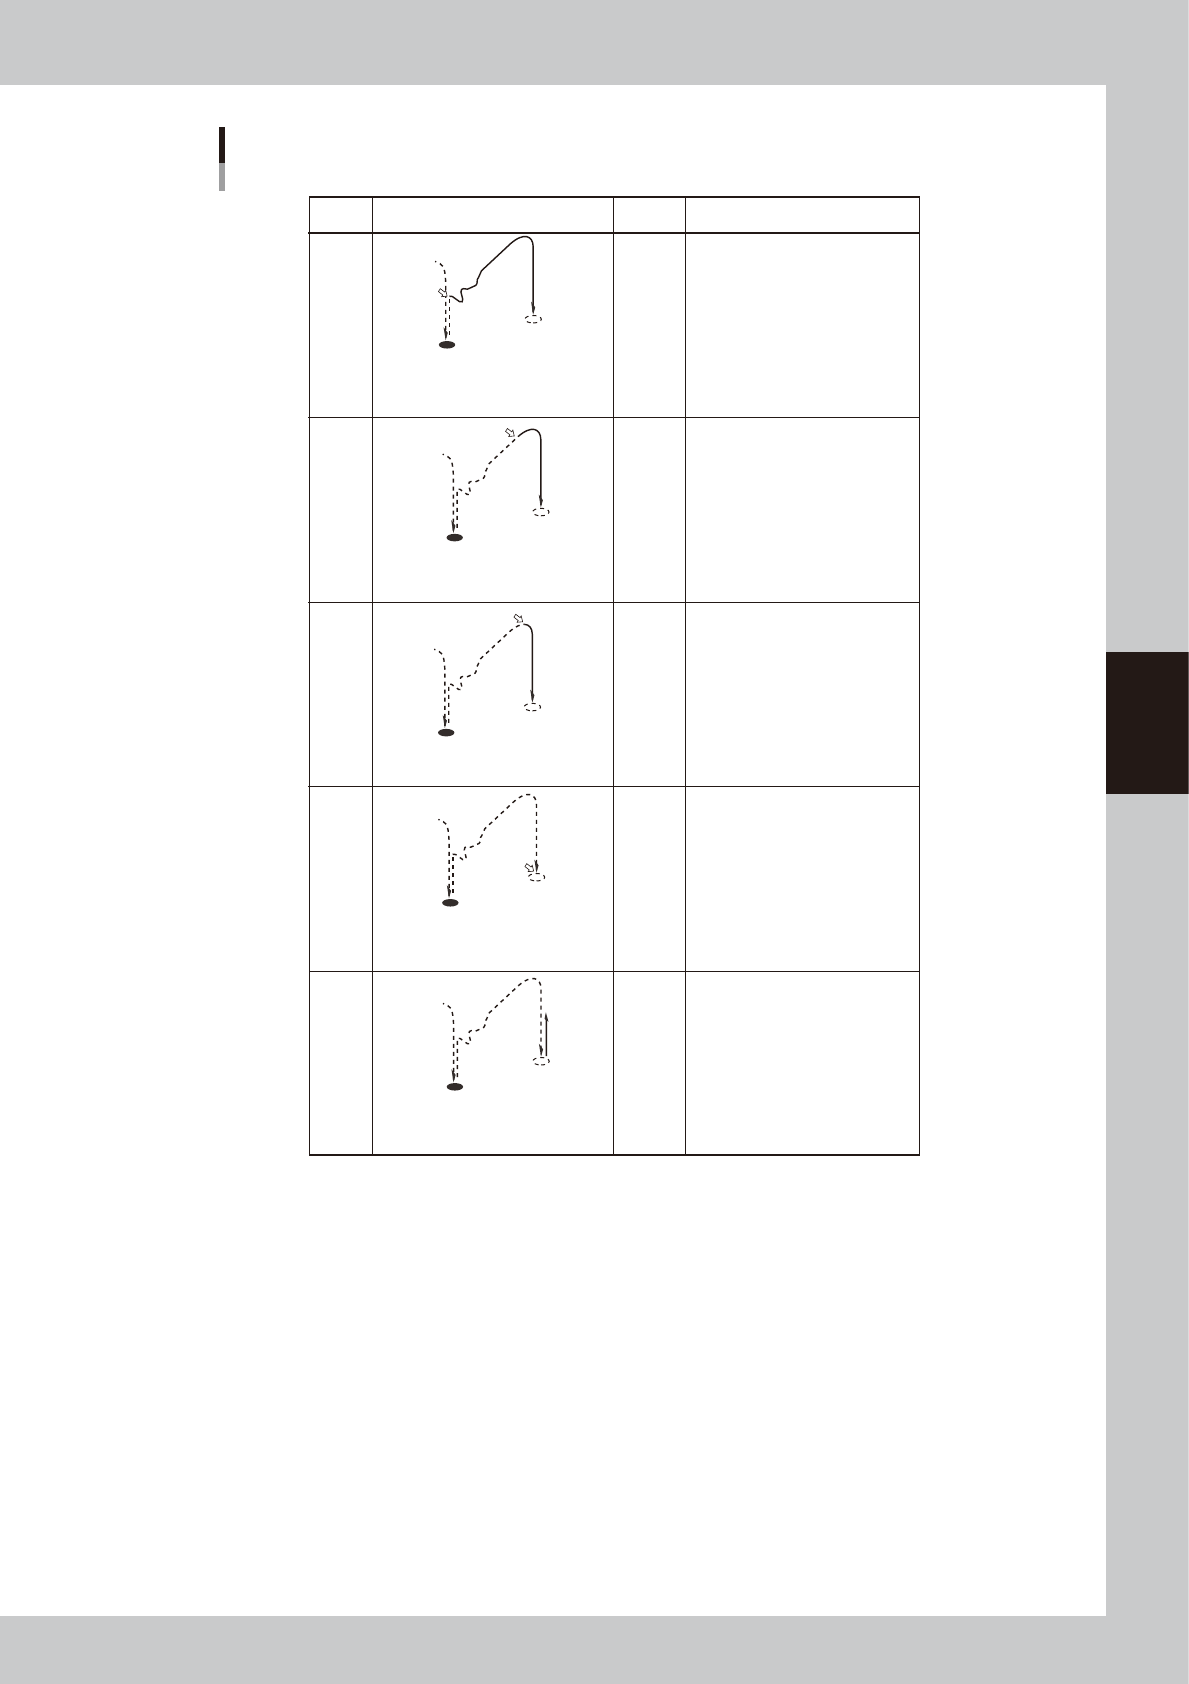
Dispense start trigger
ON
ON
ON
ON
ON
Setting Movement Dot size Description
Less than
1.5mm
More than
3.0mm
More than
3.0mm
1.5 to
3.0mm
Use this setting in most cases
when using a 2-shot nozzle for
small amounts.
–
The dispensing air valve turns on at
the same time the XY axes move
towards the next dispensing point.
If the dispensing position is not
stable with "XY-POS" due to
adhesive fluctuation at the nozzle
tip, select this setting.
Also set the "Timer before up"
parameter.
If the dispensing position is not
stable with "XY-DOWN" due to
adhesive fluctuation at the nozzle
tip, select this setting.
Also set the "Timer before up"
parameter.
This setting is not used in most
cases.
If you want to set the Z-axis
movement at extremely slow
speeds and produce tall dispensing
dots, select this setting.
The dispensing air valve turns on
when the XY axes reach the tolerance
range of the next dispensing point.
The dispensing air valve turns on at
the same time the Z-axis begins to
move down to the dispensing point.
The dispensing air valve turns on at
the same time the Z-axis begins to
move up from the dispensing point.
The dispensing air valve turns on at
the same time the Z-axis reaches the
dispensing point.
Z-UP
Z-DOWN
XY-POS
XY-GO
Z-LOW
If the dispensing position is not
stable with "XY-GO", probably
because of adhesive fluctuation at
the nozzle tip, select this setting.
Use this setting in most cases
when using a 1-shot nozzle.
63420-N7-00
5. Timer after disp (msec)
Set the time to be elapsed after the valve has performed dispensing. This parameter is useful when the diameter of
dispensed dots varies with the travel distance of the XY axes.
If the diameter varies when adhesive is dispensed at short intervals even though the same amount of adhesive is
dispensed, set this parameter to between 20 and 50ms.
6. Head down with outpos
This allows the Z axis to move down after the movement on the X and Y axes is complete.
7. Lower Position (mm)
Specify the dispensing height from the board surface. Add a "+" sign if the position is above the board surface, and add a
"-" sign if it is below the board surface.
If the nozzle stopper does not provide good contact due to upward or downward warp of the board even though a correct
height has been specified for this parameter, set it as follows.
• Enter a minus value if no contact is made by the nozzle stopper.
• Enter a plus value if the nozzle stopper makes excessive contact on the entire board.