YSD_Users_E.pdf - 第150页
4-22 4 Making the dispensing stable 3.1.5 Checking the dispensing amount on the board After setting the mark and adjusting the air pressure based on the results of the dispensing test on the dot station, actually dispens…
4-21
4
Making the dispensing stable
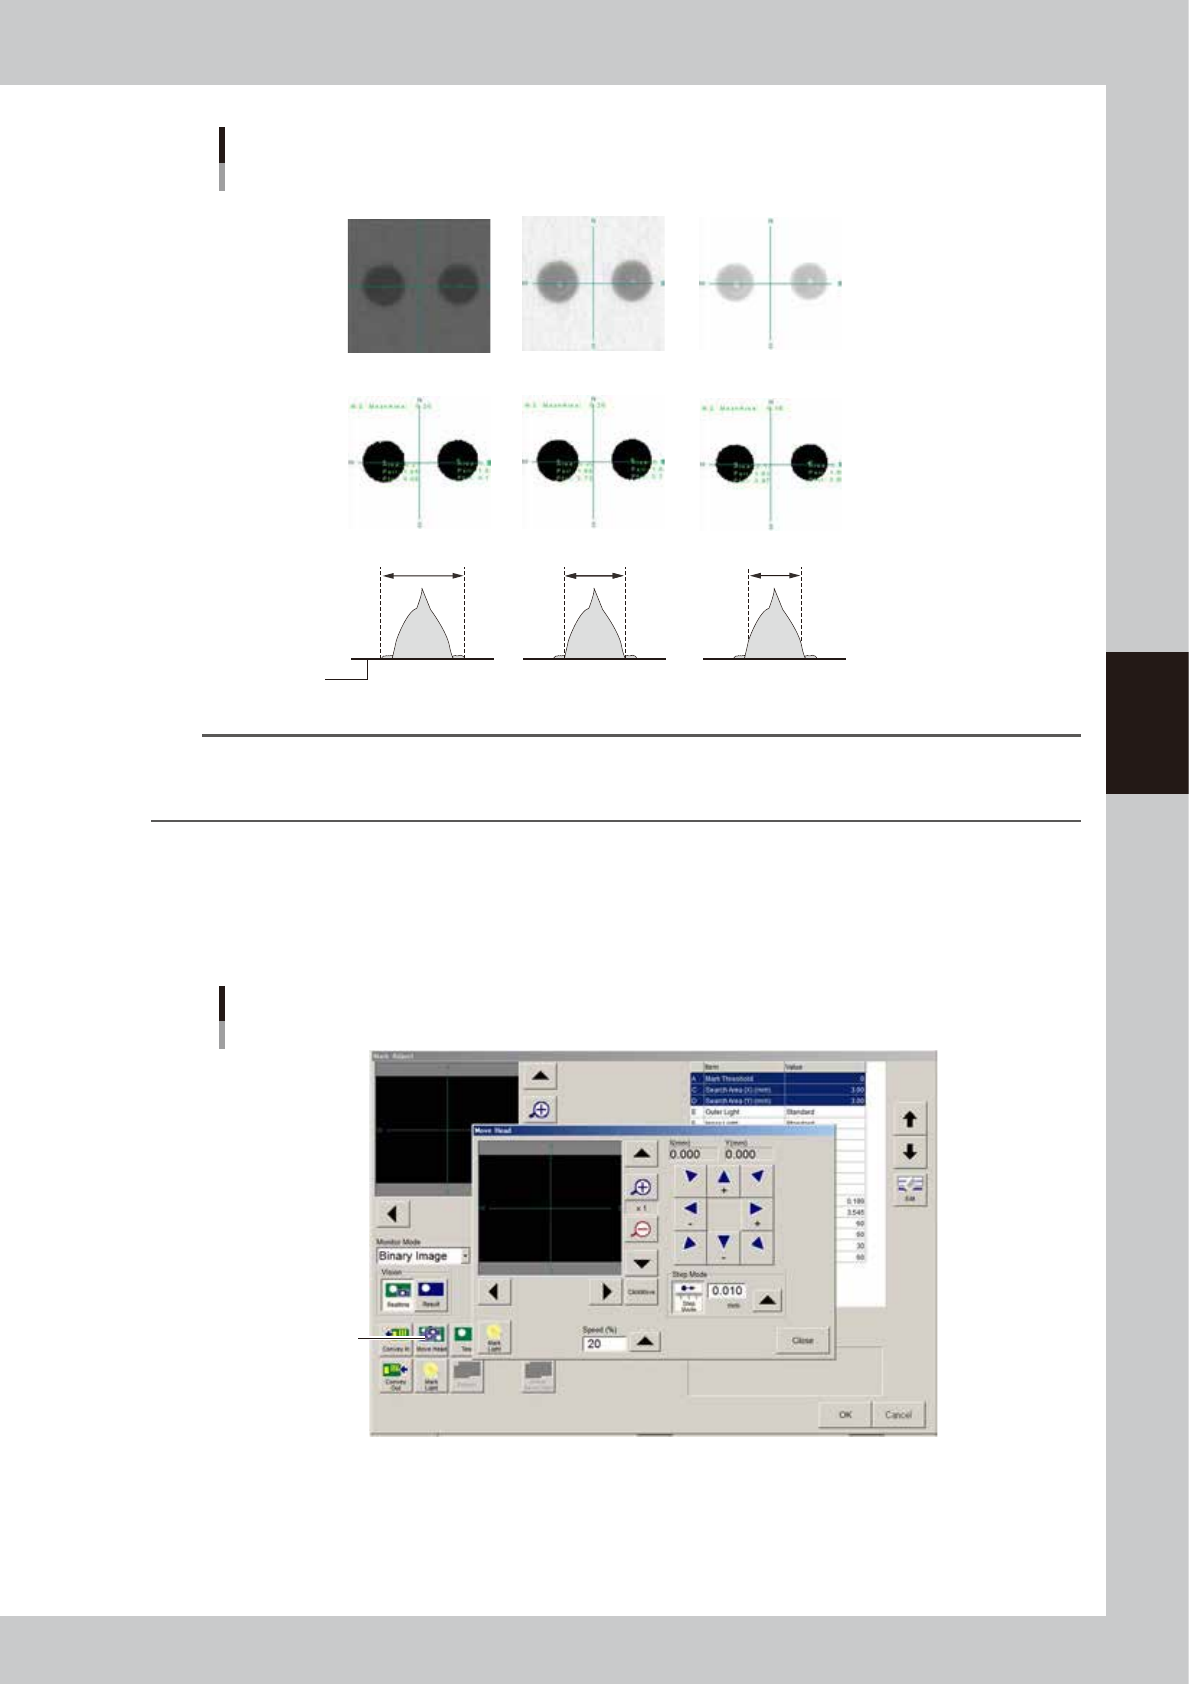
Dot recognition
Examples
Too bright
Binary image
Becomes small
Becomes large
Too dark
Good
Good
Dot recognition state
Periphery coat is recognized
Liquid outline is recognized Liquid outline is not
Paper
63410-N7-00
n
NOTE
If dot recognition is unstable even under the appropriate conditions due to the bond adhesive and solder
characteristics, then change the standard area setting to include the periphery coat so that the dot is recognized
stably.
5
Check the difference between the actual dot and recognition state.
Use the moving camera to check whether the area of the actual dot and the recognized result match
each other. Press the [Move Head] button and align the crosshairs on the camera with the dot groove
for recognition. Set the Monitor Mode to “Binary Image”, and compare the recognition state with the
actual dot to ensure there is no difference. If there is a difference, then readjust using mark adjustment.
Actual dot and recognition state
[Move Head] button
64438-N7-00
6
Confirm the air pressure
Run the dispensing test again and adjust the air pressure so that the dot has the standard area. Make a
note of the air pressure value that you just set.
7
Save the data.
Save the data that was made above.
4-22
4
Making the dispensing stable
3.1.5 Checking the dispensing amount on the board
After setting the mark and adjusting the air pressure based on the results of the dispensing test on the dot
station, actually dispense adhesive on a board and check the difference in the dispensing amount between “on
the dot station” and “on the board”.
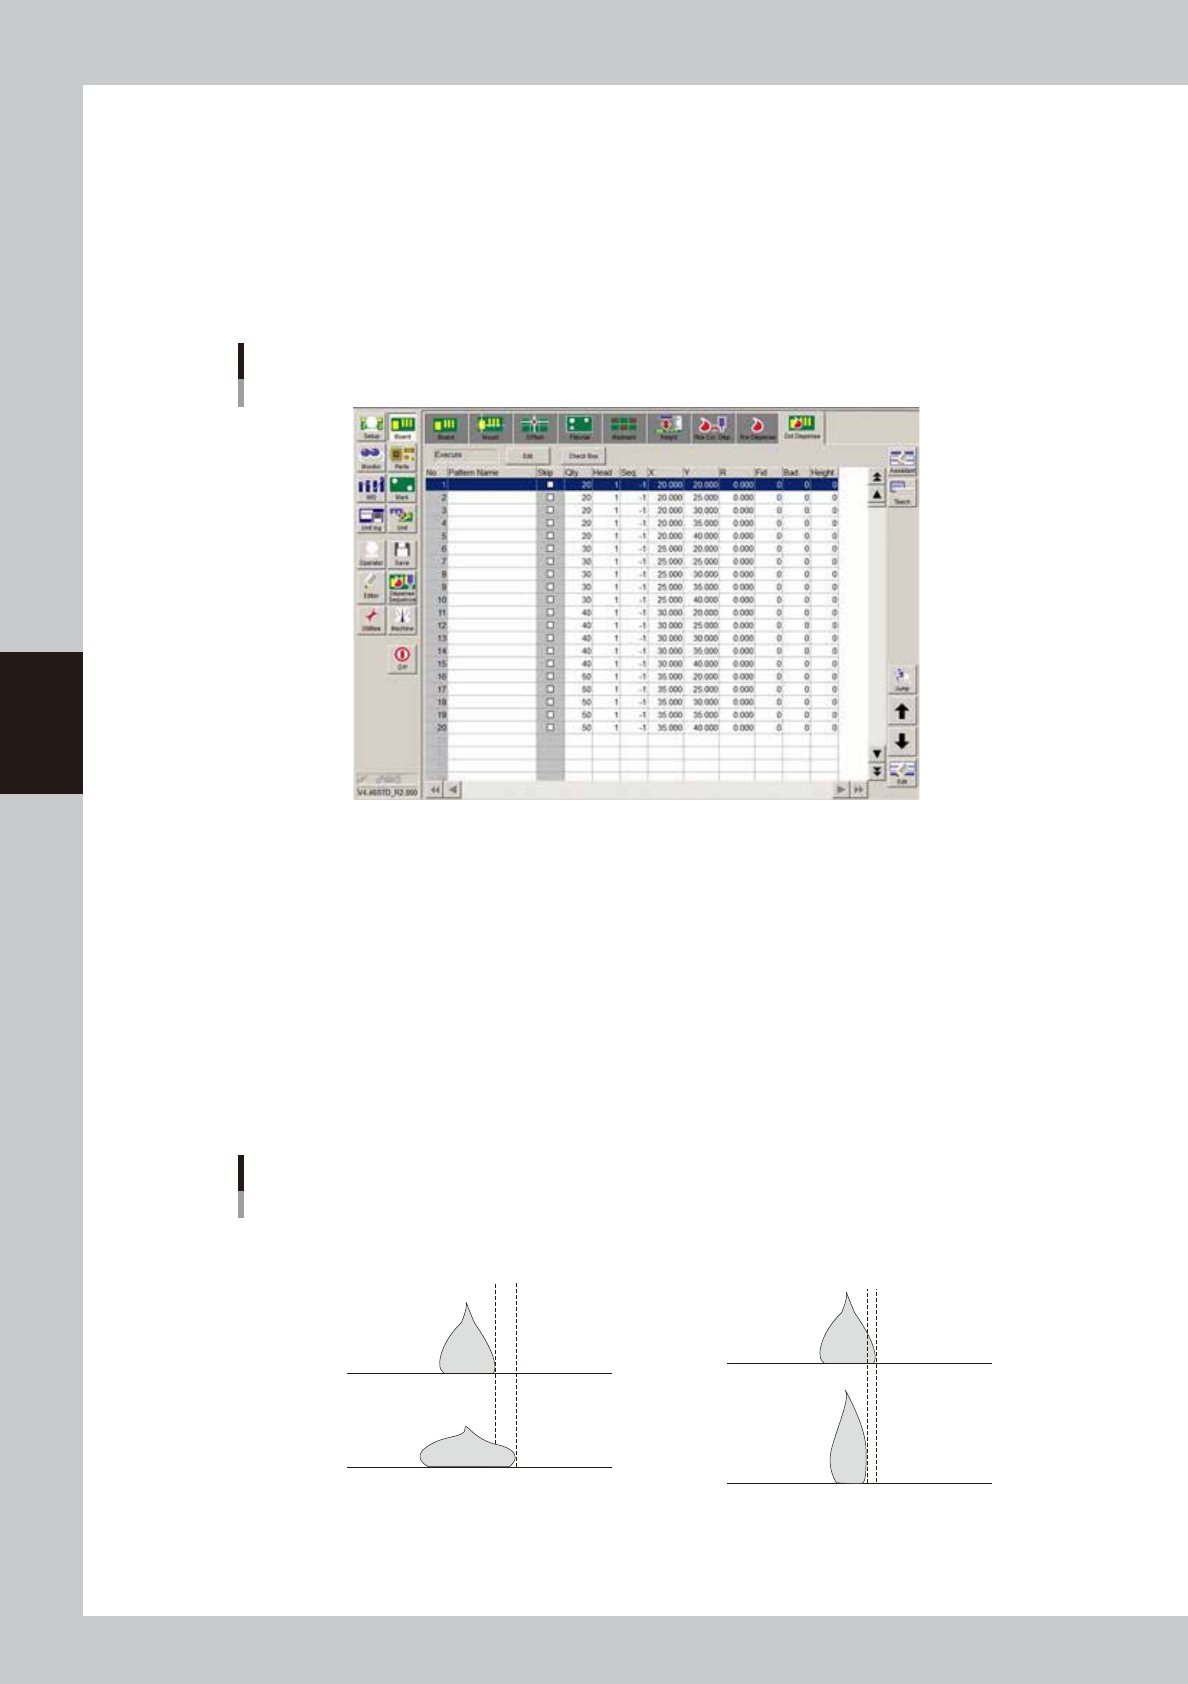
1
Enter the dot dispense parameters.
Open the [Board]-[Dot Dispense] screen and enter the parameters for checking the dispensing amount.
To check the stable dispensing amount, create five continuous points of liquid amount data.
Dot dispense parameter settings
Example
64439-N7-00
2
Dispense liquid on a board.
On the [Board]-[Pre Dispense] screen, press the [Edit] button and specify “Skip”. Then start automatic
operation to dispense liquid on a board. Repeat this process while changing the liquid amount until the
maximum desired dot size is dispensed on the board
3
Dispense liquid on the dot station.
Press the [Edit] button and return the setting to “On dot station”. Perform a dispensing test to dispense
each amount of liquid on the dot station.
4
Check the difference in the dispensing amount.
Check the liquid amounts dispensed on the board and on the dot station with eyes or with the moving
camera. When no problem is found, return the liquid amount of the predispense data to “20”.
Checking the dispensing state
Examples
Dispensing amount on board is greater
Dispensing amount on board is smaller
Dot station
Dot station
Board
Difference
Board
Difference
63411-N7-00
4-23
4
Making the dispensing stable
3.1.6 Creating the dispense correction (map)
Create the correction timer based on the mark data and predispense parameters you have created. Prepare a
new syringe that provides very stable dispensing. The syringe that was used in “3.1.4 Checking the dispensing
amount on the dot station” still holds a sufficient amount of liquid, then you may use it. This section describes
how to create the correction timer using a Type 111 nozzle as an example.
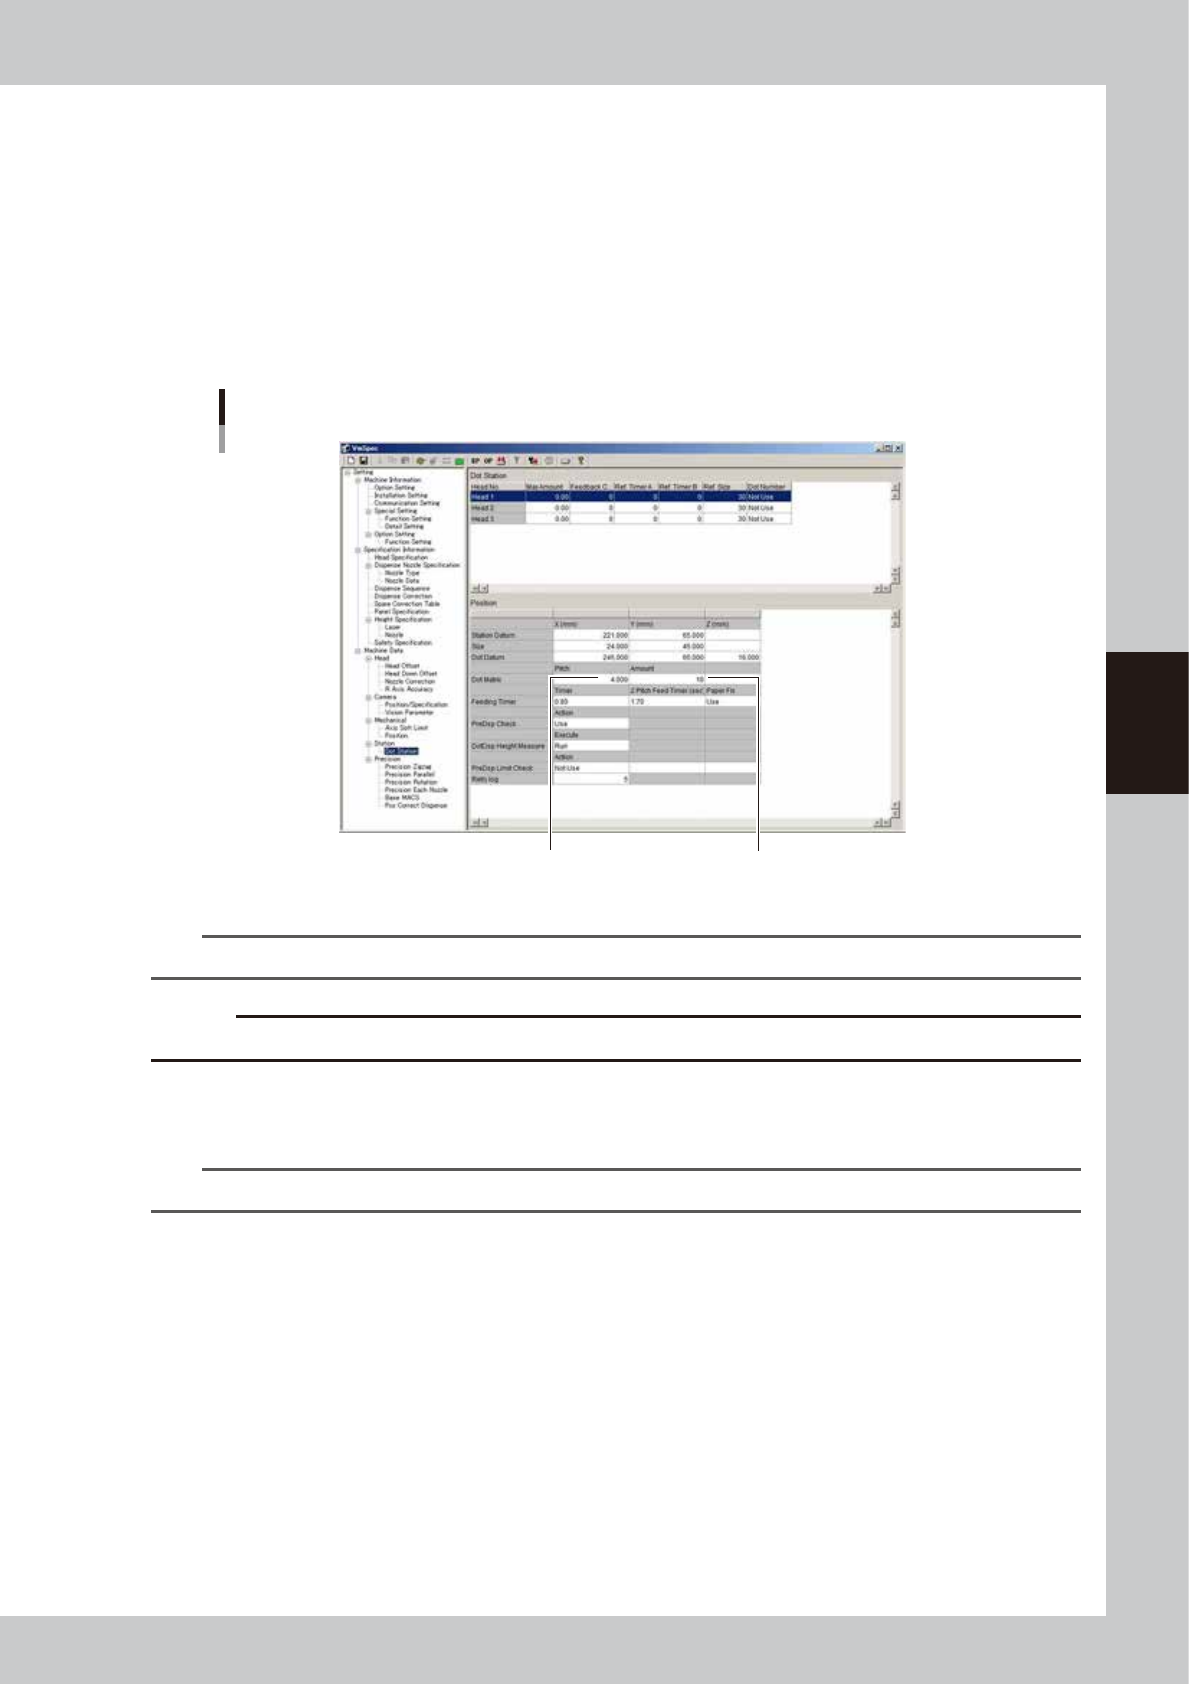
1
Change the number of predispensing points.
When using a standard nozzle, change the maximum number of predispensing points on the dot station.
On the [Machine] - “Machine Data” - “Dot Station / Position” screen, set “Dot Matrix - Pitch” to “4” and
“Dot Matrix - Amount” to “10”.
Changing the number of predispensing points
Set “Pitch” to “4.000”.
Set “Amount” to “10”.
64440-N7-00
n
NOTE
You can reduce paper consumption by changing the maximum number of predispensing points.
c
CAUTION
Do not change this setting when using a custom-made nozzle.
2
Reload the board data.
Press the [Board] button and then the [Select] button to reload the board data.
n
NOTE
After changing the machine data setting, the board data must be reloaded to enable the change.
3
Start the adjustment utility.
1. Press the [Utilities] button.
2. Select “Supervisor”, enter the password, and press the [OK] button.
3. Press the [Dispense Correction] button.