YSD_Users_E.pdf - 第355页
8-35 8 Managing the data 3.2.3 Histor y Utility T he History Utility allows you to sa ve production logs to an external storage medium at one time or clear/reset them at one time. On the Setup screen, pressing the [Histo…

8-34
8
Managing the data
5
Select the check boxes as needed.
• “Remember the lot log” check box
When this check box is selected, the board data that had been used when the power was last
turned off is loaded when the power is next turned on. The production lot data will be taken over.
• “Mch line of the Lot log does not output” check box
The lot logs of machines equipped with multiple stages or dual lanes include the “Stage” or “Lane”
column. Select this check box if you do not want to display the “Mch” row in the “Stage” or “Lane”
column.
• “Multi Language Output” check box
When this check box is selected, the production log data can be saved and loaded in multi-
language mode.
• “FullASCII Output” check box
When this check box is selected, incorrect character strings (character strings that cannot be used
with the machine) will be automatically converted into appropriate characters when a file is loaded.
Incorrect character strings (examples): !#$%&@*<>?/
• “History output setting of specified time” check box
Make this setting when specifying the time to output production log data.
Select the “History output setting of specified time” check box and enter the time in 24-hour format
in the ”Specified time” box. Production log data will be output at the specified time every day and
automatically saved.
When the “After the history output, the unit logs are reset” check box is selected, the machine
operation log data (Unit log data) will be reset at the time when production log data is output.
• “Limit size of total history” box
A limit can be set on the total amount of production log data to be saved. An alarm will be issued
when the free space remaining in the destination reaches the limit specified here. Setting this item to
“0” does not place any limit.
6
When finished setting, press the [OK] button.
The display returns to the “Setting” screen, and press the [Close] button to close it.
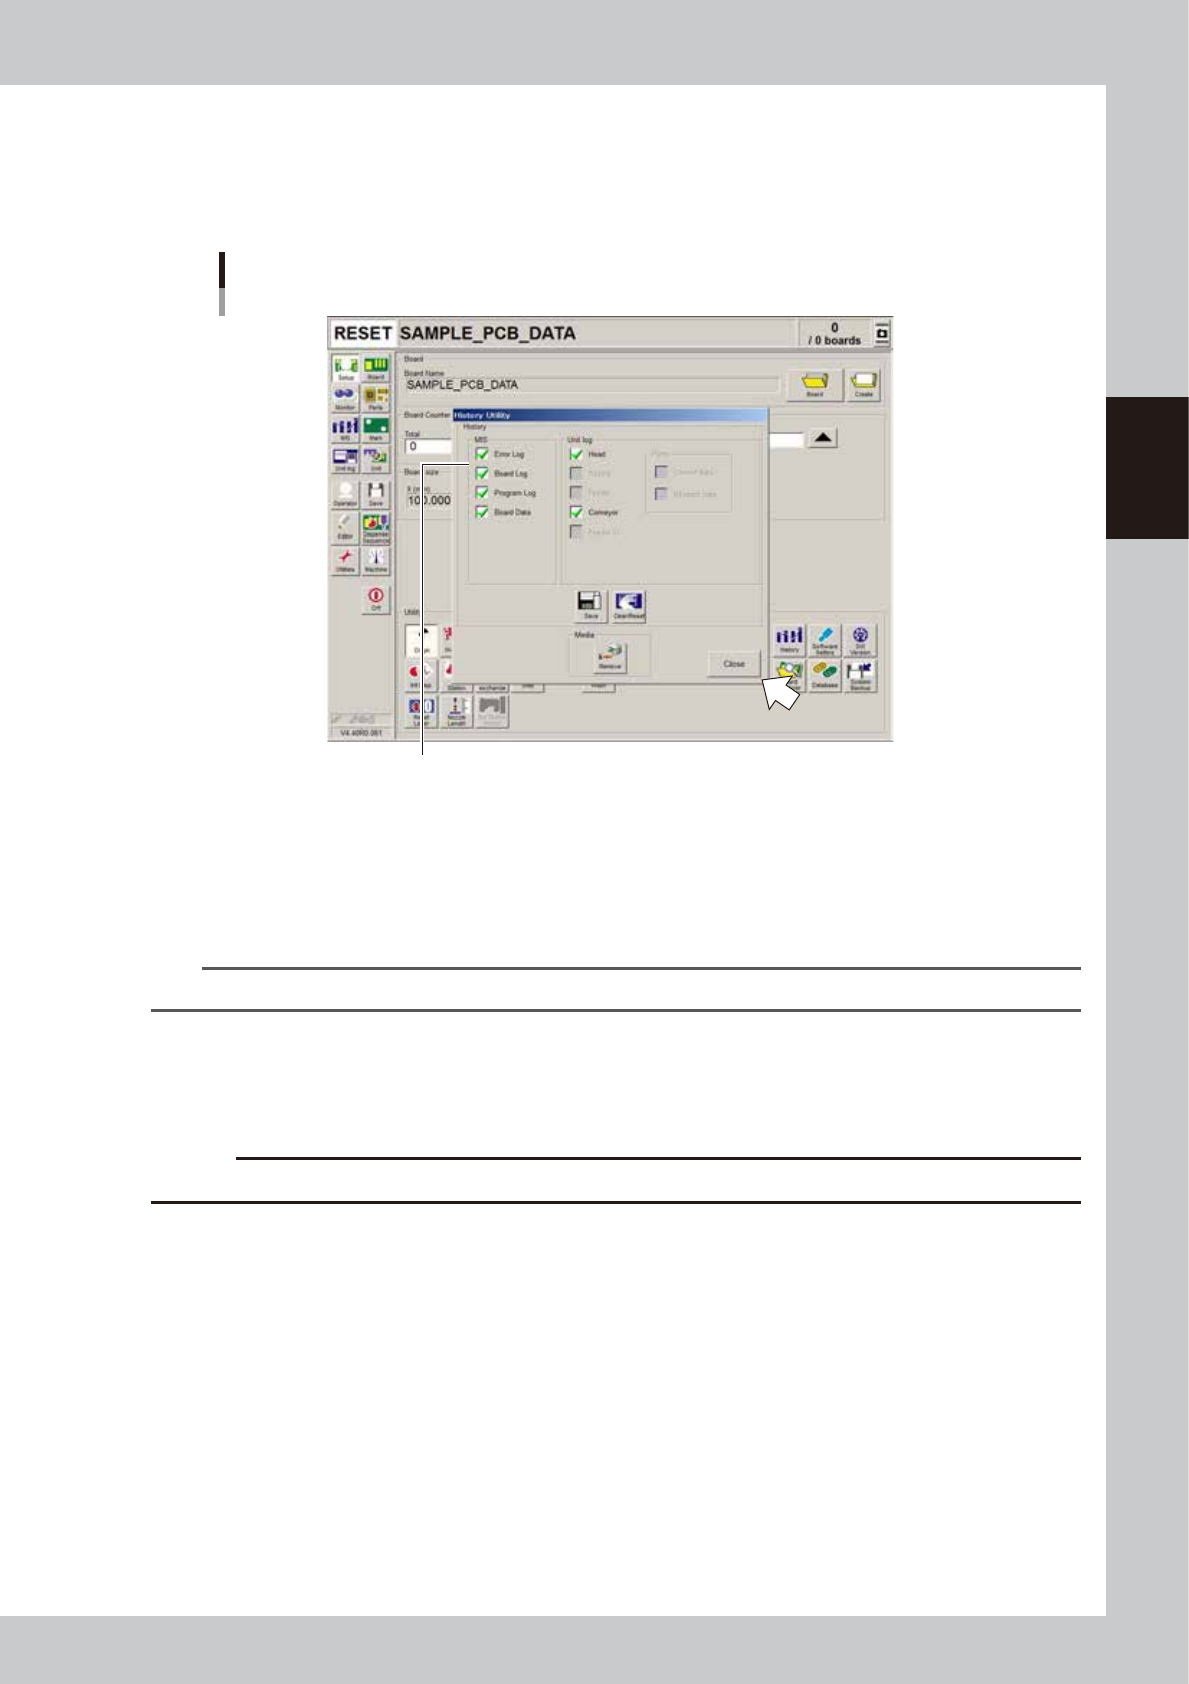
8-35
8
Managing the data
3.2.3 History Utility
The History Utility allows you to save production logs to an external storage medium at one time or clear/reset
them at one time.
On the Setup screen, pressing the [History] button opens the "History Utility" screen as shown below.
History Utility
Check the necessary items.
64834-N7-00
To save logs at one time:
1. Check the check boxes next to the items you want to save, and press the [Save] button.
2. When the "Media Select" screen appears, check or select the storage medium and press the [OK] button.
3. A confirmation dialog appears. Press the [Yes] button to save the selected items.
4. Another dialog appears when the selected items have been saved. Press the [OK] button to close the dialog box.
TIP
Production logs are saved in a folder named "My History" in the external storage medium.
To clear/reset logs at one time:
1. Check the check boxes next to the items (MIS) you want to clear or the items (Unit log) you want to reset, and press the
[Clear/Reset] button.
2. A confirmation dialog appears. Press the [Yes] button to clear/reset the selected items.
c
CAUT ION
Deleted data cannot be restored, so be careful.

S-1
INDEX
Index
4-point fiducial function 5-25
A
Alignment 2-40
Arranging the push-up pins 2-22
Auto trace function 6-6
Axis configuration 1-14
B
Backup
Making a backup of board data 8-1
Making a backup of system data 8-10
[Backup] button 8-14
Badmark
Badmark operation flows 5-28
Badmark function 5-27
Block badmark 5-27
Board badmark 5-27
Local badmark 5-27
Badmark parameter 5-26
Ball lead component 5-47
Before operation 2-1
Bleeding the nozzle air 2-29
Block fiducial function 5-23
Block offset 7-14
Distribution 7-17
Returning 7-19
Board clamp 1-13
Board fiducial function 5-23
Board file format conversion 7-20
Converting VIOS data into YGX data 7-20
Converting YGX data into VIOS data 7-22
Board information 5-13
Board parameter 5-14
Buzzer 1-1
C
CE marking i
Changing the conveyor width 2-20
Checking/correcting dispensing positions
4-55
Chip component 5-37
Clearing an error 2-4
Component information
Creating procedure 5-36
Connector component 5-48
[Conveyor] tab screen 2-20
Conveyor unit 1-13
Changing the conveyor unit setup 2-19
Conveyor unit setup flow 2-19
Conveyor width 3-4
[ConveyOut Stop] button 2-44
[Create] button 5-5,5-8
Create New Board Data 7-2
Creating the component information
5-35
Creating the dispense correction (map)
4-23
Creating the mark data for dot
recognition 4-14
Creating the predispensing information
4-8
Cursor teaching 6-11
[Cycle Stop] button 2-44
D
Database
Database list 8-23
User database 8-23
YAMAHA database 8-23
Dispense correction retries 4-48
Dispense distribution 5-68
Dispense sequence 3-9,4-51
Dispensing test function 4-2
Dot dispense information
Creating dot dispense information 5-68
Editing the dot dispense information 5-73
Dot dispense parameter 5-33
Dot plate 1-10
Dot station 1-11,4-37
Dummy feeder iv
E
Edit Assistant 6-15
Editing rows 6-17
Editor 7-1
Emergency stop 2-3
F
Fiducial parameter 5-22
Find 6-18
Finishing board production 2-44
Front panel switches 1-12
FullASCII Output 8-34
[Full Backup] button 8-15
H
Halfway Continue function 6-1
Head assembly 1-6
Height Displacement 2-43
I
IC component 5-40
K
Keyboard 1-5
L
Laser displacement meter 1-6
Liquid disposal cup 1-11
Local fiducial function 5-24
M
Machine main unit 1-1
Names and functions of major parts 1-1
Main menu button area 2-7
Main power switch 1-1,2-1
Main stopper 1-13,3-4
Mark Adjust mode 5-58
[Mark] button 5-52
Mark information 5-51
Creating procedure 5-52
Monitor
Badmark 2-42
Detail 2-37
Dispense 2-40
Fiducial 2-41
Main 2-36
Vision 2-39
Mount parameter 5-16
N
Network connections A-1
NEXT INTERFACE 1-18
Nozzle types 1-7
O
Offset parameter 5-18
Operation panel and data input unit 1-3
Operation panel buttons 1-4
[EMERGENCY STOP] button 1-4
[ERROR CLEAR] button 1-4
[READY] button 1-4
[RESET] button 1-4
[START] button 1-4
[STOP] button 1-4
Operation screen 2-7
Status area 2-7
[Operator] button 2-2
Original Block No. 5-17,5-19,5-22,5-26,
7-15,7-18
P
[Parts] button 5-36
Pattern matching 5-62,5-67
Pattern registration 5-63
Pitch distribution function 5-20
Point fiducial function 5-24
Point teaching 6-7
Multi-point input 6-9
One-point input 6-9
Position correction dispense 5-30
Position correction dispense function 4-34
Pre-dispense parameter 5-31
Predispensing interval setting 3-10
Pre-operation check 2-17
PREVIOUS INTERFACE 1-17
Production log 8-25
Push-up pin 1-13
Push-up plate 1-13
R
[READY] button 2-3
Registering board name 5-5
Remaining amount detection angle
setting 3-11
Renumber 6-19