YSD_Users_E.pdf - 第372页
2-2 2 Daily maintenance items 1. Cleaning the nozzles 1.1 Checking the head dispensing Use the following procedure to dispense adhesi ve from the head in order to chec k the nozzle condition. 1 Pr ess the [Replace Syring…

2-1
2
Daily maintenance items
Before beginning maintenance
In most cases, the main power must be turned off before beginning maintenance work.
However, some work is carried out in an emergency stop state while the power is on. In that case, ensure
sufficient safety and press the emergency stop button before beginning the work.
If you need to check the machine operation such as axis movement, leave the power turned on and also
ensure sufficient safety during maintenance.
When operating the machine, the following conditions must be met.
n
Operating conditions
1. Air pressure is at an appropriate level.
2. Safety covers are closed.
3. Nozzles and other devices are set in place correctly.

2-2
2
Daily maintenance items
1. Cleaning the nozzles
1.1 Checking the head dispensing
Use the following procedure to dispense adhesive from the head in order to check the nozzle condition.
1
Press the [Replace Syringe] button.
Press the [Replace Syringe] button on the
Setup screen to display the screen shown on
the right.
2
Move the head.
Press the [Move default] button to move the
head to the syringe replacement position.
You may also move the head by hand after
pressing the emergency stop button and
opening the cover.
54200-N7-00
e
3
Open the cover.
1. When the head is in the syringe
replacement position (front position),
press the emergency stop button and
open the cover.
2. Prepare a rag to use when dispensing
adhesive.
4
Check the nozzle for adhesive
dispensing.
1. Press the [Replace Syringe] button on the
Setup screen.
2.
Place a rag beneath the head and press
the [Head] button in the "Blow" group box.
3. Check that the adhesive is dispensed
smoothly.
• If the head or syringe was replaced, blow
for a period long enough to bleed the
air.
• When using a Type 111, 112 or 114 nozzle,
dispense adhesive 10 centimeters or
more from the nozzle tip.
• When using a nozzle with a large diameter
hole other than the above nozzles,
dispense adhesive approximately 5
centimeters from the nozzle tip.
53200-N7-00
n
If adhesive dispensing from nozzle is poor,
then check for:
• Clogged or soiled nozzle
• Low dispensing pressure
• Incorrectly clamped syringe adapter
• Incorrectly set nozzle
• Wrong heater temperature
• Old adhesive
• Adhesive that was used several times
5
End the nozzle check.
Press the [Close] button to close the
"Replace Syringe" screen.
Syringe replacement screen
Step 1
Adhesive dispensing check
Step 4
Adhesive
Rag
2-3
2
Daily maintenance items
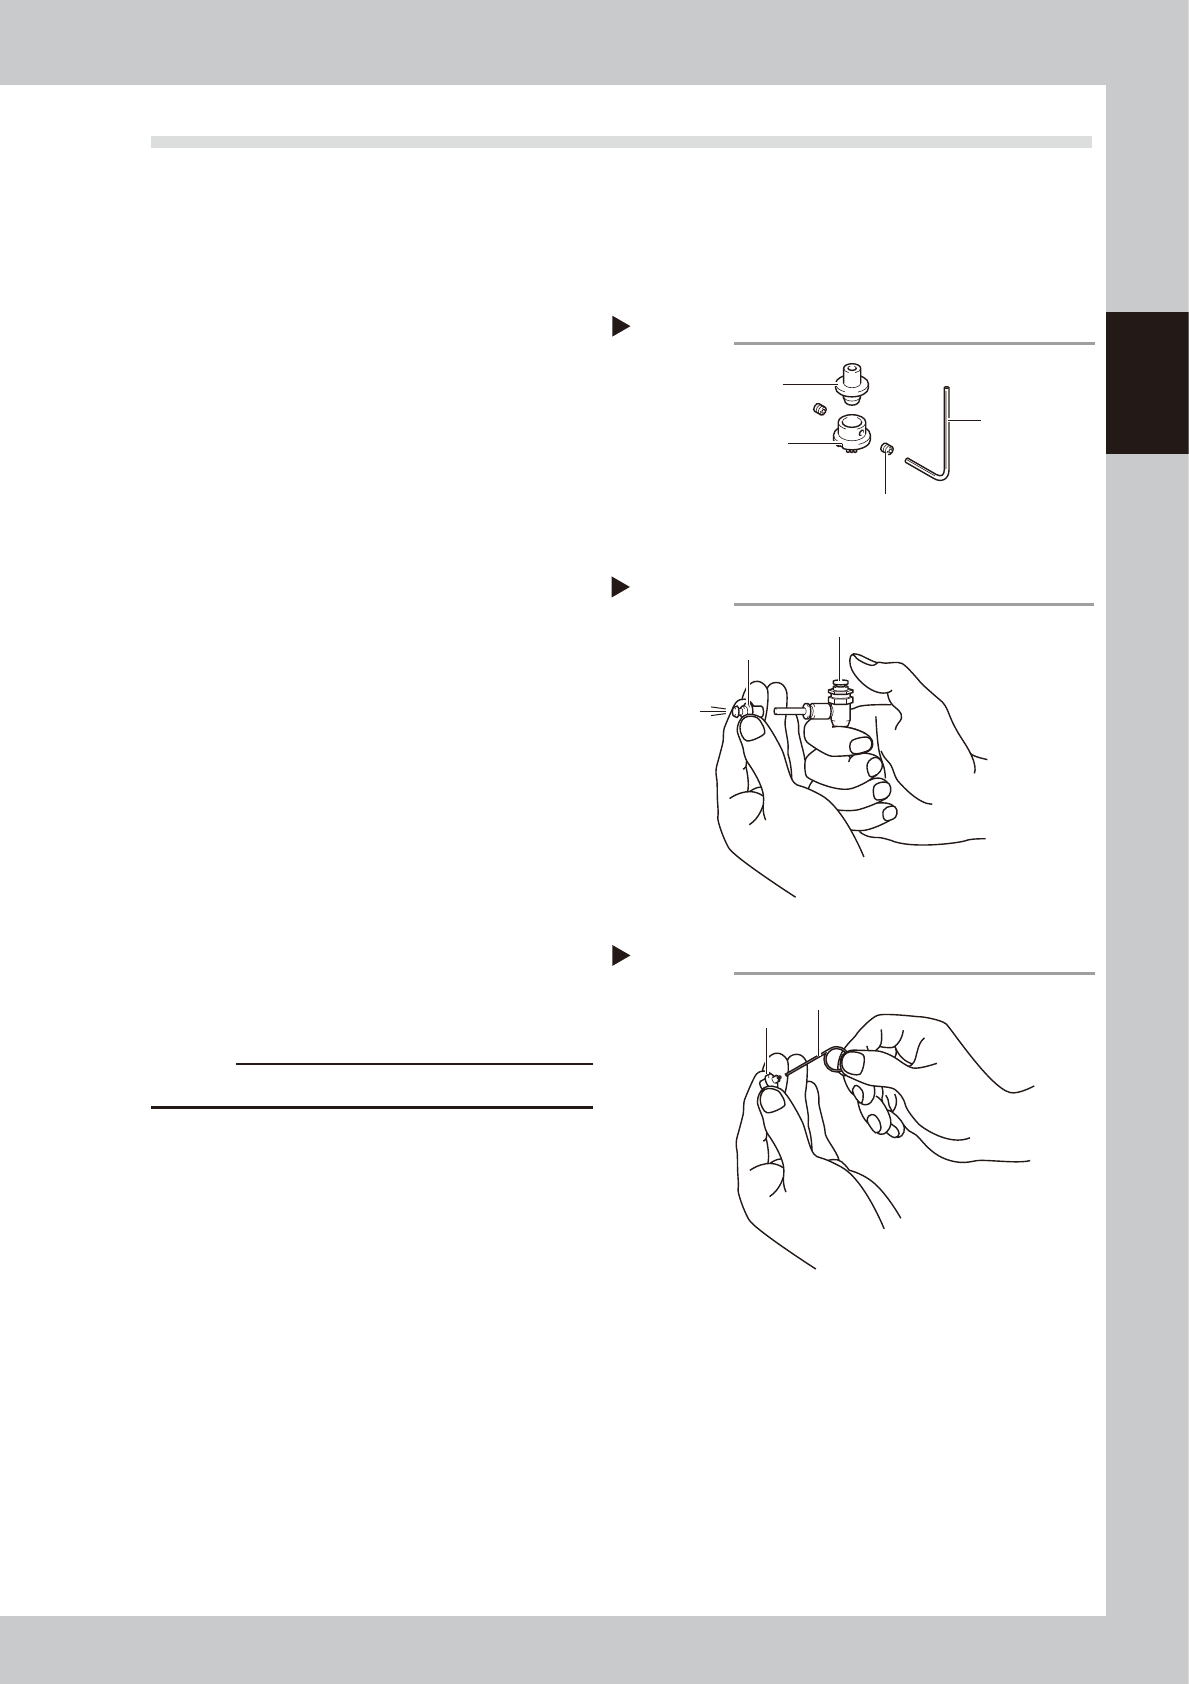
1.2 Cleaning the nozzles
The nozzle cannot function correctly if it is poorly cleaned and used while solder or adhesive is still sticking to
the nozzle tip. To prevent poor nozzle dispensing, inspect and clean each nozzle daily.
e
1
Remove the nozzle.
Always set the machine to emergency stop and open the cover before removing the nozzle.
2
Remove the dispense nozzle from
the joint nozzle.
1. Use an air blow tool to remove adhesive
and other matter from inside the nozzle.
2. Using a hex wrench, remove the dispense
nozzle from the joint nozzle.
3. Using a lint-free cleaning paper twisted
and formed in the shape of a toothpick,
wipe off adhesive and other matter
remaining inside the nozzle and joint
nozzle.
53201-N7-00
3
Remove adhesive with an air blow
tool.
1. After washing the joint nozzle with solvent
such as acetone, clean the joint nozzle
with an air blow tool.
2. Also clean the dispense nozzle using the
same procedure.
3. Using a lint-free cleaning paper twisted
and formed in the shape of a toothpick,
wipe the inside of the dispense nozzle
and joint nozzle.
53202-N7-00
4
Clean the nozzle hole.
1. Clean the nozzle hole using the cleaning
pin matching the size of the nozzle hole.
c
CAUTION
Clean carefully so as not to scratch the path.
2. Clean the nozzle hole once again with
an air blow tool.
3. Make a visual check for any adhesive
residue remaining inside the joint nozzle
and dispense nozzle holes.
53203-N7-00
n
If using an ultrasonic cleaner
• This can efficiently clean away adhesive or other
material adhering to the entire nozzle. However,
always make a visual check for any grime or other
material after cleaning.
• If a nozzle is placed in the ultrasonic cleaner solvent
without wiping away adhesive inside the nozzle, the
adhesive will react with the solvent and adhere to
the walls of the nozzle, causing nozzle clogs or
blockages.
• After cleaning the removed nozzle hole, immerse
the nozzle into a container filled with alcohol or
stored is inside a clean case, etc.
Removing the dispense nozzle
Step 2
Hex wrench
Setscrew
Dispense nozzle
Joint nozzle
Air blow into the joint nozzle
Step 3
Air blow tool
Joint nozzle
Cleaning the nozzle hole
Step 4
Cleaning pin
Dispense nozzle