SL940-Install-Ops-Maintenance-7210918_B.pdf - 第139页
Maintenance 7-9 4. Wearing g lov es, clean a ll acces sible cab les using a sof t lint - free cloth and isopropyl alcohol. WARNING ! Fingers m a y be pinched if the r obot is m oved whil e cleani ng and lubr icati ng the…
7-8 Maintenance
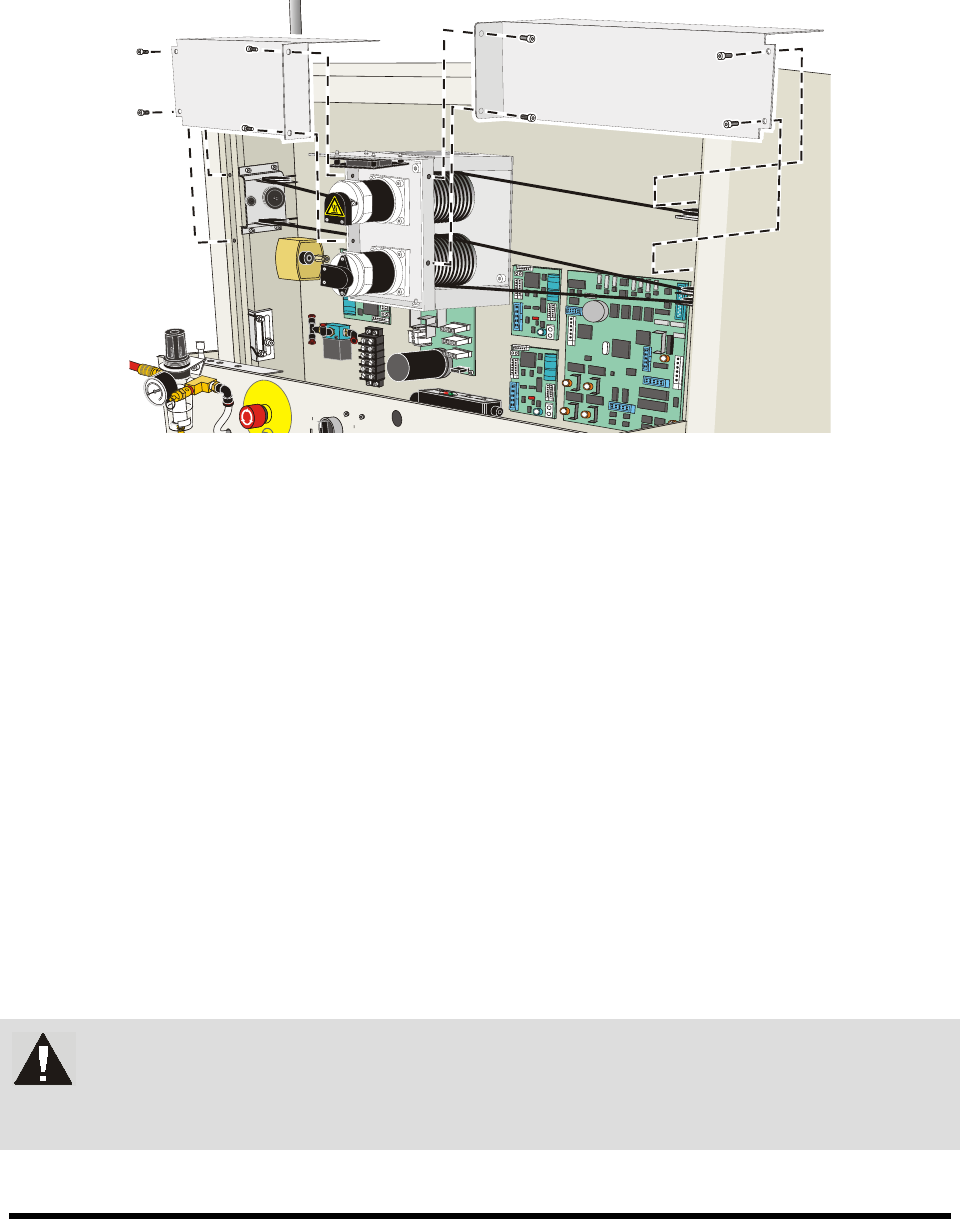
To remove the rear cable covers:
1. Use a 4-mm hex key to remove the screws (Figure 7-7).
2. Lift off.
Figure 7-7 Removing the Rear Cable Covers
7.10 Lubricating the Cables and Linear Guides
The XYZ-Axis cables support the robot and allow it to travel within the dispensing area. To ensure
smooth movement, the cables and linear guides must be lubricated approximately every three months.
NOTE To perform the following procedures, you will need Asymtek Grease Kit (P/N 7203262).
The kit contains a grease syringe. See Appendix A - Material Safety Information for the
Material Safety Data Sheet on the Asymtek Grease Kit.
7.10.1 Lubricating the Cables
NOTE The following procedure is a two-man operation.
To lubricate the cables:
1. Perform a service shutdown as specified in 2.12 Service Shutdown.
2. Remove the axis and cable covers as described above.
3. Open the coating system hood and move the robot to the front middle of the dispensing area.
WARNING! Use Personal Protective Equipment when working with cleaning and lubrication
materials. Refer to the applicable MSDS. Remove all spills and properly dispose
of contaminated materials.

Maintenance 7-9
4. Wearing gloves, clean all accessible cables using a soft lint-free cloth and isopropyl alcohol.
WARNING! Fingers may be pinched if the robot is moved while cleaning and lubricating the
cables.
5. Visually inspect the cleaned cables for uneven and excessive wear. Run a lint-free cloth over
cables while feeling for breaks in sheathing or swollen spots.
NOTE If the cables show signs of wear, skip this procedure and contact Asymtek. If the
cables show no signs of wear, proceed with the next step.
6. Wearing rubber gloves, manually apply an adequate but not excessive amount of grease to
the exposed portion of all mechanical cables.
7. Move the X-beam to the rear of the machine and apply grease to all exposed cables on the left
and right sides of the machine.
8. Move the X-beam to the front of the machine and apply grease to all exposed cables on the
left and right sides of the machine.
9. Move the Z-head to the left side of the X-beam and apply grease to all exposed cables on the
X-beam.
10. Move the Z-head to the right side of the X-beam and apply grease to all exposed cables on
the X-beam.
11. While an assistant is moving the X-beam SLOWLY in the Y-direction from bump stop to
bump stop, apply grease to the exposed cables near the Y-motor drive pulley.
12. While an assistant is moving the X-beam SLOWLY in the X-direction from bump stop to
bump stop, apply grease to the exposed cables near the X-motor drive pulley.
NOTE Do not apply grease directly to the drive pulleys or cable pulleys as this will over
grease the mechanics.
13. Manually exercise the X/Y mechanics fully in all directions.
14. Wipe excess grease off drive pulleys, motor pulleys, cables, and frame.
15. When finished, replace the axis and cable covers.
16. Ensure adequate clearance between the pulley assemblies and side covers.
7.10.2 Lubricating the X-Y Linear Guides
To load the grease gun:
1. Pull back on the handle at the bottom of the grease gun cylinder until the locking tabs
are visible.
2. Twist the lock into position.
3. Unscrew and remove the top of the grease gun.

7-10 Maintenance
4. Remove the blue cap from the grease cartridge and place it, open end down, into the grease
gun cylinder.
5. Remove the seal from the bottom of the grease cartridge by pulling the tab.
6. Replace the top of the grease gun.
7. Screw the extension into the front side at the top of the grease gun.
8. Release the handle from the locked position.
9. Purge the air from the grease gun cartridge by dispensing grease into a waste receptacle until
a solid stream flows from the gun.
To lubricate the linear guides:
1. Perform a service shutdown as specified in 2.12 Service Shutdown.
2. Manually move the robot to the front of the dispensing area.
3. Remove the X- and Y-axis covers. See 7.9 Removing the Axis Covers.
WARNING! Use Personal Protective Equipment when working with cleaning and lubrication
materials. Refer to the applicable MSDS. Remove all spills and properly dispose
of contaminated materials.
4. Using an ammonia-based cleaner and a soft cloth, clean and wipe the X- and Y-rails.
Manually move the robot as necessary to reach all parts of the rails.
5. Locate the grease fitting on each of the four X-beam Linear Bearing Cars and four Y-rail
Linear Bearing Cars (Figure 7-8 and Figure 7-9).
6. Attach grease gun to each fitting and pull the grease gun lever one time to squirt grease into
the bearing.
7. Use a soft cloth to clean up any excess grease.
8. Replace the X- and Y-axis covers
9. Power on the coating system.
10. Use the Fluidmove position controls to move the robot back and forth in both the X-axis and
the Y-axis.
11. Open the hood and use a soft cloth to remove any excess grease along the rails.