SL940-Install-Ops-Maintenance-7210918_B.pdf - 第77页
Pow er - up an d Test in g 4- 17 4.14 Conve yor Functio n To check function of the C onveyo r: 1. Load a sam ple work piece ( includ ed in th e acces sories crate) o nto the convey or port. If necessa ry, ad just the d…

4-16 Power-up and Testing
The Robot Utilities commands are described in Table 4-3.
Table 4-3 ECXP Robot Utilities Commands
ECXP Command Description
Home Robot Sends the Robot to the XYZ machine origin.
Terminal
Displays a terminal window that is used to send ACL commands to the
Robot Controller. The ACL commands are immediately executed.
Analog Outputs This feature allows you to adjust air pressure settings.
Restore Defaults
Clears the Robot Controller memory and prompts you to load the ACL file
included on the Calibration/Restoration disk. This action restores the
default Robot personality parameters. Use this utility only if the Controller
memory becomes corrupted.
Download ACL
Sends the designated ACL file to the Robot Controller. The file is
immediately executed.
Tension
Procedure
NOT USED ON THE SL-940E/SL-941E. Used to run the Century 74X
tension procedure.
Power-up and Testing 4-17
4.14 Conveyor Function
To check function of the Conveyor:
1. Load a sample workpiece (included in the accessories crate) onto the conveyor port.
If necessary, adjust the distance between the conveyor rails to fit the sample workpiece.
Refer to 5.7 Conveyor Operations.
2. Select
Edit > Edit Mode from the ECXP Operator Screen to access the ECXP Edit Screen.
3. Select
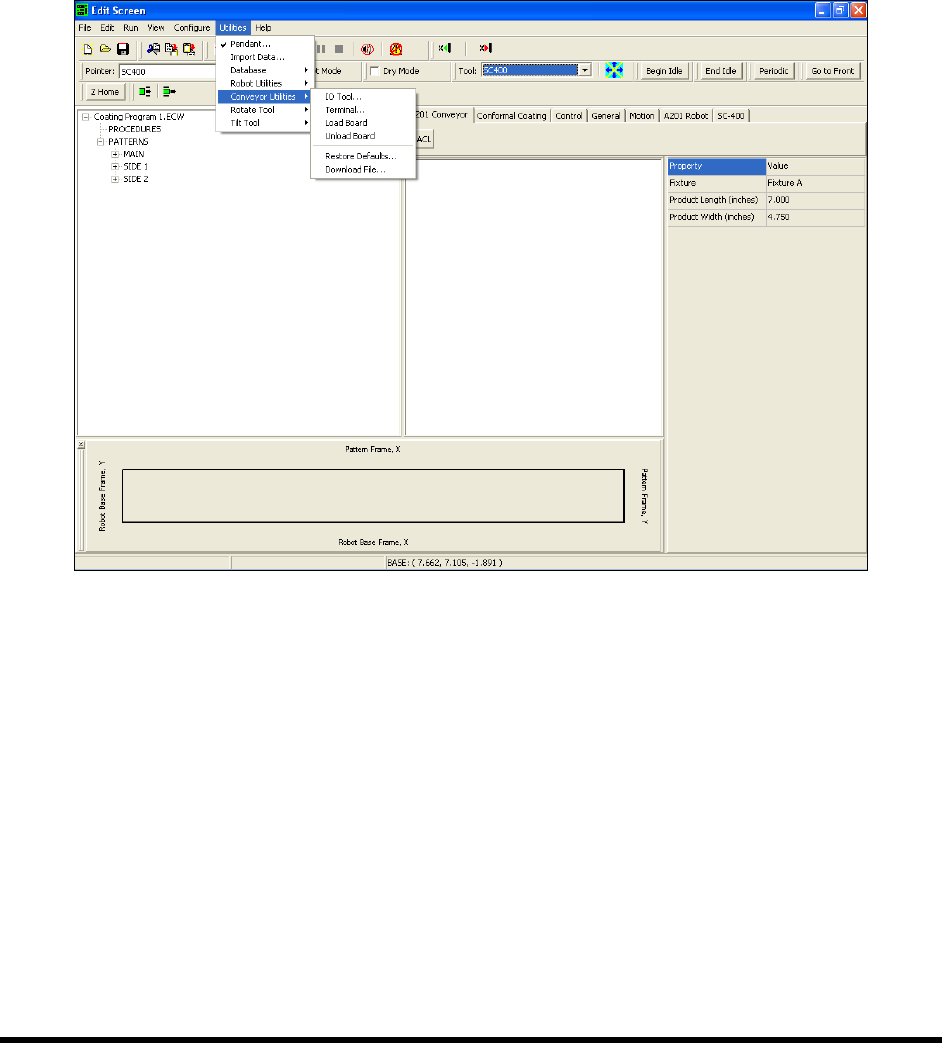
Utilities > Conveyor Utilities > IO Tool from the menu bar (Figure 4-13).
Figure 4-13 ECXP Edit Screen - Conveyor Utilities
4. Locate the I/O labeled Left Sense (Figure 4-7).
5. Manually move the workpiece under the Board Sensor.
6. Watch the Left Sense bit in the I/O Test dialog box and make sure that it toggles
ON and OFF
as the workpiece passes under the sensor.
If the bit does not toggle ON and OFF, the sensor location may need to be adjusted. Refer
to Section 8 - Troubleshooting.
7. Repeat Steps 5 through 6 for each Board Sensor on your coating system.
8. Click on
Utilities > Conveyor Utilities > Load Board.
4-18 Power-up and Testing
9. Make sure that the stop pins function correctly during the loading process.
If they do not function correctly, refer to Section 8 - Troubleshooting.
10. Click on
Utilities > Conveyor Utilities > Unload Board.
11. Make sure that the stop pins function correctly during the unloading process.
If they do not function correctly, refer to Section 8 - Troubleshooting.
4.14.1 ECXP Conveyor Utilities
In addition to the IO Tool described earlier in this section, the following ECXP commands, shown in
Table 4-4, may also be used to test and set up the Conveyor. To access the Utilities menu, click on
Edit > Edit Mode from the ECXP Operator Screen. To access the Conveyor Utilities commands, click on
Utilities > Conveyor Utilities from the ECXP Edit screen menu bar (Figure 4-13).
Table 4-4 ECXP Conveyor Utilities Commands
ECXP Command Description
Terminal
Displays a terminal window that is used to send ACL commands to the
Conveyor Controller.
Load Board
Requests a board from the upstream machine and loads it into the
workcell.
Unload Board Moves the current board on the Conveyor out of the workcell.
Restore Defaults
Resets the Conveyor configuration parameters to the factory defaults.
USE THIS FEATURE ONLY IF THE CONTROLLER MEMORY IS
CORRUPT.
Download File
Sends the designated file to the Conveyor Controller. The file is
immediately executed.
4.14.2 Inverter
If the Conveyor is equipped with an inverter, use the following ECXP command to test the inverter. To
access the Utilities menu, click on
Edit > Edit Mode from the ECXP Operator Screen. The command
described below is accessed from the ECXP Edit screen menu bar
1. Click on
Utilities > Inverter to move the currently loaded board into the Inverter.
2. Verify that the inverter flips or rotates the board.