SL940-Install-Ops-Maintenance-7210918_B.pdf - 第75页
Pow er - up an d Test in g 4- 15 4.13 Robot (Dis pensing He ad) Functi on 1. Verify that the di spensing area front door is closed. The beacon lig ht should be green. 2. Use the ECXP software to move the Robot in the X…

4-14 Power-up and Testing
To check the function of the Reservoir Pressure Regulator and Gauge:
1. Locate the Reservoir Pressure Regulator adjustment knob inside the front cabinet.
2. Unlock the knob by pulling it outward.
3. Rotate the Reservoir Pressure Regulator adjustment knob counterclockwise until the
Reservoir Pressure Gauge registers 0 psi.
4. Rotate the knob clockwise until the Reservoir Pressure Gauge registers 60 psi (413 kPa).
TIP For accurate pressure adjustment, lower the pressure below the desired level and then
increase to the desired pressure.
If there is an air leak, identify the source, shut off the facility air, and fix the leak before
proceeding.
5. Lock the knob by pushing it inward.
Item Description
1 Reservoir Pressure Gauge
2 Reservoir Pressure Regulator
Figure 4-11 Fluid Pressure Pneumatic Controls
2
1
Power-up and Testing 4-15
4.13 Robot (Dispensing Head) Function
1. Verify that the dispensing area front door is closed.
The beacon light should be green.
2. Use the ECXP software to move the Robot in the XY and Z-axes. See 5.9 Positioning the
Robot.
NOTE Make sure that the robot does not encounter any obstacles or is restricted by air
hoses or cables as it moves around the dispensing area.
4.13.2 Testing the EMO
1. Press the EMO button on the front panel.
2. Verify that power has been cut to the coating system by testing the front panel controls.
If front panel controls are still active, contact Asymtek Technical Support.
3. Turn the
EMO button clockwise until it pops back out.
4. Press
Start on the front panel.
The robot should move to the extreme front left corner of the dispensing area.
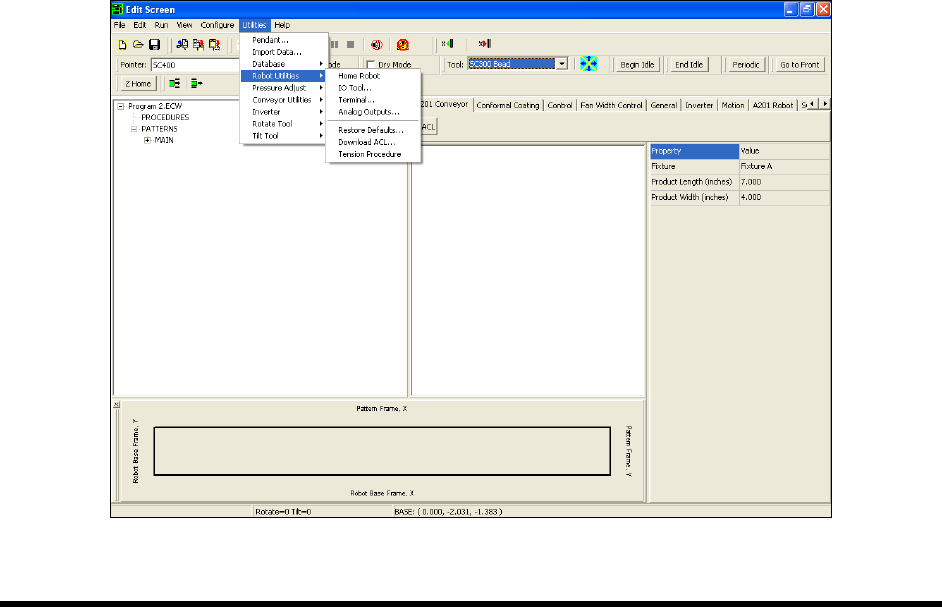
4.13.3 ECXP Robot Utilities
In addition to the IO Tool described earlier in this section, the following ECXP commands may also be
used to test the Robot. To access the Utilities menu, click on
Edit > Edit Mode from the ECXP Operator
Screen. To access the Robot Utilities commands, click on
Utilities > Robot Utilities from the ECXP Edit
screen menu bar (Figure 4-12).
Figure 4-12 ECXP Edit Screen – Robot Utilities

4-16 Power-up and Testing
The Robot Utilities commands are described in Table 4-3.
Table 4-3 ECXP Robot Utilities Commands
ECXP Command Description
Home Robot Sends the Robot to the XYZ machine origin.
Terminal
Displays a terminal window that is used to send ACL commands to the
Robot Controller. The ACL commands are immediately executed.
Analog Outputs This feature allows you to adjust air pressure settings.
Restore Defaults
Clears the Robot Controller memory and prompts you to load the ACL file
included on the Calibration/Restoration disk. This action restores the
default Robot personality parameters. Use this utility only if the Controller
memory becomes corrupted.
Download ACL
Sends the designated ACL file to the Robot Controller. The file is
immediately executed.
Tension
Procedure
NOT USED ON THE SL-940E/SL-941E. Used to run the Century 74X
tension procedure.