SL940-Install-Ops-Maintenance-7210918_B.pdf - 第149页
Parts Replacement 9-1 9 Part s Replacement 9.1 Overvi ew This sec tion includ es g eneral i nform ation for orderi ng recom m ended spare s and re placem ent parts for your Sele ct Coa t SL - 940E/S L-941E Series C onfor…
8-4 Troubleshooting
8.4.4 Vision System
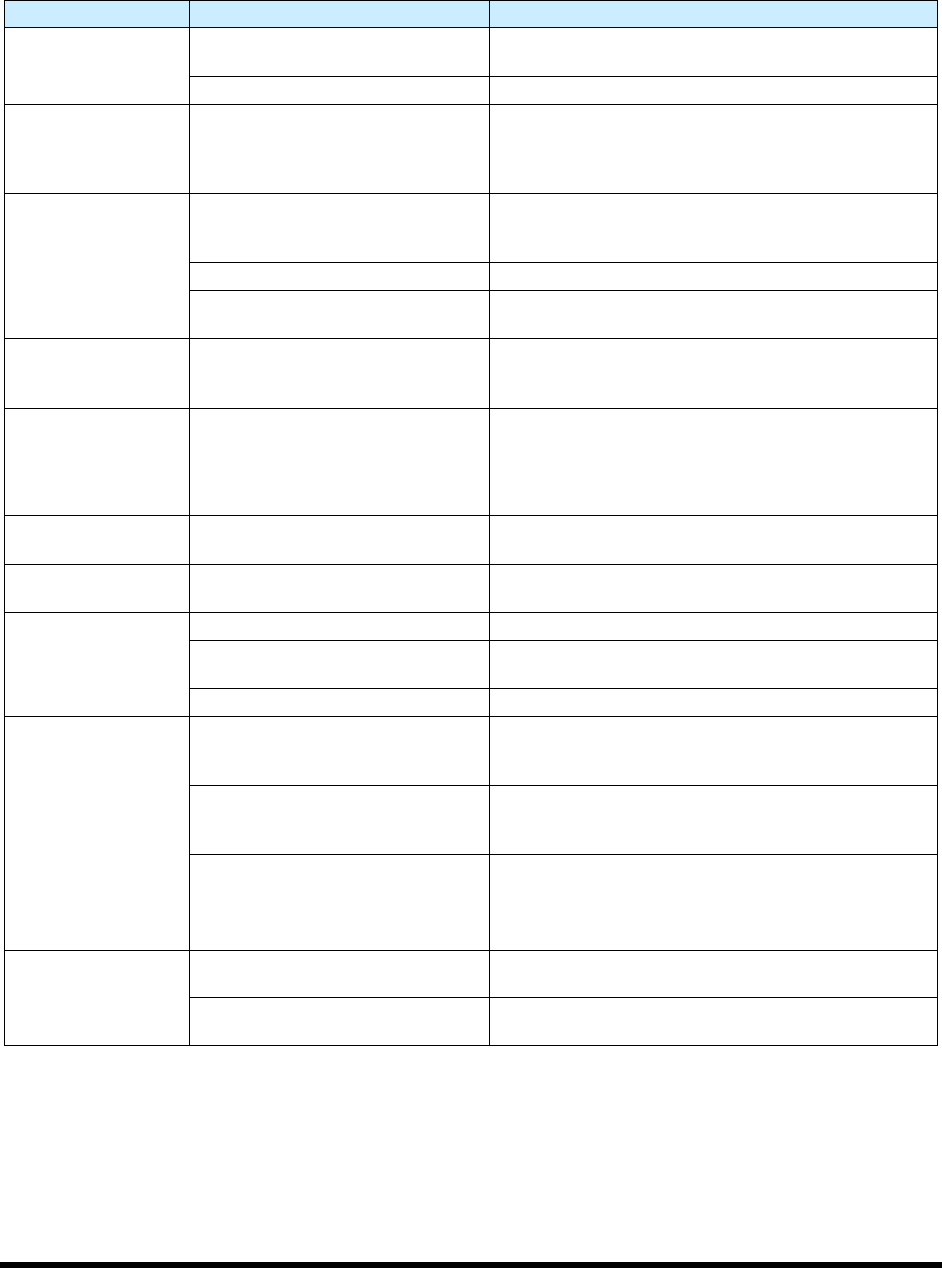
Table 8-4 Vision System Troubleshooting
Symptom Possible Cause Recovery
No Image (ECXP
display window is a
solid pink color)
Camera not connected
Verify camera cable is securely connected to the
connector on the top of the camera.
Faulty camera cable Replace camera cable.
CorAcq Error on
Startup
Camera software did not connect
to camera before ECXP was
started.
Close ECXP and wait until Device available icon is
present in toolbar at lower right corner of screen. If
necessary, right click on device IP error icon and left
click on “find devices”.
Camera LEDs are
OFF
Camera not connected
Verify camera power cable is securely connected to
the connector on the top of the camera and to the
accessories/main board in the Electronics Pan.
Faulty camera cable Replace camera cable.
Machine is not receiving power
Make sure that machine is plugged in, power
manager is on, and green power button is lit.
Camera LED
Steady Red
Camera not initialized
It may take several minutes for the camera to acquire
a connection with the laptop. DO NOT attempt to run
ECXP or DALSA programs during this time.
Camera LED Slow
Flashing Red
Camera Initialization problem
1. Shutdown the computer and turn off power to the
machine.
2. Restart the machine, and then the computer.
3. If necessary, contact a service technician.
Camera LED Fast
Flashing Red
Camera overheated Contact a service technician.
Camera LED Fast
Flashing Blue
Ethernet cable disconnected
Verify Ethernet cable is securely connected to the
camera and computer.
No Image (ECXP
display window is
dark or black)
F-Stop is completely closed. Restore lighting by turning F-Stop ring.
Lens is blocked by foreign matter
Remove and inspect the camera lens. If necessary,
replace lens. See 9.9 Replacing the Camera Lens.
Lens cover is still on. Remove lens cover.
Unfocused image
Substrate is not within height
focus limits of the camera or the
lens is loose
Adjust camera bracket and/or focal ring. See 5.16
Focusing the Camera.
Lens is damaged or there is
foreign matter on the lens
Remove and inspect the camera lens. If lens is
damaged or dirty, contact a service technician. See
9.9 Replacing the Camera Lens.
1.5mm Spacer ring is absent.
Spacer ring should be located
between camera lens and camera
body.
Locate and return spacer ring. See 9.8 Replacing
Camera Lens.
If spacer ring cannot be located, contact service
technician for part number to order replacement.
No monitor display
Computer power switch OFF (0) Turn ON (I) computer power switch.
Computer is asleep.
Press and release computer power switch to wake up
computer.

Parts Replacement 9-1
9 Parts Replacement
9.1 Overview
This section includes general information for ordering recommended spares and replacement parts for
your Select Coat SL-940E/SL-941E Series Conformal Coating System. Part numbers can be found in
Appendix C. This section also contains the following procedures:
• Parts Ordering Information
• Unpacking and Inspecting Replacement Parts
• Gaining Access to Coating System Components
• Replacing Conveyor Chains
• Replacing the Camera Lens
• Replacing Fuses
NOTE This section does not include the removal and replacement of coating applicator
components. Refer to the manual for your specific coating applicator for recommended
maintenance procedures.
9.2 Safety First
Operation of the SL-940E/SL-941E involves heat, air pressure, electrical power, mechanical devices, and
the use of hazardous materials. It is essential that every person servicing or operating the coating system
fully understands all hazards, risks, and safety precautions. Refer to Section 2 - Safety for additional
information.
WARNING! CAUTION!
To ensure optimal performance and safety, it is necessary to install the coating
system and its components in a facility that meets the necessary requirements
listed in Section 10 - Specifications. If you have any questions, please contact
Asymtek Technical Support.
9.3 Record Keeping
The type of service performed should be recorded in the coating system maintenance records. Dates, part
numbers/serial numbers of replaced parts, names of technicians, and other pertinent data should be
recorded.
WARNING! Some part replacement procedures involve the use and disposal of hazardous
materials. Always follow the material manufacturer MSDS, facility requirements,
and local regulations for protection of personnel and disposal of materials.

9-2 Parts Replacement
9.4 Parts Ordering Information
9.4.1 Placing Your Order
Customers can order spare parts by contacting Asymtek Customer Service. Your Customer Service
Representative can take your order or assist you in setting up an account to purchase spare parts through
our Internet Web Store. When ordering parts, be prepared to provide the following information:
Your Company Name Billing Address
Shipping Address Part Number and Description of Part
Purchase Order Number Quantity
Coating System Serial Number
(found on back panel)
Shipping Instructions with Collect
Account Number
NOTE Find Customer Service contact information in the front of this manual or click on
Customer Service on Asymtek web page www.asymtek.com.
9.4.2 Shipping Instructions
When ordering parts, specify which carrier you prefer to use and provide your shipping account number.
If no instructions are received, Asymtek will determine the best shipping method and items will be
shipped prepaid with the shipping charge added to the invoice.
9.4.3 Warranty
Contact Asymtek Technical Support for any warranty issues pertaining to spare parts.
9.4.4 Credit and Exchanges
Contact Asymtek Customer Service for credit or exchanges of recommended spare parts or refurbished
components (components restored to original specifications but not sold as new).
9.4.5 Return Material Authorization
Contact Asymtek Technical Support to obtain a Return Material Authorization (RMA) before returning
any parts
.
NOTE Find your local Technical Support contact on the Asymtek web page,
www.asymtek.com/support.htm.