YSP20_Users_E.pdf - 第116页
4-24 4 aily operation 3 Displa y the oper ation monitor as required. When you want to confirm the operation status during production, press the [Monitor] button in the main menu button area. Different types of producti…
4-23
4
aily operation
9. Starting board production
When solder rolling is finished, start production as follows.
1
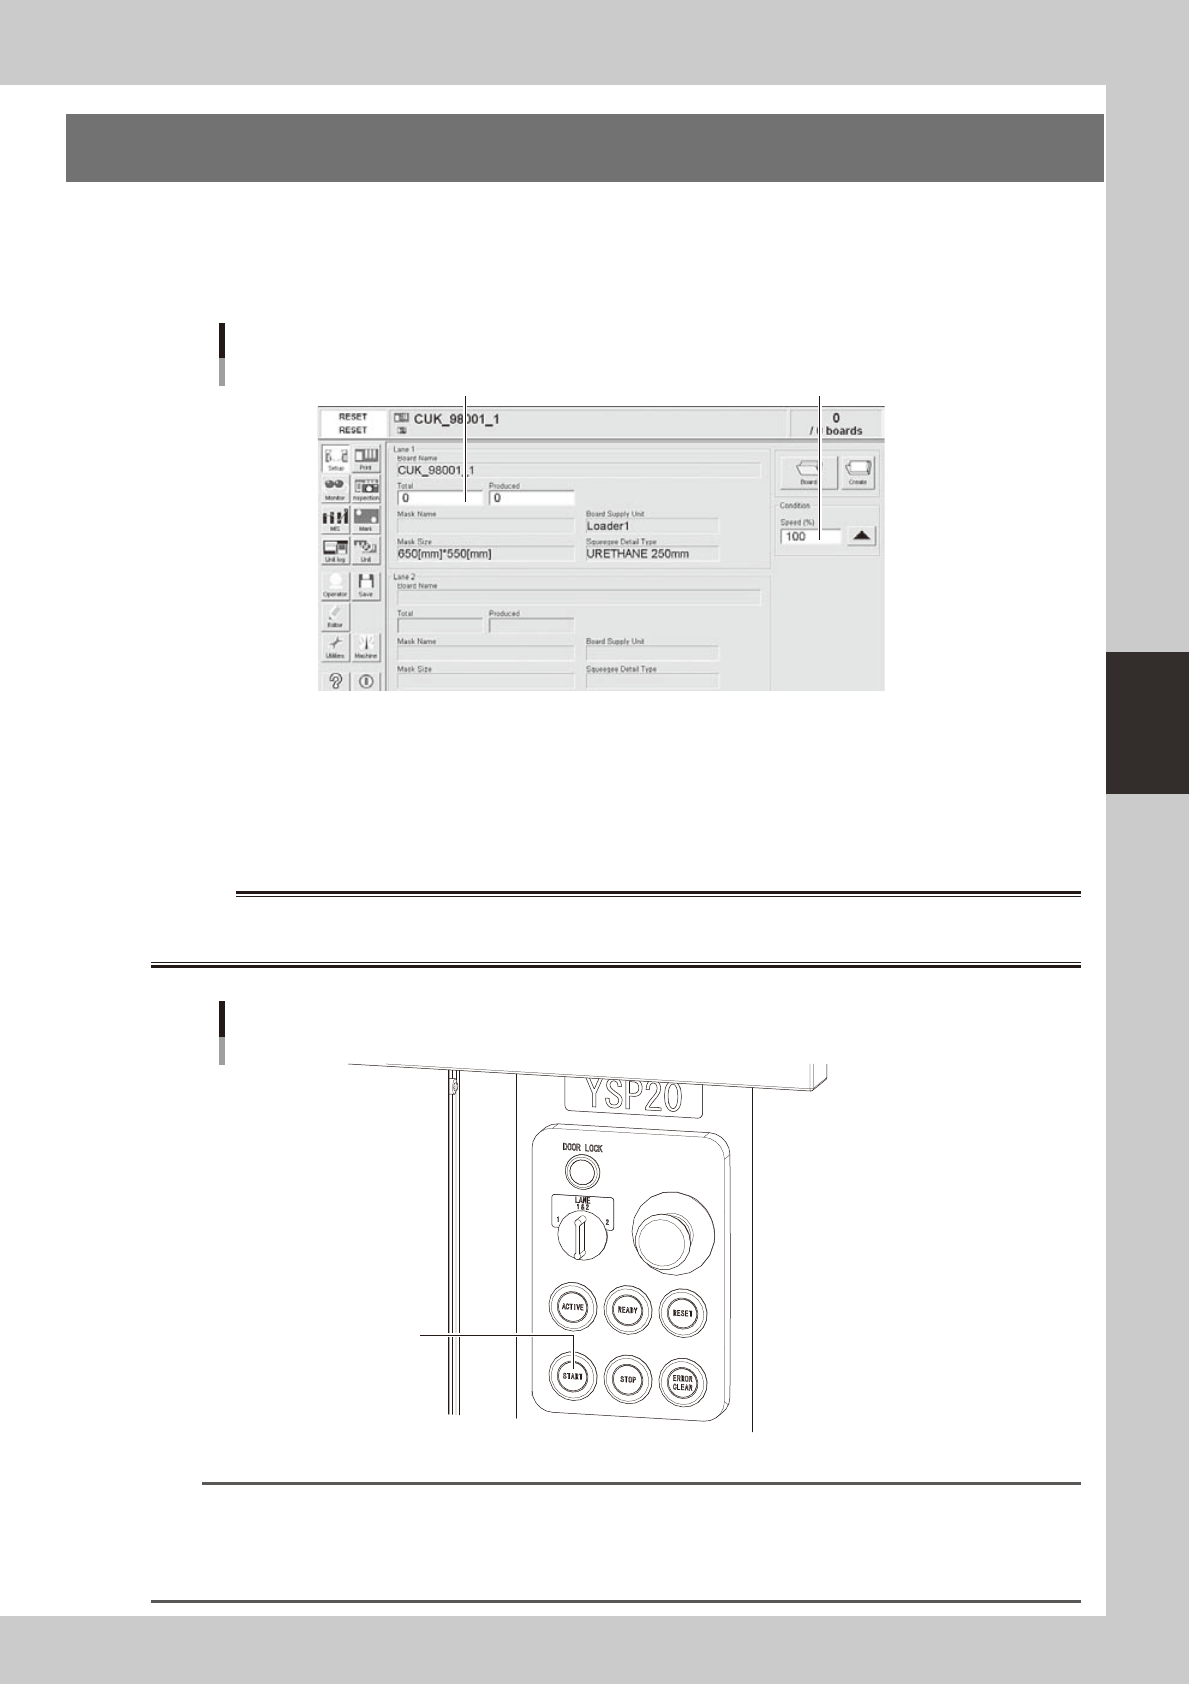
Open the Setup screen and set the operating conditions.
Set the total number of boards to be produced and the operation speed.
Setup screen
Set the operation speed (%).
Set the total number of boards to be produced.
64414-N3-00
2
Start operation.
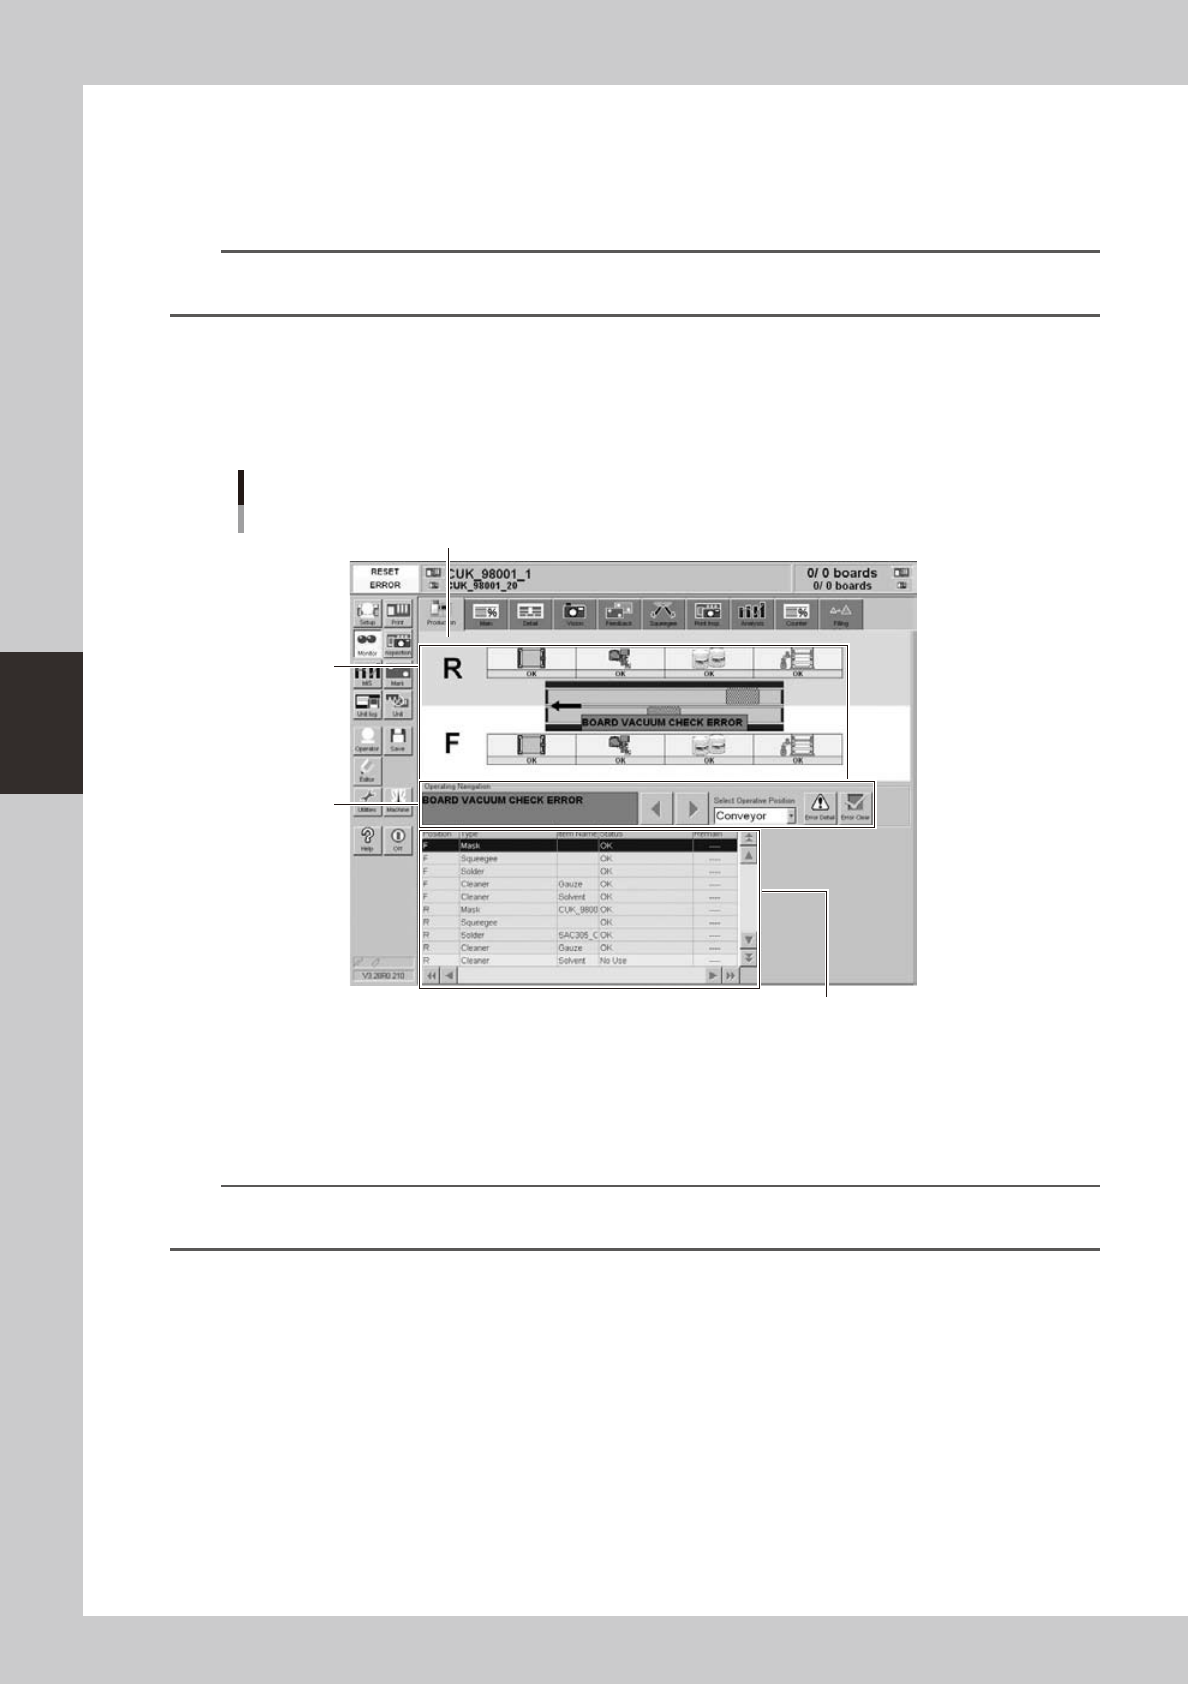
1. Release the emergency stop button, and press the [READY] button on the operation panel.
2. Check that the surrounding area is safe and then press the [START] button on the operation panel.
3. When the entrance sensor detects the board, the conveyor belt will start rotating. The board will
then be transferred to the printing position and solder printing will start.
w
WARNING
[START] button
Operation panel
63425-N3-00
TIP
When the "Cleaning Method" parameter (on the [Print]-[Cleaner] tab) is set to "Auto", the mask is automatically
cleaned every time that the specified number of boards has been produced (or at specified time intervals). To stop
production during automatic operation, press the [STOP] key on the operation panel. If you want to stop production
after printing and unloading the current board, press the [Convey-out Stop] button on the Setup screen. (See "10.
Finishing board production" in this chapter.)
4-24
4
aily operation
3
Display the operation monitor as required.
When you want to confirm the operation status during production, press the [Monitor] button in the
main menu button area.
Different types of production information can be confirmed by selecting the [Production], [Main],
[Vision], [Squeegee] tabs, etc.
TIP
When both lanes are used for production, the [Lane] button is displayed on the [Main], [Output], [Fiducial] and
[Badmark] tabs.
l
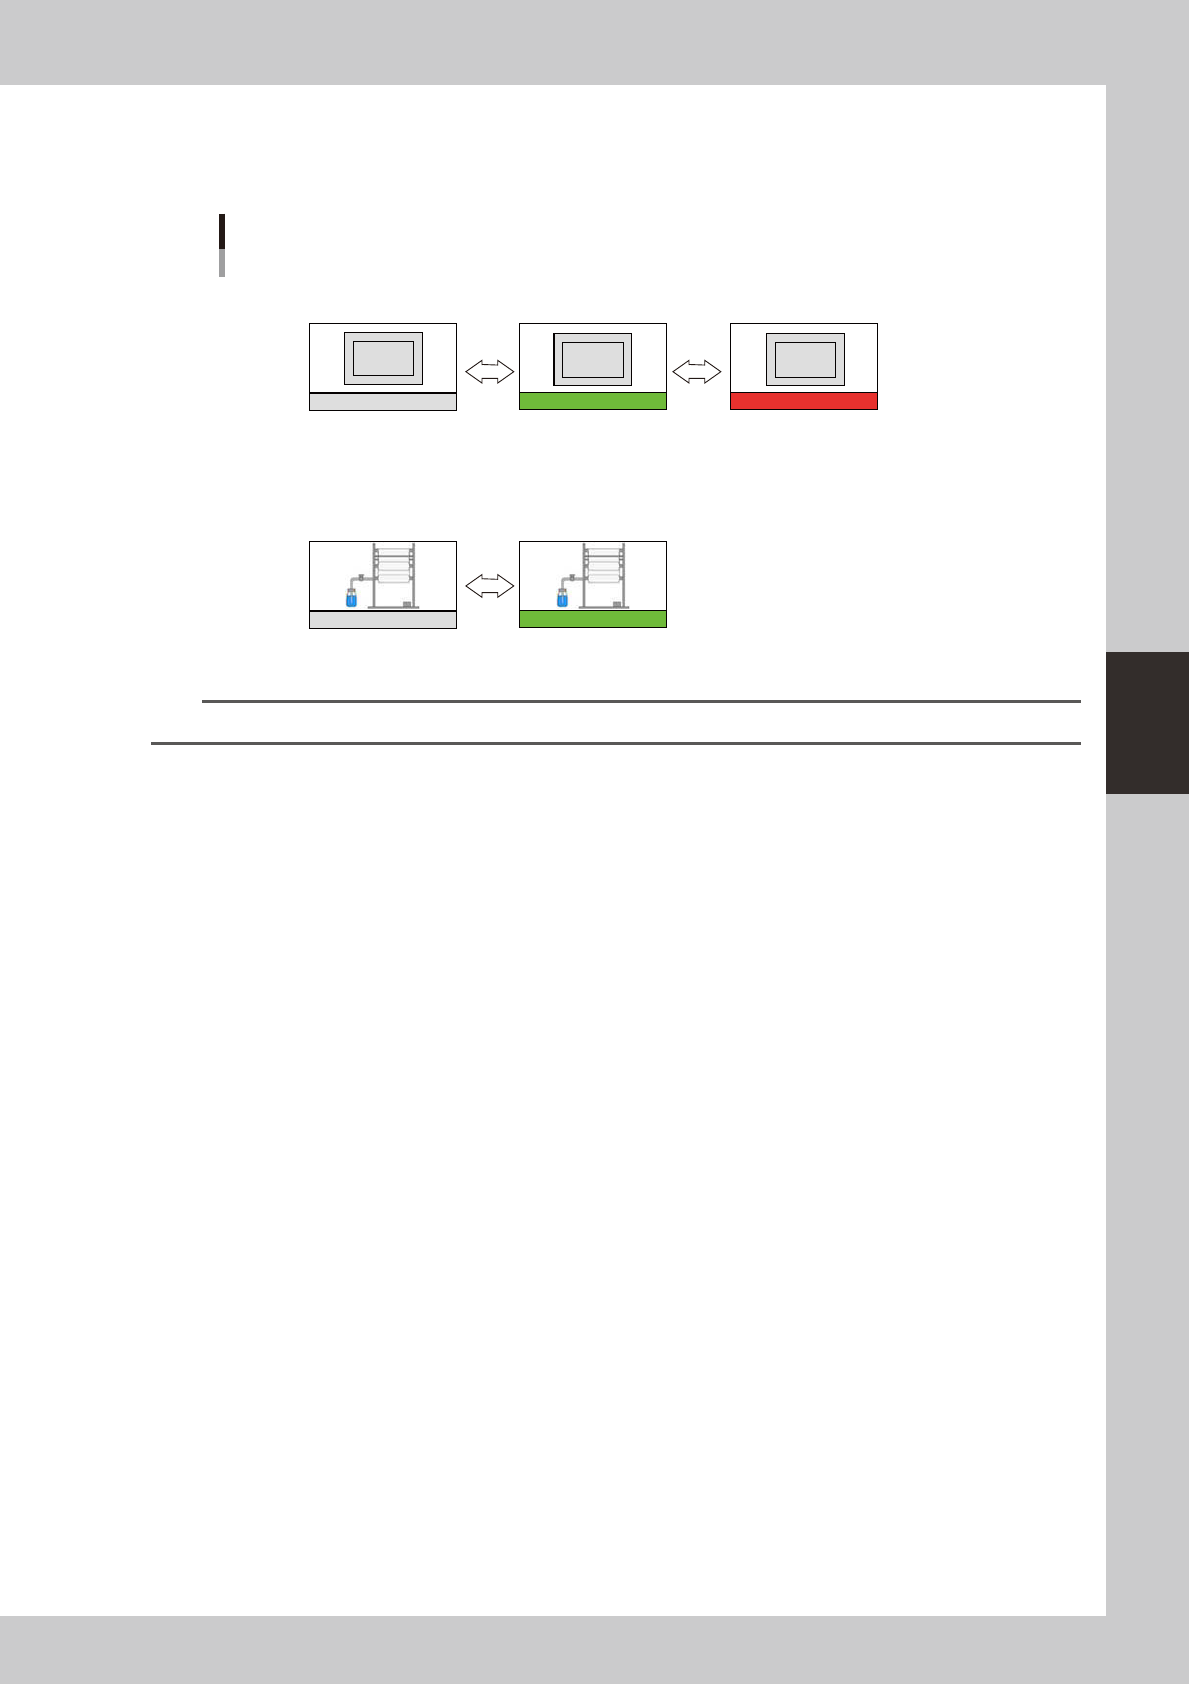
Monitor: Production
This screen shows the status of machines currently producing boards. Real-time information is displayed on the
machine layout view as shown below. When an error occurs on the machine, open this screen to check status
information such as what type of error occurred, operating instructions, and warnings, etc.
[Monitor]-[Production] tab
2
3
1
Shows the machine rear as a colored background.
64423-N3-10
1. Operating instruction area
• Select Operating Position drop-down list
When an error, operating instruction or warning occurs, select the position showing an error from this drop-down list.
Only positions requiring an operator task are displayed in the drop-down list.
TIP
You can select the operating position by clicking the error area on the layout view. However the operating position
cannot be selected if you click on an area where there are no errors, operating instructions or warnings.
• Operating Navigation instructions
This displays messages with countermeasures for handling errors, operating instructions or warnings at operating position
selected with the "Select Operating Position" drop-down list. When multiple errors occur, those items with the highest
priority for countermeasures are displayed in sequence. To switch to other instruction messages, press the left/right arrow
buttons.
[Error Detail] button
Pressing this button displays an error message dialog that contains detailed information and countermeasures for the
error and operating instruction, or warning displayed in the "Operating Navigation" area.
[Error Clear] button
Press this button after recovering from the error or after handling the operating instruction or warning displayed in the
"Operating Navigation" area. Pressing this button shows that recovery is complete by following the message in the
"Operating Navigation" area, and that automatic operation can restart. However, automatic operation will not restart if a
recovery task is still incomplete (other than warnings).
4-25
4
aily operation
2. Setup status area
Displays the current setup status of the mask and cleaner unit. The color of status bar changes if an error
occurs.
[Monitor]-[Production] tab
Setup status area
Mask
Cleaner
No mask is clamped
(Mask is not used)
Mask is clamped (green) Mask is not clamped (red)
(Mask is used)
Cleaner is used (green)Cleaner is not used
OK NG
No Use
No Use
OK
64424-N3-00
TIP
If an error has occurred on the entire machine then the entire area background is displayed in blue.
3. Detailed information area
This shows a list of all items displayed in the setup status area.