YSP20_Users_E.pdf - 第254页
2-10 2 Inspection and maintenance 3. Replacing the consumable par ts 3.1 Replacing the squeegee unit When replacing the squeegee as a unit, install a new unit after the currently used unit has been removed b y loosening …
2-9
2
Inspection and maintenance
5
Reconnect the air hose to the air
coupler.
After connecting the air hose, check that no
air is leaking.
n
NOTE
Leave the filter cup removed to clean the air coupler
as explained in the next procedure.
n
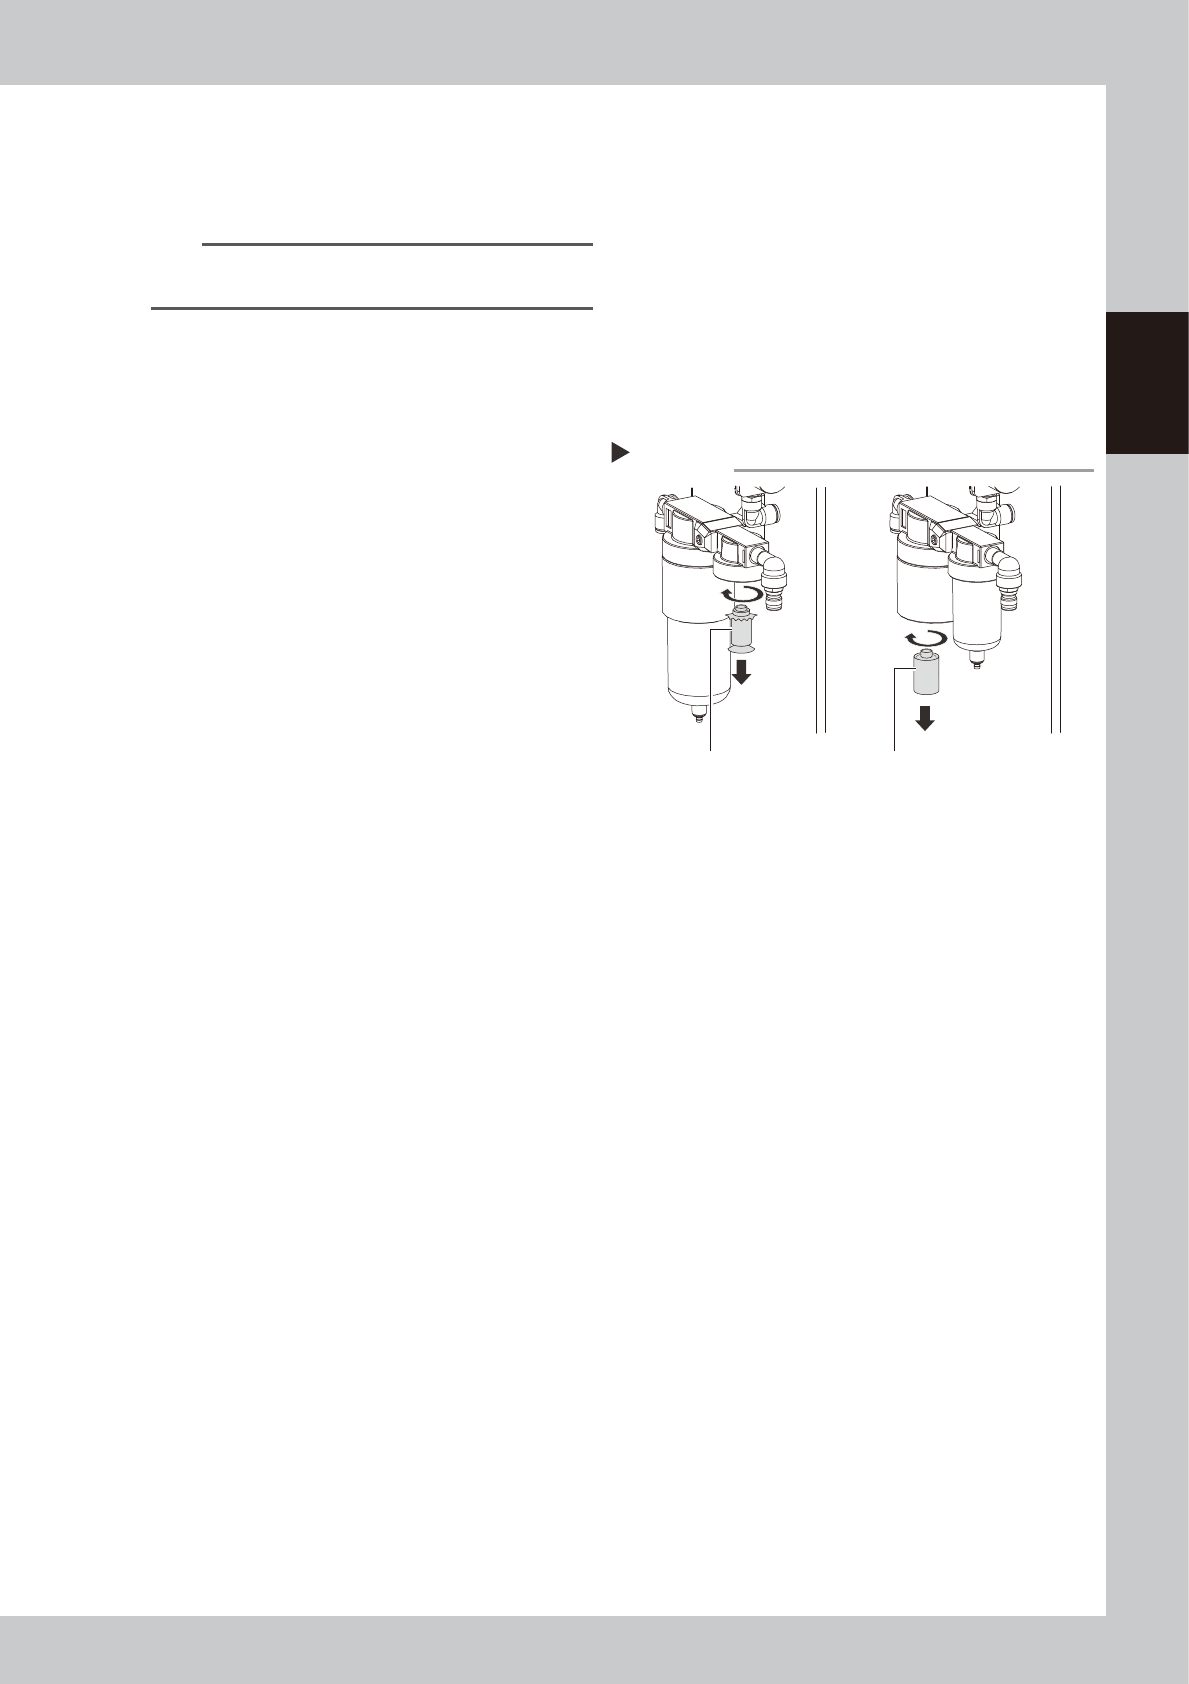
Cleaning the air/mist filters
1
Remove the filter cup.
See the previous procedure in "Cleaning the
filter cup".
2
Remove the filter.
Remove the filter by turning it.
53205-N3-00
3
Clean the filter element.
Use an air blow gun to blow away dust and
impurities trapped by the filter element. If
the filter is excessively dirty and cannot be
cleaned, replace it with a new filter.
4
Reattach the filter.
5
Reattach the filter cup.
6
Reconnect the air hose to the air
coupler.
After connecting the air hose, check that no
air is leaking.
Removing thefilter
Step 2
MIST FILTER ELEMENT FILTER ELEMENT
2-10
2
Inspection and maintenance
3. Replacing the consumable parts
3.1 Replacing the squeegee unit
When replacing the squeegee as a unit, install a new unit after the currently used unit has been removed by
loosening the mount knobs on the squeegee to be replaced.
n
3S squeegee (Unit)
Squeegee unit Part No. Part name Q'ty Notes
Metal
(METAL 3S)
KHT-M71A0-00X METAL ASSY,3S 530 1 Squeegee length, 530 mm
KHT-M71A0-10X METAL ASSY,3S 440 1 Squeegee length, 440 mm
KHT-M71A0-20X METAL ASSY,3S 400 1 Squeegee length, 400 mm
KHT-M71A0-30X METAL ASSY,3S 350 1 Squeegee length, 350 mm
KHT-M71A0-40X METAL ASSY,3S 300 1 Squeegee length, 300 mm
KHT-M71A0-50X METAL ASSY,3S 250 1 Squeegee length, 250 mm
Urethane
(URETHANE 3S)
KHT-M71B0-00X URETHANE ASSY,3S 530 1 Squeegee length, 530 mm
KHT-M71B0-10X URETHANE ASSY,3S 440 1 Squeegee length, 440 mm
KHT-M71B0-20X URETHANE ASSY,3S 400 1 Squeegee length, 400 mm
KHT-M71B0-30X URETHANE ASSY,3S 350 1 Squeegee length, 350 mm
KHT-M71B0-40X URETHANE ASSY,3S 300 1 Squeegee length, 300 mm
KHT-M71B0-50X URETHANE ASSY,3S 250 1 Squeegee length, 250 mm
n
Double squeegee (Unit)
Squeegee unit Part No. Part name Q'ty Notes
Metal
(METAL W-SQG)
KHT-M71C0-00X METAL ASSY,W-SQG.530 2 Squeegee length, 530 mm
KHT-M71C0-10X METAL ASSY,W-SQG.440 2 Squeegee length, 440 mm
KHT-M71C0-20X METAL ASSY,W-SQG.400 2 Squeegee length, 400 mm
KHT-M71C0-30X METAL ASSY,W-SQG.350 2 Squeegee length, 350 mm
KHT-M71C0-40X METAL ASSY,W-SQG.300 2 Squeegee length, 300 mm
KHT-M71C0-50X METAL ASSY,W-SQG.250 2 Squeegee length, 250 mm
Urethane
(URETHANE W-SQG)
KHT-M71E0-00X URE.ASSY,W-SQG.530 2 Squeegee length, 530 mm
KHT-M71E0-10X URE.ASSY,W-SQG.440 2 Squeegee length, 440 mm
KHT-M71E0-20X URE.ASSY,W-SQG.400 2 Squeegee length, 400 mm
KHT-M71E0-30X URE.ASSY,W-SQG.350 2 Squeegee length, 350 mm
KHT-M71E0-40X URE.ASSY,W-SQG.300 2 Squeegee length, 300 mm
KHT-M71E0-50X URE.ASSY,W-SQG.250 2 Squeegee length, 250 mm
c
CAUTION
Parts (Part No.) listed above is current as of the issue date of this manual. When ordering a replacement part, please
check for the latest information.
c
CAUTION
Part Nos. are subject to change without prior notice. When ordering a replacement part, contact your local sales
dealer to check its part No.
2-11
2
Inspection and maintenance
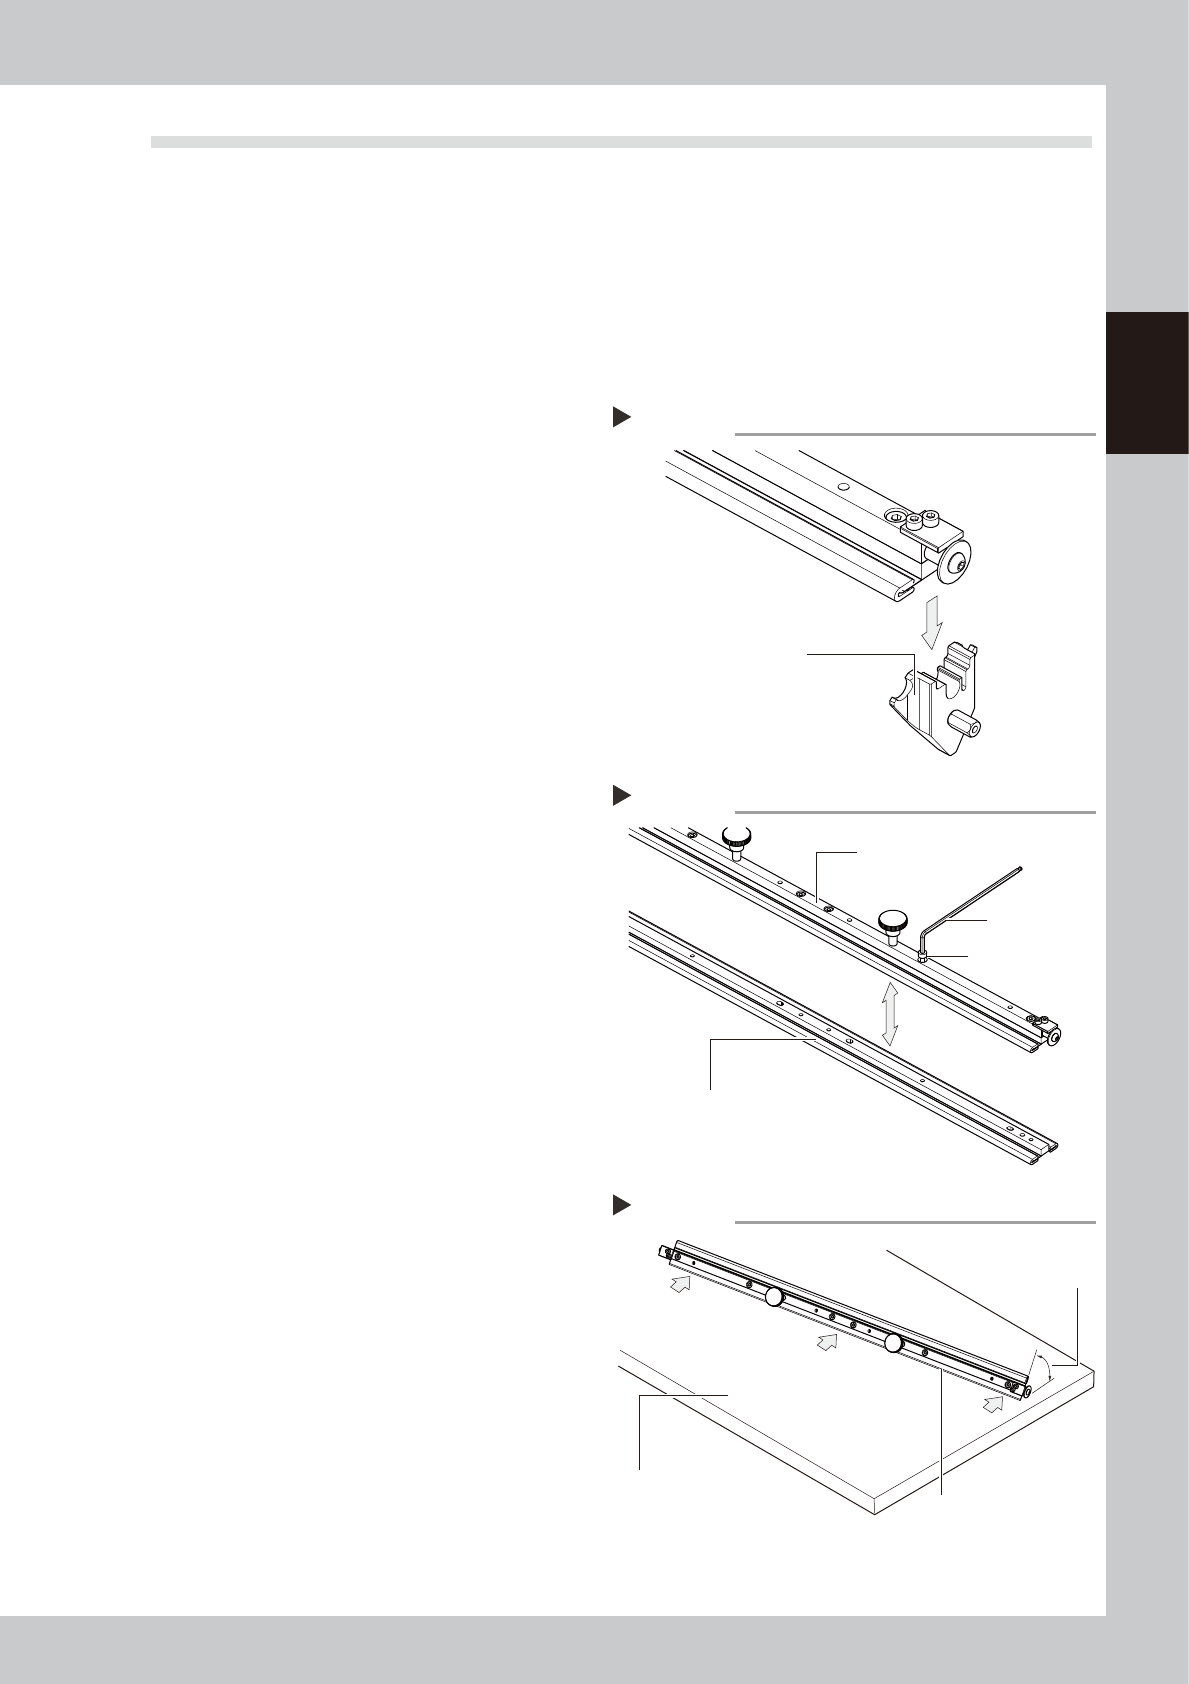
3.2 Replacing the squeegee scraper
For the squeegee of this machine, it is possible to replace only the squeegee scraper.
n
Items to be prepared
• Hex wrench (4mm)
3.2.1 Metal squeegee scraper
The solder scraper of the metal squeegee may collide with other object, causing deformation of the scraper. If
this happens, loosen the bolts that fasten the metal scraper from the top and replace it with a new one.
1
Remove the side plates.
Remove the side plates from both sides of
the squeegee as described in the figure on
the right.
53206-N3-00
2
Remove the squeegee frame.
Use an Allen wrench to remove the bolts
that fasten the squeegee frame and the
squeegee scraper to be replaced.
53207-N3-00
3
Attach a new squeegee scraper.
Attach a new squeegee scraper to the
squeegee frame and temporarily fasten
them with an Allen wrench.
4
Check if the squeegee scraper is
properly attached.
1. Place the squeegee scraper blade on a
surface plate or similar flat surface table,
at an angle close to the attack angle.
2. Check that there is no gap between the
blade and the flat surface at positions
indicated by arrow. If a gap is found,
loosen the mounting bolts and adjust to
eliminate the gap.
3. After adjustment, tighten the mounting
bolts securely.
53208-N3-00
5
Install the side plates.
Install the side plates you have removed in
the above step on the squeegee in the
reverse order of removal work.
Removing the side plates.
Step 1
Side plate
Removing the squeegee frame.
Step 2
Squeegee frame
Hex wrench
(4mm)
Mounting bolt
New squeegee scraper
Checking if the squeegee scraper is properly attached
Step 4
Surface plate or
similar flat surface table
Remove protective molding.
Angle close to
attack angle