YSP_Users_E.pdf - 第211页
7-2 7 Replacing the consumable parts 2. Replacing the squeegee 2.1 Replacing the unit When replacing the squeegee as a unit, install a new unit after the currently used unit has been removed b y loosening the mount knobs…

7-1
7
Replacing the consumable parts
1. Precautions
Be sure to observe the following precautions when replacing consumable parts.
• Parts replacement must be performed by or under the direction of person who has received training from YAMAHA or a
YAMAHA sales representative.
• Always turn off the power to the machine before replacing consumable parts.
• Be careful not to allow any foreign matter to penetrate inside the machine during parts replacement.
• When replacing parts, always use parts approved by YAMAHA or a YAMAHA sales representative.
• Do not modify any parts in the machine. Modification may result in poor performance or threaten operator safety.
7-2
7
Replacing the consumable parts
2. Replacing the squeegee
2.1 Replacing the unit
When replacing the squeegee as a unit, install a new unit after the currently used unit has been removed by
loosening the mount knobs on the squeegee to be replaced.
n
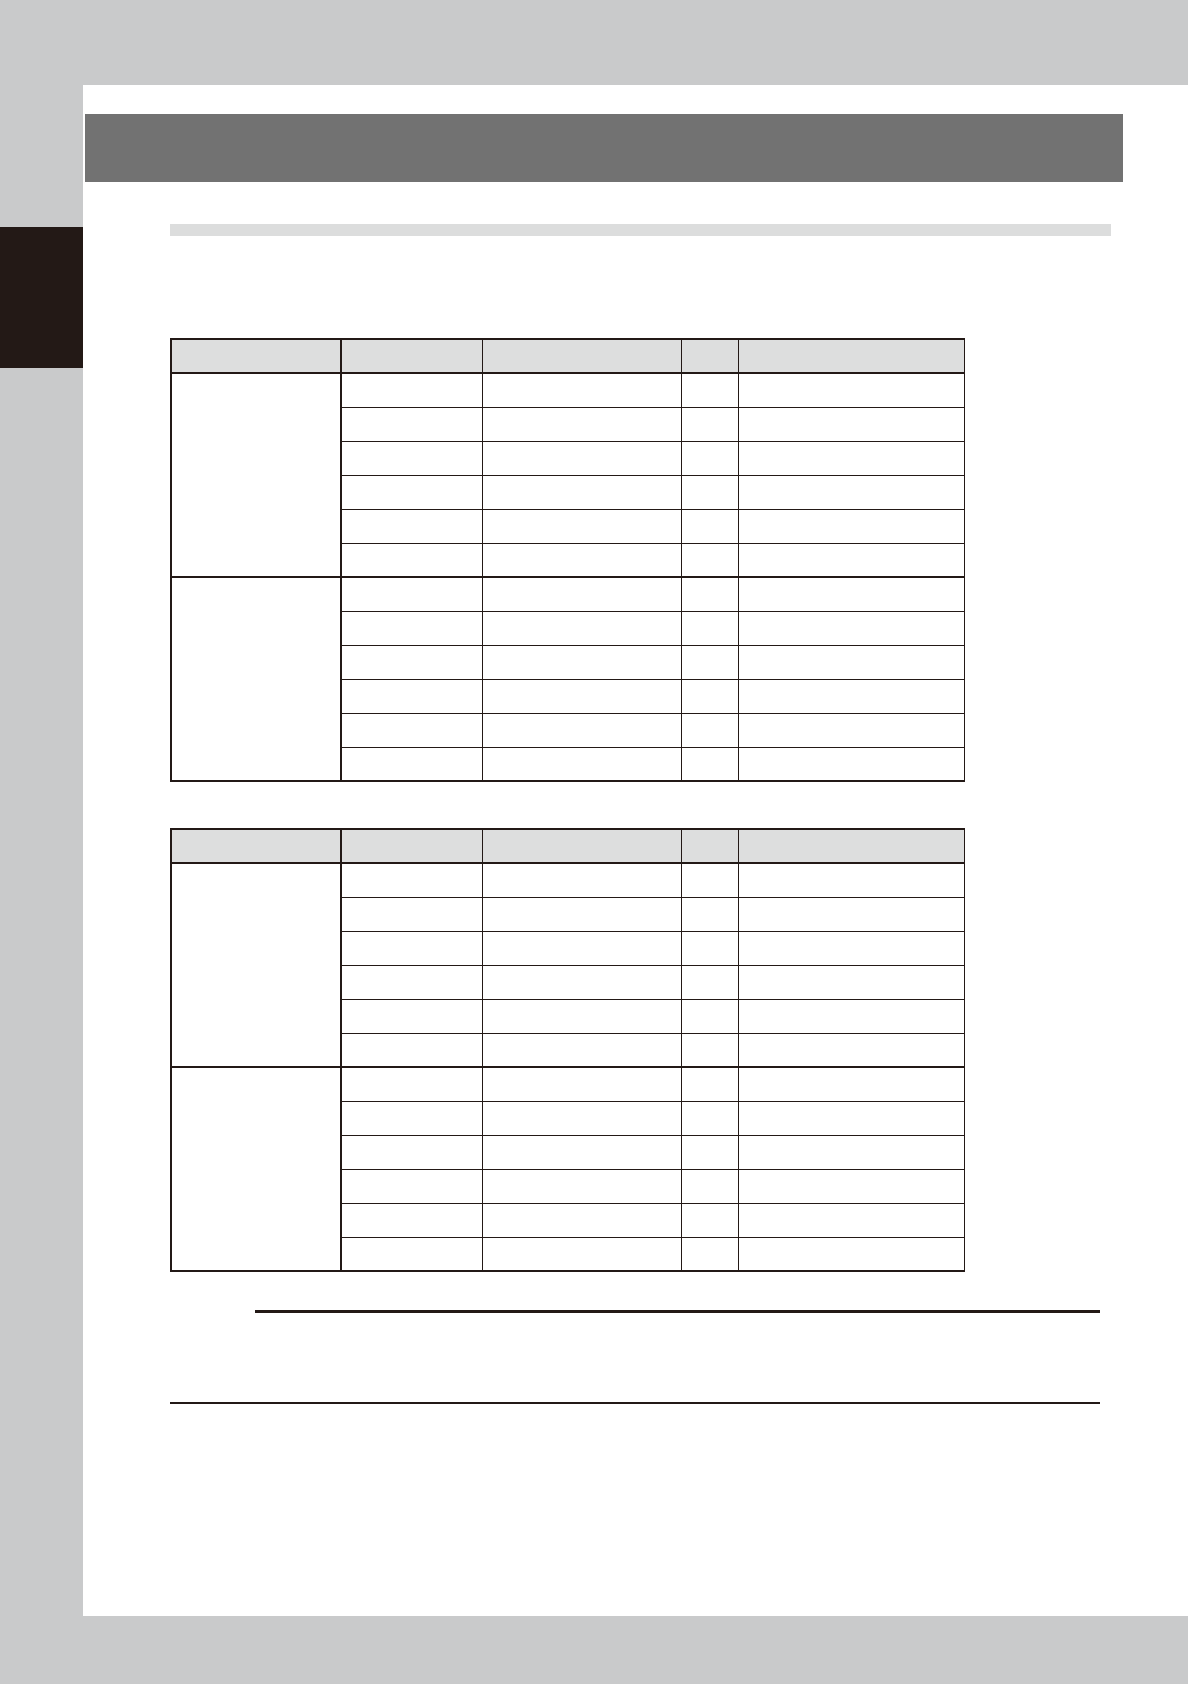
3S squeegee (Unit)
Squeegee unit Part No. Part name Q'ty Notes
Metal
(METAL 3S)
KHT-M71A0-00X METAL ASSY,3S 530 1 Squeegee length, 530 mm
KHT-M71A0-10X METAL ASSY,3S 440 1 Squeegee length, 440 mm
KHT-M71A0-20X METAL ASSY,3S 400 1 Squeegee length, 400 mm
KHT-M71A0-30X METAL ASSY,3S 350 1 Squeegee length, 350 mm
KHT-M71A0-40X METAL ASSY,3S 300 1 Squeegee length, 300 mm
KHT-M71A0-50X METAL ASSY,3S 250 1 Squeegee length, 250 mm
Urethane
(URETHANE 3S)
KHT-M71B0-00X URETHANE ASSY,3S 530 1 Squeegee length, 530 mm
KHT-M71B0-10X URETHANE ASSY,3S 440 1 Squeegee length, 440 mm
KHT-M71B0-20X URETHANE ASSY,3S 400 1 Squeegee length, 400 mm
KHT-M71B0-30X URETHANE ASSY,3S 350 1 Squeegee length, 350 mm
KHT-M71B0-40X URETHANE ASSY,3S 300 1 Squeegee length, 300 mm
KHT-M71B0-50X URETHANE ASSY,3S 250 1 Squeegee length, 250 mm
n
Double squeegee (Unit)
Squeegee unit Part No. Part name Q'ty Notes
Metal
(METAL W-SQG)
KHT-M71C0-00X METAL ASSY,W-SQG.530 2 Squeegee length, 530 mm
KHT-M71C0-10X METAL ASSY,W-SQG.440 2 Squeegee length, 440 mm
KHT-M71C0-20X METAL ASSY,W-SQG.400 2 Squeegee length, 400 mm
KHT-M71C0-30X METAL ASSY,W-SQG.350 2 Squeegee length, 350 mm
KHT-M71C0-40X METAL ASSY,W-SQG.300 2 Squeegee length, 300 mm
KHT-M71C0-50X METAL ASSY,W-SQG.250 2 Squeegee length, 250 mm
Urethane
(URETHANE W-SQG)
KHT-M71E0-00X URE.ASSY,W-SQG.530 2 Squeegee length, 530 mm
KHT-M71E0-10X URE.ASSY,W-SQG.440 2 Squeegee length, 440 mm
KHT-M71E0-20X URE.ASSY,W-SQG.400 2 Squeegee length, 400 mm
KHT-M71E0-30X URE.ASSY,W-SQG.350 2 Squeegee length, 350 mm
KHT-M71E0-40X URE.ASSY,W-SQG.300 2 Squeegee length, 300 mm
KHT-M71E0-50X URE.ASSY,W-SQG.250 2 Squeegee length, 250 mm
c
CAUTION
The part Nos. given in this manual are the original part Nos. which were assigned to the parts when this manual was
issued. Because these part Nos. may be changed without prior notice, be sure to verify the latest part Nos. before
ordering parts.
7-3
7
Replacing the consumable parts
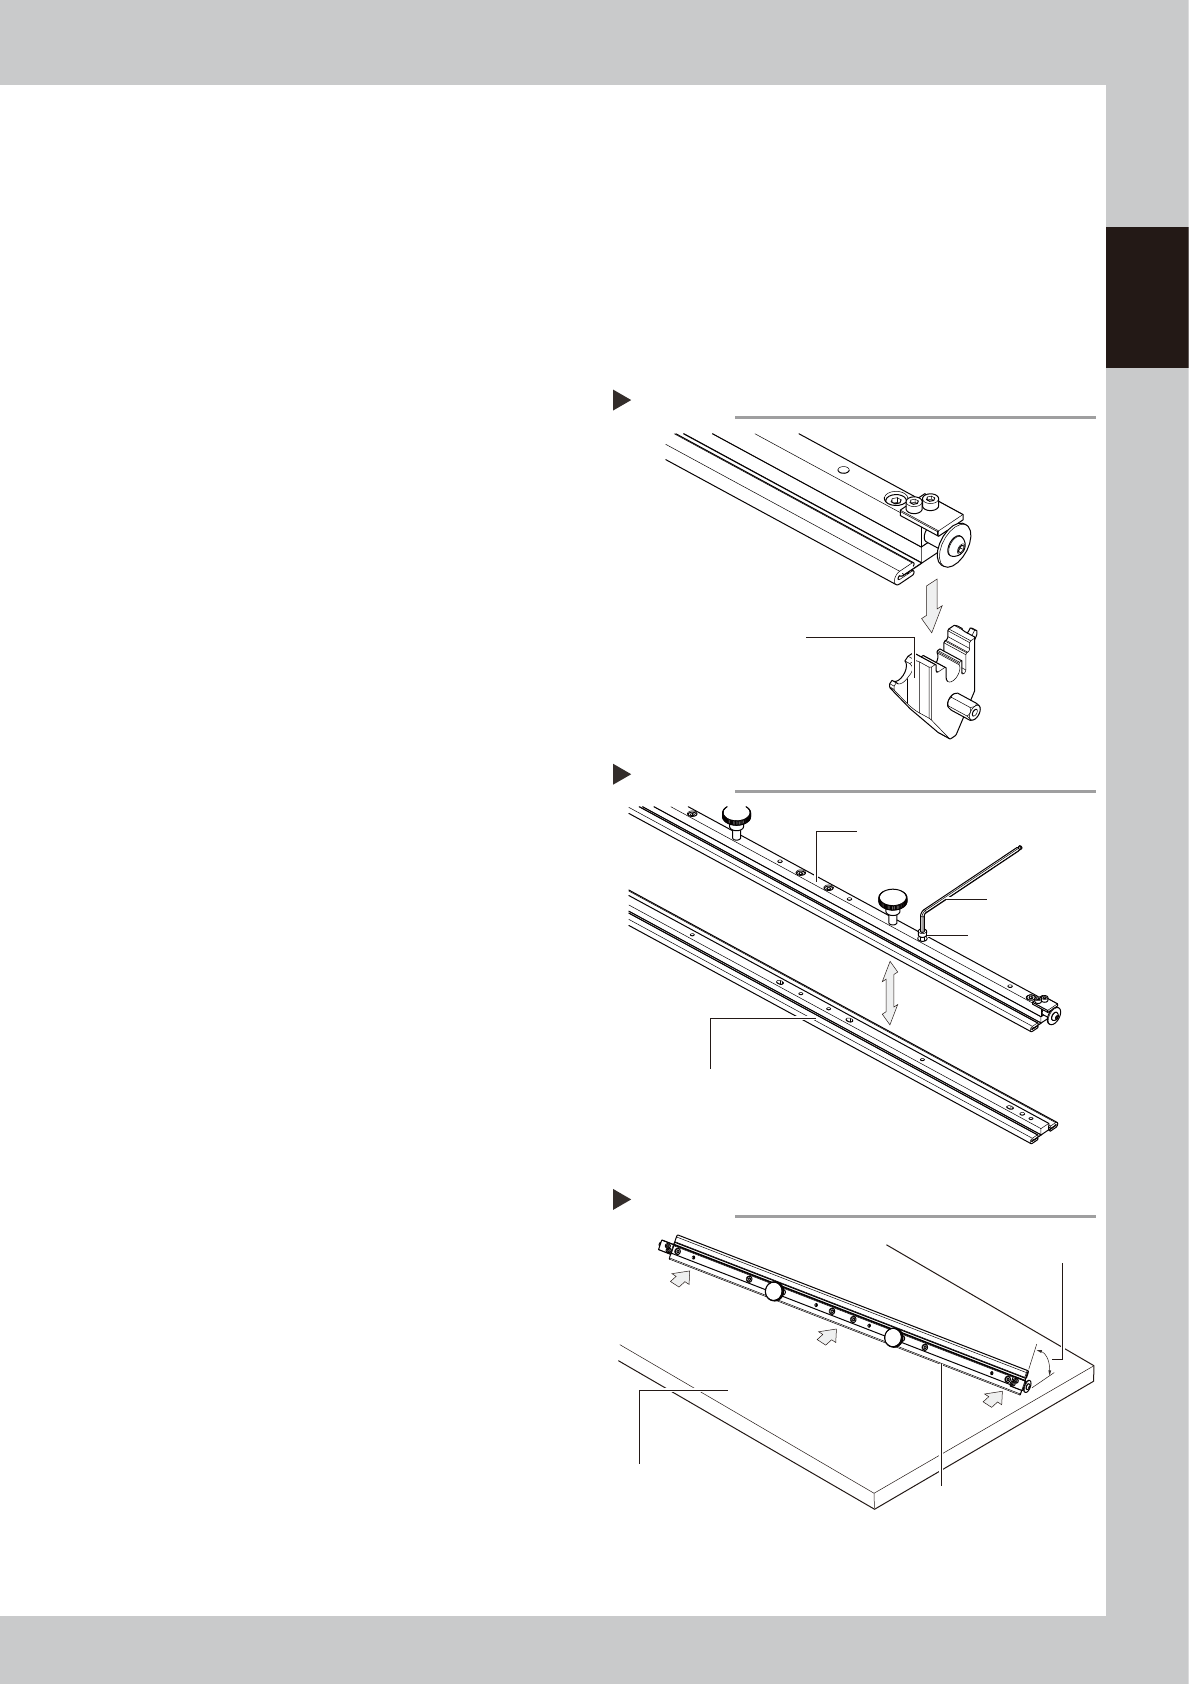
2.2 Replacing the squeegee scraper
For the squeegee of this machine, it is possible to replace only the squeegee scraper.
n
Items to be prepared
• Hex wrench (4mm)
2.2.1 Metal squeegee scraper
The solder scraper of the metal squeegee may collide with other object, causing deformation of the scraper. If
this happens, loosen the bolts that fasten the metal scraper from the top and replace it with a new one.
1
Remove the side plates.
Remove the side plates from both sides of
the squeegee as described in the figure on
the right.
63711-L3-10
2
Remove the squeegee frame.
Use an Allen wrench to remove the bolts
that fasten the squeegee frame and the
squeegee scraper to be replaced.
63712-L3-10
3
Attach a new squeegee scraper.
Attach a new squeegee scraper to the
squeegee frame and temporarily fasten
them with an Allen wrench.
4
Check if the squeegee scraper is
properly attached.
1. Place the squeegee scraper blade on a
surface plate or similar flat surface table,
at an angle close to the attack angle.
2. Check that there is no gap between the
blade and the flat surface at positions
indicated by arrow. If a gap is found,
loosen the mounting bolts and adjust to
eliminate the gap.
3. After adjustment, tighten the mounting
bolts securely.
63713-L3-10
5
Install the side plates.
Install the side plates you have removed in
the above step on the squeegee in the
reverse order of removal work.
Removing the side plates.
Step 1
Side plate
Removing the squeegee frame.
Step 2
Squeegee frame
Allen wrench
Mounting bolt
New squeegee scraper
Checking if the squeegee scraper is properly attached
Step 4
Surface plate or
similar flat surface table
Remove protective molding.
Angle close to attack angle