YSP_Users_E.pdf - 第235页
8-3 8 Inspection and maintenance 2.2 Periodic inspection (W eekly/Monthly) In addition to daily inspection, periodic inspections (weekly and monthly) are essential to ensure safe and efficient use of the machine. W e rec…
8-2
8
Inspection and maintenance
2. Inspection and maintenance
2.1 Daily inspection
To prevent unwanted trouble, the following points should be checked on a daily basis before and after using
the machine.
n
Daily checkpoints
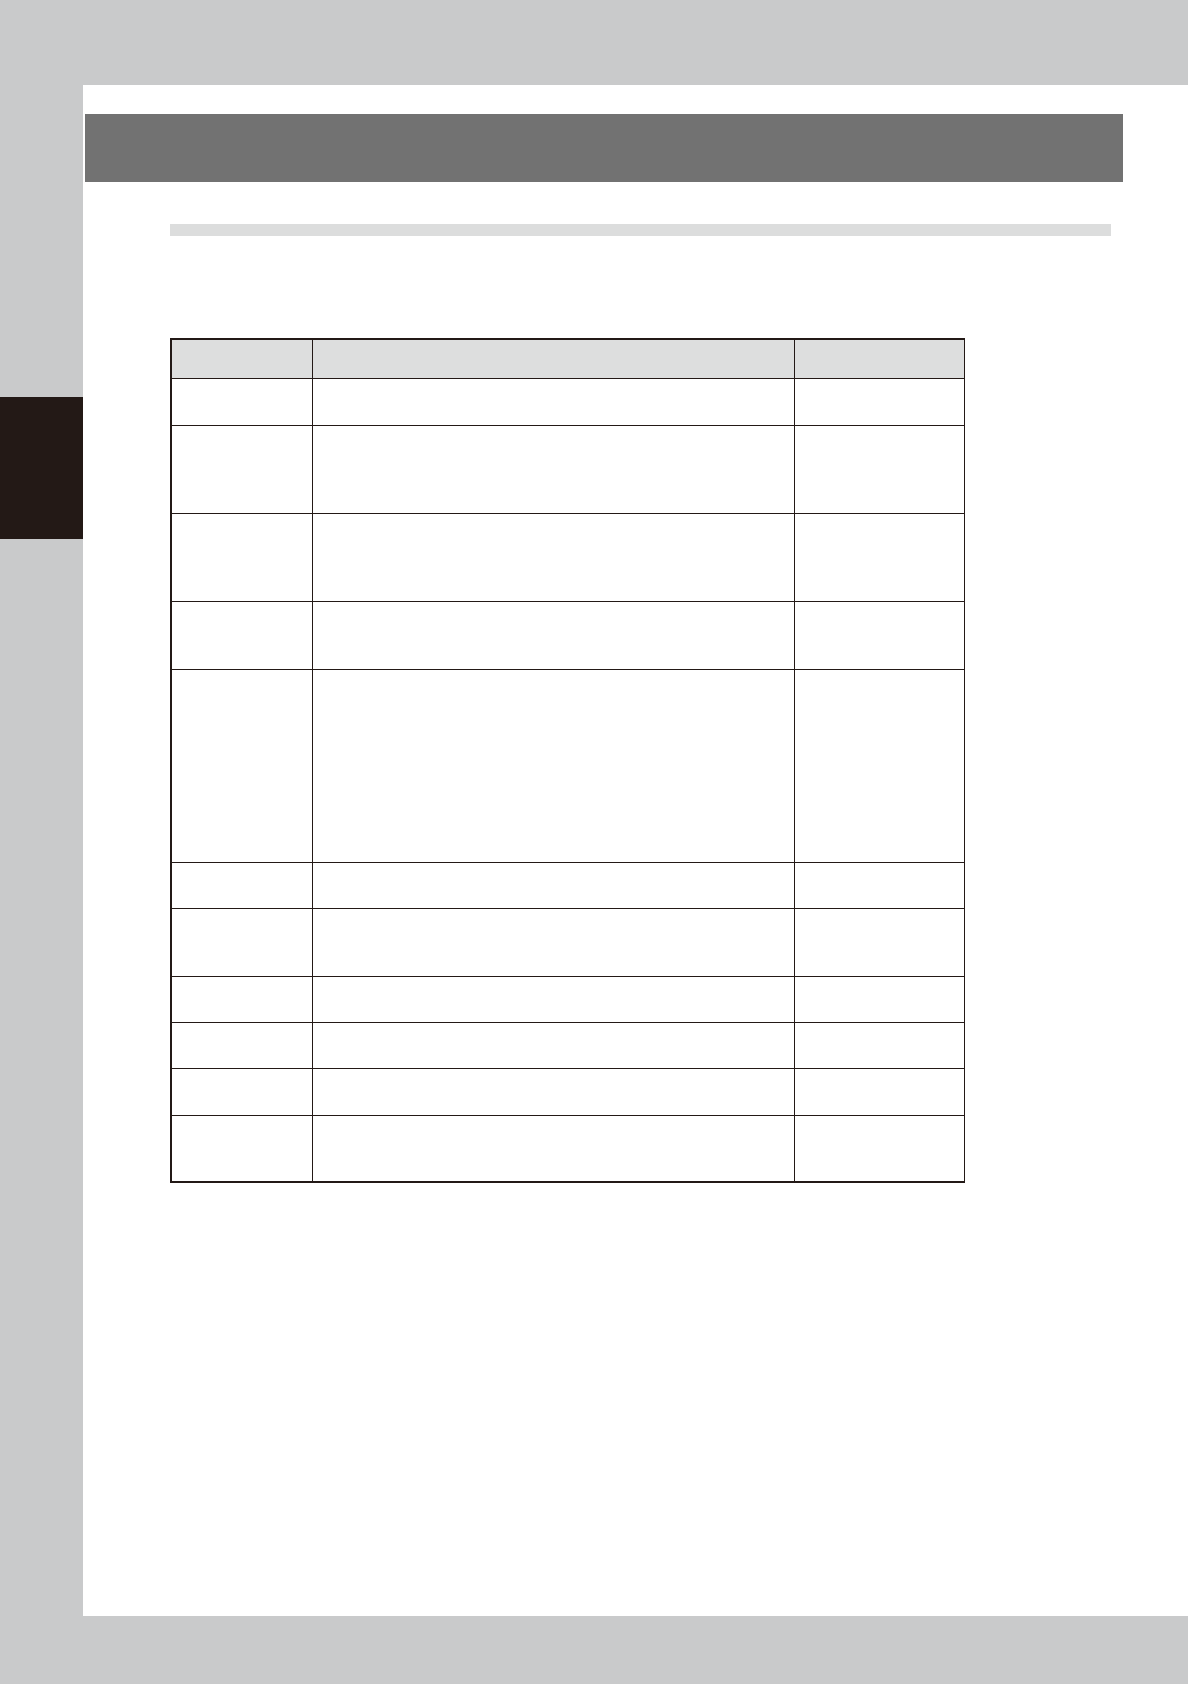
Checkpoints Check items Refer to
Air pressure
Check the air pressure shown on its display is between 0.40MPa
and 0.41MPa.
"1.1 Air regulator unit"
in Appendix
Temperature
control unit
(option)
Check the drain tank once a day, especially in wet season with high
humidity, and drain the tank. When the tank is filled with water, an
alarm buzzer sounds and the Temperature control unit will stop after
10 minutes if left undrained.
Conveyor unit
Check that no foreign matter, solder or debris is on the conveyor
rail, edge clamp, board flap, push-up jig (machine using optional
push-up jigs), push-up plate, etc.
Check that no matrix pins come loose from the push-up table.
"4. Conveyor unit" in
Chapter 1
Extended
exit conveyor
(option)
Check that no board remains on the conveyor.
Check that no solder and debris adheres to the conveyor.
Squeegee
Squeegee head
Check that the mount knobs of the squeegee head are tightened
firmly.
Check that the squeegee is securely attached to the squeegee
holder. (The squeegee mount knobs are tightened firmly.)
Check that there are no scratches, nicks and wear on the scraper.
Check that there are no foreign matter, debris and solder adhesion.
Remove the squeegees after work and clean them with cleaning
paper or cloth. (When using a urethane squeegee, do not immerse
the squeegee in alcohol. The urethane scraper may expand.)
"3. Printing section"
in Chapter 1
Cleaning unit
Check that the cleaner gauze roll is set correctly. Check also that
the cleaner gauze is filled with cleaning alcohol.
"5. Cleaning unit" in
Chapter 1
Mask frame
stopper pin
position
Check that the mask frame stopper pin position is correct.
"2.1 Mask size and
mask stopper pin
position" in Appendix
Mask clamp Check that there are no foreign matter, debris and solder adhesion.
"3. Printing section"
in Chapter 1
Mask
Check that there are no foreign matter, debris, solder adhesion,
warp and scratches.
Mask manufacturer's
instruction manual
Solder
Check that solder has returned to room temperature and is well
agitated and rolled.
Solder manufacturer's
instruction manual
Touch screen
(option)
Check that there are no scratches or grime on the screen surface.
See "Precautions
when handling the
touch screen" below
l
Precautions when handling the touch screen
Take the following precautions when handling the touch screen (option).
• The touch screen surface is made of acrylic resin. Do not scratch its surface with a pointed tools or hard objects. Use
the finger pad to operate the buttons on the touch screen.
• To clean the touch panel surface, wipe gently with a soft cloth moistened with synthetic detergent diluted with water
and then wrung-out well. Never use volatile chemicals such as benzine, thinner or alcohol.
• To prevent dust adhesion due to static electricity, we recommend using an anti-electrostatic agent.

8-3
8
Inspection and maintenance
2.2 Periodic inspection (Weekly/Monthly)
In addition to daily inspection, periodic inspections (weekly and monthly) are essential to ensure safe and
efficient use of the machine.
We recommend setting an earlier inspection interval if parts are subject to frequent usage.
2.2.1 Parts to be replaced during periodic replacement
If parts need to be replaced as a result of the periodic inspection, use the spare parts listed below.
n
Replacement parts (conveyor related)
Part No. Part name Q'ty Location used Replacement interval
KHT-M9123-00X CONV. EDGE PLATE 1 Board clamp
Replace the part according
to the worn away status
observed during inspection.
KHT-M9127-01X TRANSFER BELT W2 1
Conveyor belt at printing stage
(Feb. 2011 or earlier)
KHT-M9127-02X TRANSFER BELT W2 1
Conveyor belt at printing stage
(March 2011 or later)
KHT-M9314-01X
TRANSFER BELT W1
1 Conveyor belt at entrance/exit
KHT-M9314-11X
TRANSFER BELT W3L
1
Conveyor belt of extended
conveyor
n
Replacement parts (filter related)
Part No. Part name Q'ty Location used Replacement interval
KGR-M9933-F0X FILTER, SPARE 2 Filter of ejector for mask vacuum
Replace the filter 1 or 2 years
after delivery. As a general
guide, replace the filter if it
becomes dirty when checked
from the outside.
KGY-M3710-4XX INL, FILTER ELEMENT 1 In front of blower on rear of machine
KHW-M8501-10X
ELEMENT
1 Air filter for primary air supply
As a general guide, replace
the filter if it becomes dirty
when checked from the
outside
KHW-M8501-20X
MANTLE
1 Mist filter for primary air supply
c
CAUTION
The part Nos. given in this manual are the original part Nos. which were assigned to the parts when this manual was
issued. Because these part Nos. may be changed without prior notice, be sure to verify the latest part Nos. before
ordering parts.
2.2.2 Recommended grease
When lubricating axis ball screws and linear guides according to the periodic inspection checkpoints, use only
the grease stated in the list below.
n
Recommended grease
Lubrication point Grease name YAMAHA part No. Notes
Ball screws and leaner guides of all axes
GREASE PACK (accessory)
K48-M3856-00X NSK NSL(80g)
n
Precautions when handling grease
w
WARNING
INFLAMMATION MAY OCCUR IF GREASE OR LUBRICANT GETS IN THE EYES. BEFORE HANDLING THE GREASE, WEAR SAFETY
GOGGLES TO ENSURE THE GREASE WILL NOT COME IN CONTACT WITH THE EYES.
w
WARNING
INFLAMMATION MAY OCCUR IF THE GREASE OR LUBRICANT COMES INTO CONTACT WITH SKIN. BE SURE TO WEAR
PROTECTIVE GLOVES TO PREVENT CONTACT WITH SKIN.
w
WARNING
DO NOT TAKE ORALLY OR EAT THE GREASE OR LUBRICANT. EATING WILL CAUSE DIARRHEA AND VOMITING.
c
CAUTION
When storing the grease after use, tightly close the cap of the grease tube or container to prevent dust and moisture
from entering inside. Store it in a dark place to avoid direct sunlight, and keep away from fire and heating sources.

8-4
8
Inspection and maintenance
2.2.3 List of periodic inspection checkpoints
Use the inspection check sheet to periodically inspect the machine.
The inspection check sheet describes the contents of the inspections to be performed weekly or monthly in
addition to the daily inspection described in the previous section.
Make a copy of the inspection check sheet (sample) stated on the next page and use it for the periodic
inspection. Or, it is recommended that the customer prepares an appropriate inspection sheet in such format
and properly perform the periodic inspection with it.
c
CAUTION
Periodic inspections must be performed by or under the direction of person who has received training from YAMAHA
or a YAMAHA sales representative.
c
CAUTION
Warm up the machine and wipe away excess grease before greasing up the lubrication points.