YSP_Users_E.pdf - 第243页
8-11 8 Inspection and maintenance 2.4 Inspecting and cleaning the air/mist filters Air/mist filters are used to prevent oil, mist and other impurities in the air compressor from penetrating into the machine. T hese filte…

8-10
8
Inspection and maintenance
6
Tighten the mounting bolt of the
tensioner (pulley).
If the belt tension isl loose, adjust the
tensioner position to tighten the belt.
c
CAUTION
Tighten the mounting bolts of the pulley and pulley
bracket to the following torques:
• Pulley mounting bolt : 5.5N•m.
Be careful not to tighten the bolts excessively.
n
NOTE
The specification of the conveyor belt tension is in the
following. Use the tension meter to adjust as needed.
• Board clamping part : 519 to 554Hz
7
Check the belt rotating condition.
1. Cancel emergency stop.
2. On the [Unit]-[Conveyor] tab, press the
[Convey In] and [Convey Out] buttons to
turn on the conveyor motor and check
the belt rotation.
3. If the slip of the motor pulley, the belt
rotation fluctuation and the deflection
are excessive, adjust the tensioner
(pulley) position and transfer a board
again and check the condition.
8
Return the mask guide plate to its
original position.

8-11
8
Inspection and maintenance
2.4 Inspecting and cleaning the air/mist filters
Air/mist filters are used to prevent oil, mist and other impurities in the air compressor from penetrating into the
machine. These filters should be inspected and cleaned periodically as instructed below.
c
CAUTION
The air coupler should be disconnected to safely perform the work. When disconnecting it, be careful not to allow oil,
water, or impurities to splash outward. Also take care since a large air exhaust sound is produced when disconnecting
the air coupler.
n
Required tools
• Neutral detergent
• Air blow tool (option)
• Cleaning rag
• Replacement air filter (KHW-M8501-10X ELEMENT)
• Replacement mist filter (KHW-M8501-20X MANTLE)
c
CAUTION
When performing air blow, wear dust-proof goggles and mask to protect your face from blown dust, etc.
n
Cleaning the filter cup
1
Check the inside of the filer cup.
Check for oil or water deposits in the filter
cup through the window. If the window is
dirty, follow the steps below to clean the
filter cup.
TIP
The drain cock at the bottom of the filter cup is an
auto-drain type. It automatically drains the oil or water
when deposited in the cup. We recommend
connecting a hose to this drain cock.
2
Remove the filter cup.
Turn the filter cup in the allow direction
shown in the figure with pressing the button
on the filter cup, then pull it out downward.
63815-L3-00
3
Clean the inside of the filter cup.
1. Lightly clean the filter cup with water.
2. Then, pour water-diluted neutral
detergent into the filter cup and clean
the inside while shaking it.
3. Air blow the filter cup and wipe away
any moisture with clean cloth or paper.
4
Reattach the filter cup.
1. Adjust the button on the cup to the
position where the filter has been
removed. Push the cup upward.
2. Turn the cup clockwise until a click sound
is heard.
5
Reconnect the air hose to the air
coupler.
After connecting the air hose, check that no
air is leaking.
n
NOTE
Leave the filter cup removed to clean the air filter as
explained in the next procedure.
Step 2
Removing the filter cup
Filter cup
Disconnect the
air coupler.
Air filer
Button
Oil mist filter
8-12
8
Inspection and maintenance
n
Cleaning the air/mist filters
1
Remove the filter cup.
See the previous procedure in "Cleaning the
filter cup".
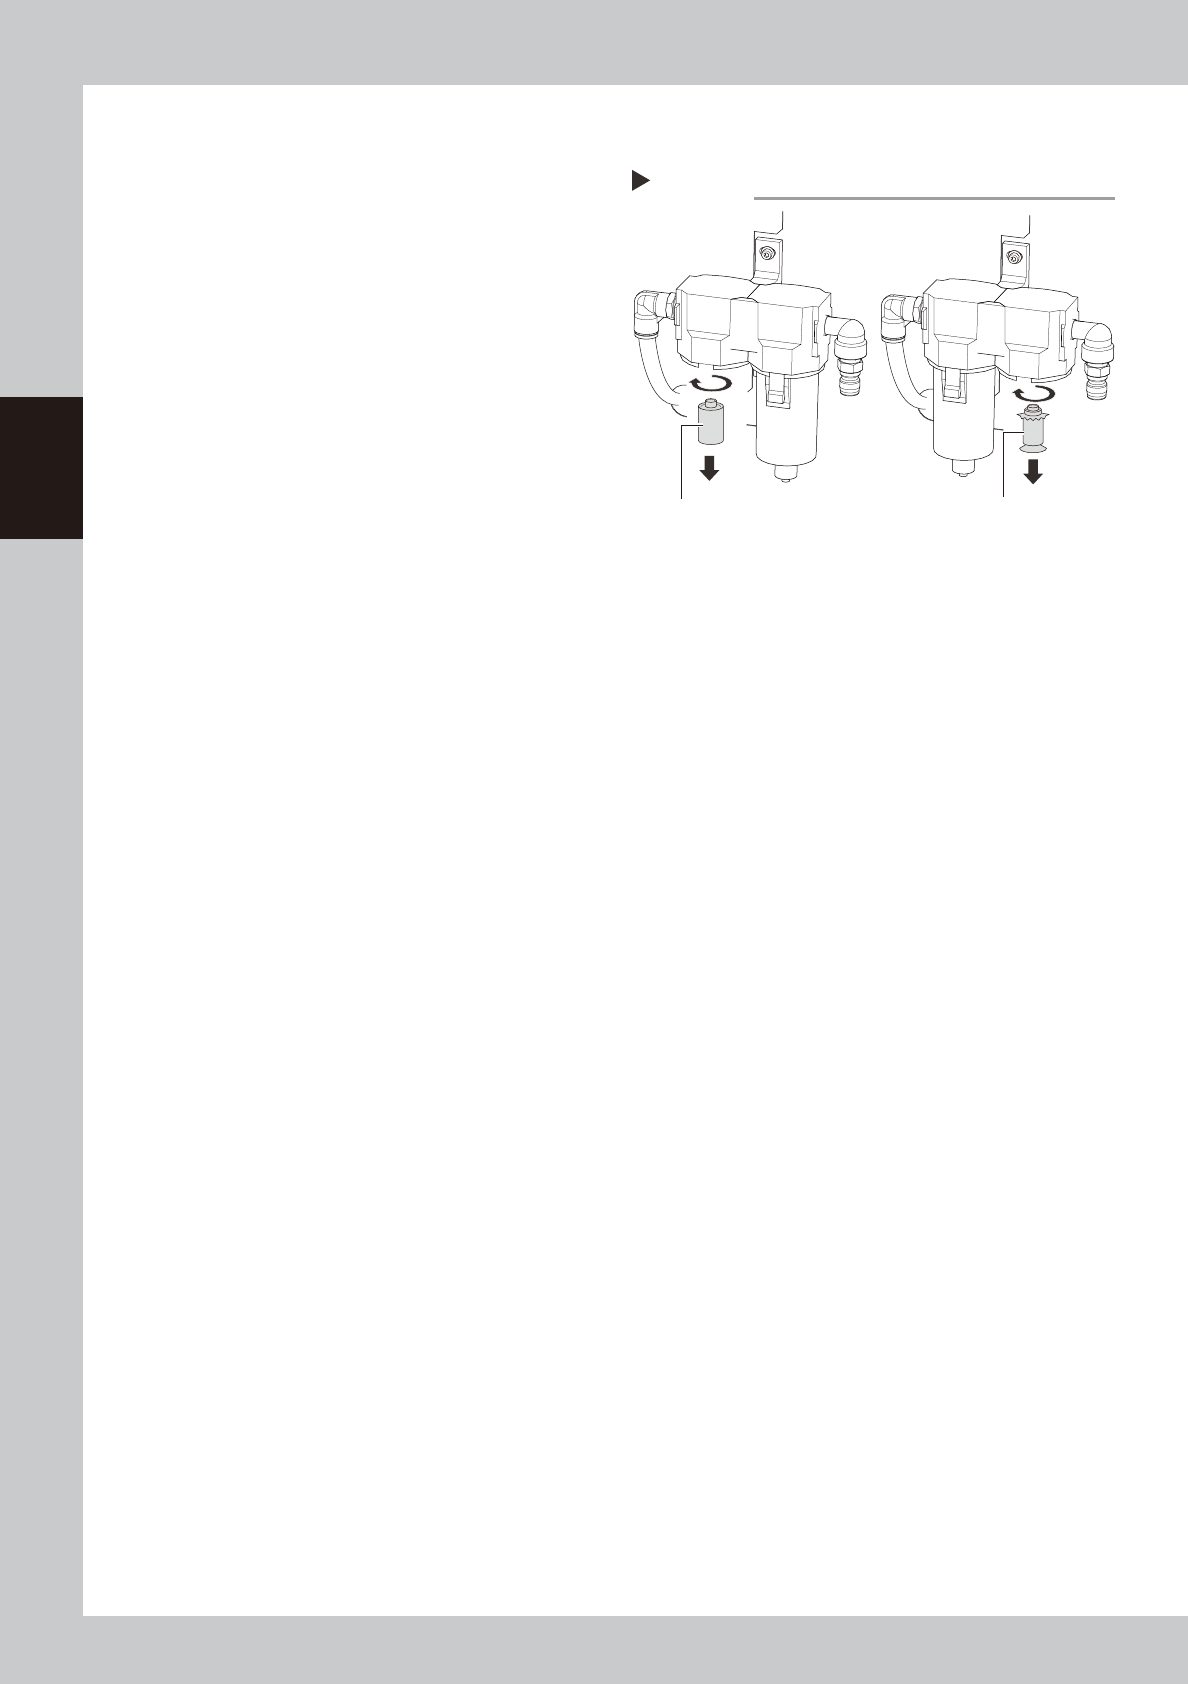
2
Remove the filter.
Remove the filter by turning it.
63816-L3-00
3
Clean the filter element.
Use an air blow gun to blow away dust and
impurities trapped by the filter element. If
the filter is excessively dirty and cannot be
cleaned, replace it with a new filter.
4
Reattach the filter.
5
Reattach the filter cup.
6
Reconnect the air hose to the air
coupler.
After connecting the air hose, check that no
air is leaking.
Step 2
Removing thefilter
MIST FILTER ELEMENT
( MANTLE)
FILTER ELEMENT
( ELEMENT)