YSP_Users_E.pdf - 第236页
8-4 8 Inspection and maintenance 2.2.3 List of periodic inspection checkpoints Use the inspection chec k sheet to periodically inspect the machine. T he inspection check sheet describes the contents of the inspections to…

8-3
8
Inspection and maintenance
2.2 Periodic inspection (Weekly/Monthly)
In addition to daily inspection, periodic inspections (weekly and monthly) are essential to ensure safe and
efficient use of the machine.
We recommend setting an earlier inspection interval if parts are subject to frequent usage.
2.2.1 Parts to be replaced during periodic replacement
If parts need to be replaced as a result of the periodic inspection, use the spare parts listed below.
n
Replacement parts (conveyor related)
Part No. Part name Q'ty Location used Replacement interval
KHT-M9123-00X CONV. EDGE PLATE 1 Board clamp
Replace the part according
to the worn away status
observed during inspection.
KHT-M9127-01X TRANSFER BELT W2 1
Conveyor belt at printing stage
(Feb. 2011 or earlier)
KHT-M9127-02X TRANSFER BELT W2 1
Conveyor belt at printing stage
(March 2011 or later)
KHT-M9314-01X
TRANSFER BELT W1
1 Conveyor belt at entrance/exit
KHT-M9314-11X
TRANSFER BELT W3L
1
Conveyor belt of extended
conveyor
n
Replacement parts (filter related)
Part No. Part name Q'ty Location used Replacement interval
KGR-M9933-F0X FILTER, SPARE 2 Filter of ejector for mask vacuum
Replace the filter 1 or 2 years
after delivery. As a general
guide, replace the filter if it
becomes dirty when checked
from the outside.
KGY-M3710-4XX INL, FILTER ELEMENT 1 In front of blower on rear of machine
KHW-M8501-10X
ELEMENT
1 Air filter for primary air supply
As a general guide, replace
the filter if it becomes dirty
when checked from the
outside
KHW-M8501-20X
MANTLE
1 Mist filter for primary air supply
c
CAUTION
The part Nos. given in this manual are the original part Nos. which were assigned to the parts when this manual was
issued. Because these part Nos. may be changed without prior notice, be sure to verify the latest part Nos. before
ordering parts.
2.2.2 Recommended grease
When lubricating axis ball screws and linear guides according to the periodic inspection checkpoints, use only
the grease stated in the list below.
n
Recommended grease
Lubrication point Grease name YAMAHA part No. Notes
Ball screws and leaner guides of all axes
GREASE PACK (accessory)
K48-M3856-00X NSK NSL(80g)
n
Precautions when handling grease
w
WARNING
INFLAMMATION MAY OCCUR IF GREASE OR LUBRICANT GETS IN THE EYES. BEFORE HANDLING THE GREASE, WEAR SAFETY
GOGGLES TO ENSURE THE GREASE WILL NOT COME IN CONTACT WITH THE EYES.
w
WARNING
INFLAMMATION MAY OCCUR IF THE GREASE OR LUBRICANT COMES INTO CONTACT WITH SKIN. BE SURE TO WEAR
PROTECTIVE GLOVES TO PREVENT CONTACT WITH SKIN.
w
WARNING
DO NOT TAKE ORALLY OR EAT THE GREASE OR LUBRICANT. EATING WILL CAUSE DIARRHEA AND VOMITING.
c
CAUTION
When storing the grease after use, tightly close the cap of the grease tube or container to prevent dust and moisture
from entering inside. Store it in a dark place to avoid direct sunlight, and keep away from fire and heating sources.

8-4
8
Inspection and maintenance
2.2.3 List of periodic inspection checkpoints
Use the inspection check sheet to periodically inspect the machine.
The inspection check sheet describes the contents of the inspections to be performed weekly or monthly in
addition to the daily inspection described in the previous section.
Make a copy of the inspection check sheet (sample) stated on the next page and use it for the periodic
inspection. Or, it is recommended that the customer prepares an appropriate inspection sheet in such format
and properly perform the periodic inspection with it.
c
CAUTION
Periodic inspections must be performed by or under the direction of person who has received training from YAMAHA
or a YAMAHA sales representative.
c
CAUTION
Warm up the machine and wipe away excess grease before greasing up the lubrication points.
8-5
8
Inspection and maintenance
n
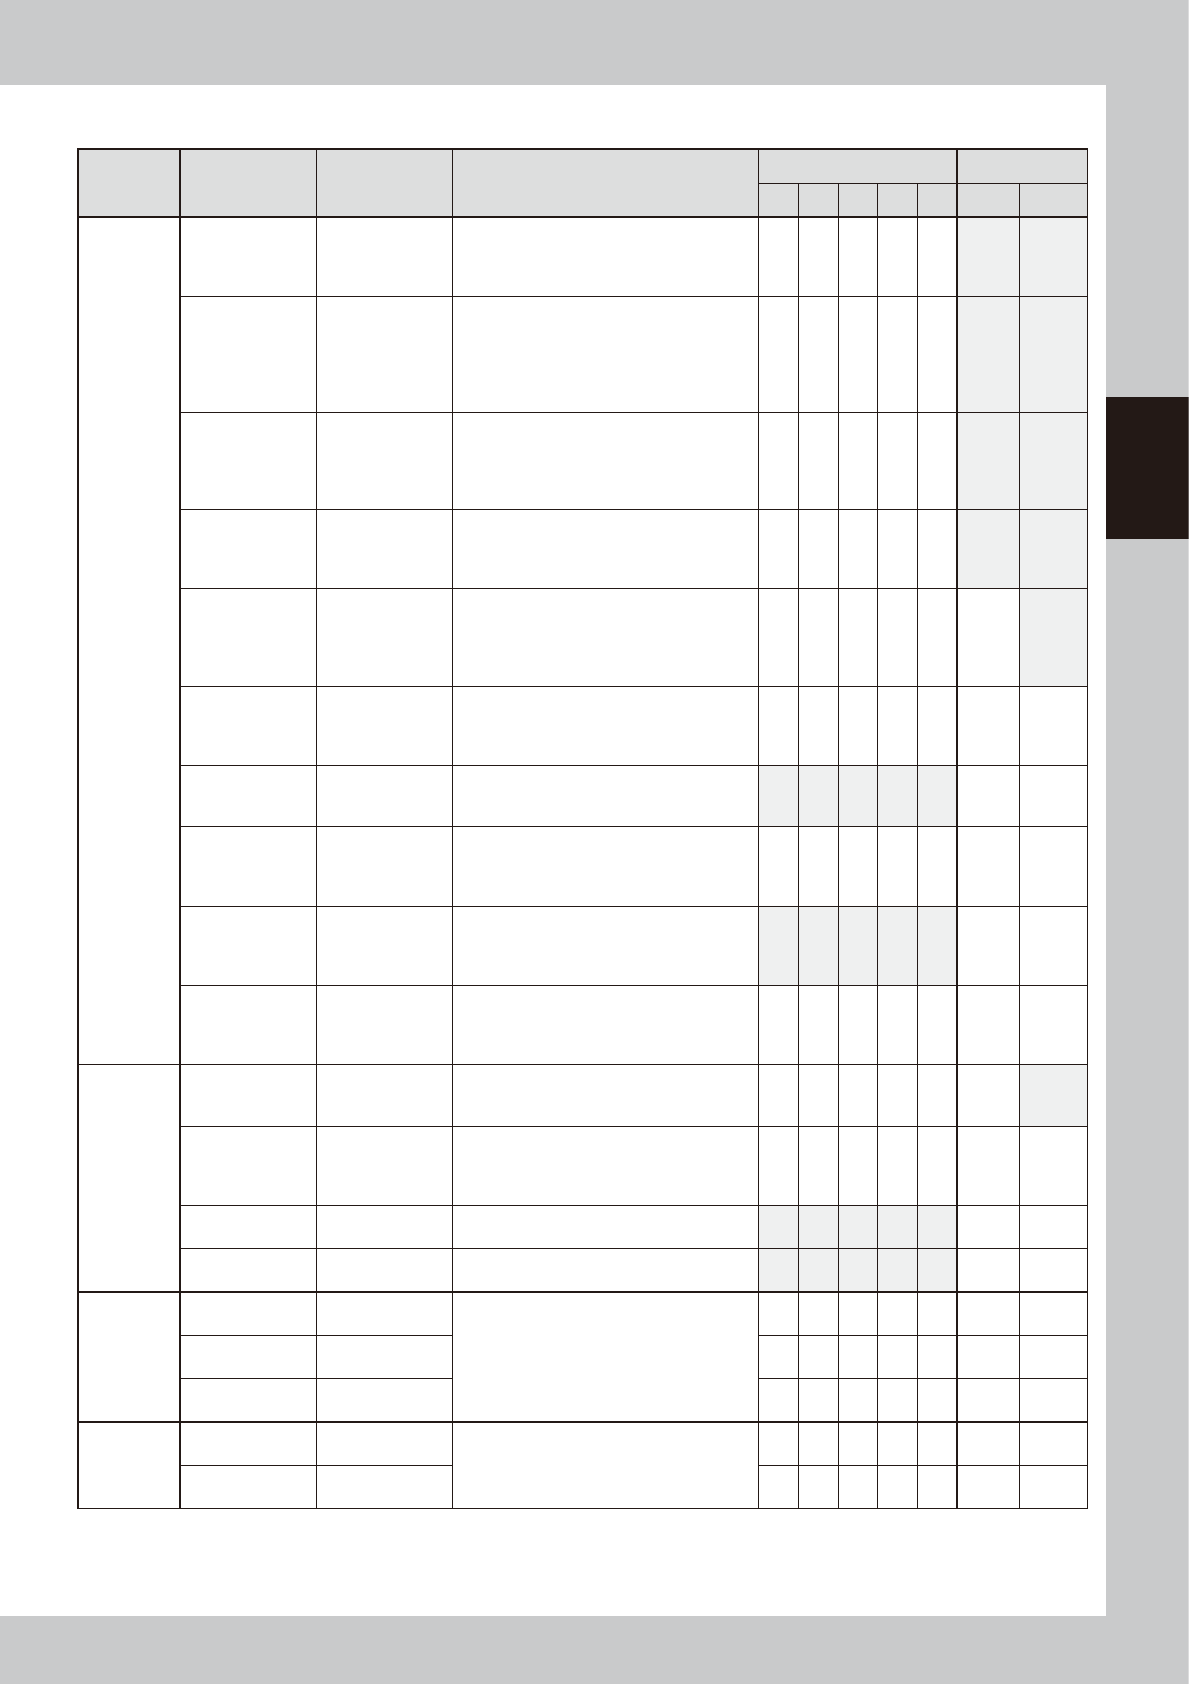
Inspection check sheet (Sample)
Section Check item Checkpoint Contents of inspection/work
Weekly (Date) Monthly
/ / / / /
Cleaning Lubrication
Conveyor
unit
Main stopper
Contamination
Operation,
sensor
• Check that the operation timing is
correct.
• Check that no mounting part rattles.
• Check for solder contamination.
Edge clamp
Entrance/exit
stopper
Operation,
sensor
• Check that the edge clamp functions at
an air pressure level of 0.1 MPa or less.
• Check that the edge plate (metallic part
of the edge clamp) for wear.
• Check that the sensor of the entrance/
exit stopper responds correctly.
Board flap
Contamination
on backside of
flap
Operation,
sensor
• Check that the sensor responds
correctly.
* Clean the solder contamination on the
backside.
Conveyor belt
Contamination,
napped surface,
operation
• Check the board transfer belt for
contamination, wear, or napping.
* Clean the sensor surface if any dust or
lint is on it.
Push-up plate
Operation,
contamination
on top surface
• Check that the push-up plate is leveled
without noise when operating it with the
board set.
* Remove the matrix plate and clean the
top surface of the plate.
PU-axis
Ball screw
Linear guide
• Check for foreign matter or solder
sticking.
* As needed, wipe away excess grease
after the grease has been applied.
W-axis timing
belt
Crack,
deterioration
• Check the belt for wear and the belt
tension.
* If the belt deteriorates, replace it.
W-axis conveyor
auto width
adjustment
Ball screw
Linear guide
• Check for foreign matter or solder
sticking.
* As needed, wipe away excess grease
after the grease has been applied.
Mask vacuum
Operation
Vacuum filter
• Check that the mask vacuum functions
correctly.
* Check the filter. Clean or replace the
filter if necessary.
MS-axis
Ball screw
Linear guide
• Check the MS-axis unit for foreign
matter or solder sticking.
* As needed, wipe away excess grease
after the grease has been applied.
Vision
camera unit
related
Mask camera
Contamination
on light lens
Lighting status
• Check the light lens for contamination.
• Turn on each light individually to check
that it is lit correctly.
CX-axis
Ball screw
Linear guide
Check for foreign matter or solder
sticking.
* As needed, wipe away excess grease
after the grease has been applied.
Board camera Lighting status
• Turn on each light individually to check
that it is lit correctly.
Inspection
camera (OP)
Lighting status
• Turn on each light individually to check
that it is lit correctly.
X-, Y-, and
Z-axis
X1-axis, X2-axis
Ball screw
Linear guide
Check for foreign matter or solder
sticking.
* As needed, wipe away excess grease
after the grease has been applied.
Note: Detach the Y-axis cover when
working on these.
Y-axis
Ball screw
Linear guide
Z-axis
Trapezoid screw
Guide
Printing
head
SY-axis
Ball screw
Linear guide
• Check for foreign matter or solder
sticking.
* As needed, wipe away excess grease
after the grease has been applied.
SZ-axis
Ball screw
Linear guide