YSP_Users_E.pdf - 第232页
Chapter 8 Inspection and maintenance T his chapter explains checkpoints and procedures for daily and periodic inspections to use the mac hine safely and to prevent possible trouble. Before beginning inspection or mainten…
7-22
7
Replacing the consumable parts
7
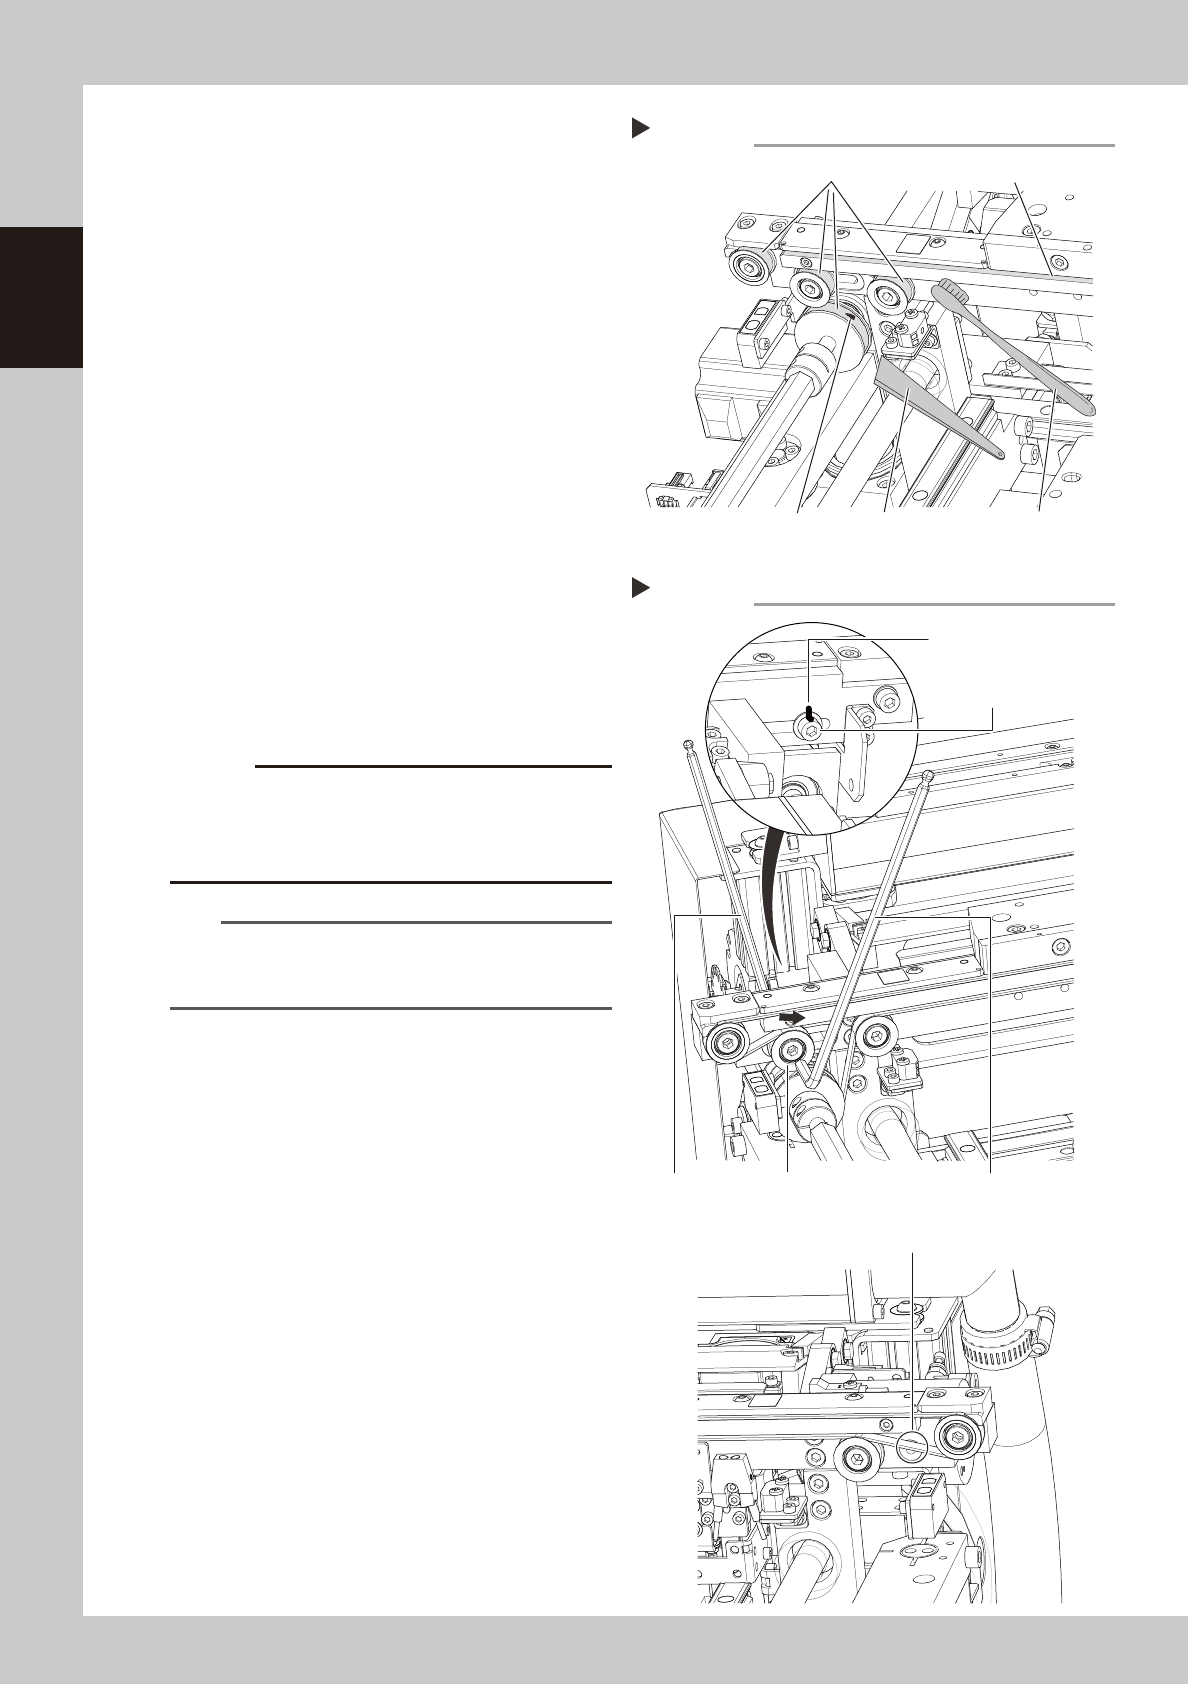
Clean the guides and pulleys.
1. Use a vacuum assembly (option) to
suction the belt wear debris on the belt
guides and sensors, etc.
2. Use a plastic spatula or similar tool to
remove the belt wear debris adhering to
the outer peripheral surface of the
pulleys.
3. Use a brush or similar tool to remove the
belt wear debris caught in the belt
guides.
63734-L3-00
8
Attach a new belt.
1. Temporarily fit a new belt onto the pulley.
2. Return the coupling to its original position
and tighten the bolt.
3. Move the tensioner (pulley) to the
position that has been marked and then
tighten the bolts.
4. If looseness of the belt is found, adjust
the position of the tensioner (pulley) to
apply necessary tension.
63735-L3-00
c
CAUTION
Tighten the mounting bolts of the pulley and pulley
bracket to the following torques:
• Pulley mounting bolt : 5.5N•m.
Be careful not to tighten the bolts excessively.
n
NOTE
The specification of the conveyor belt tension is in the
following. Use the tension meter to adjust as needed.
• Board clamping part : 519 to 554Hz
9
Check the belt rotating condition.
1. Cancel emergency stop.
2. Press the [Conveyor Drive Allow] buttons
on the [Unit] - [Conveyor] screen to turn
on the conve
3. If the slip of the motor pulley, the belt
rotation fluctuation and the deflection
are excessive, adjust the tensioner
(pulley) position and transfer a board
again and check the condition.
0
Return the mask guide plate to its
original position.
Step 7
Cleaning the guide and pulleys
Brush
Belt guides
Belt wear debris
sticking to pulley
Spatula
(made of plastic)
Outer peripheral surface of pulley
Step 8
Tension measurement positions
Add belt tension.
Hex wrench (4mm) Tensioner (pulley) Hex wrench (5mm)
Tensioner (pulley)
mounting bolt
Align with the marking
position.

Chapter 8 Inspection and maintenance
This chapter explains checkpoints and procedures for daily and periodic inspections to use the machine safely and to prevent
possible trouble.
Before beginning inspection or maintenance work, be sure to read "1. Precautions" in this chapter and follow the instructions.
Contents
1. Precautions 8-1
2. Inspection and maintenance 8-2
2.1 Daily inspection 8-2
2.2 Periodic inspection (Weekly/Monthly) 8-3
2.2.1 Parts to be replaced during periodic replacement 8-3
2.2.2 Recommended grease 8-3
2.2.3 List of periodic inspection checkpoints 8-4
2.2.4 Parts recommended for periodic replacement 8-6
2.3 Adjusting the conveyor belt tension 8-7
2.3.1 Board carry-in and carry-out conveyors 8-7
2.3.2 Board clamp unit (board clamp table) 8-9
2.4 Inspecting and cleaning the air/mist filters 8-11
3. List of lubrication locations 8-13
3.1 X-, Y-, and Z-axis 8-13
3.1.1 X1-axis and X2-axis 8-13
3.1.2 Y-axis 8-14
3.1.3 Z-axis 8-14
3.2 Printing head 8-15
3.2.1 SY-axis 8-15
3.2.2 SZ-axis 8-15
3.3 Conveyor unit 8-16
3.3.1 PU-axis 8-16
3.3.2 MS-axis 8-16
3.3.3 W-axis (Conveyor auto width adjustment) 8-17
3.4 Vision camera unit 8-18
3.4.1 CX-axis 8-18

8-1
8
Inspection and maintenance
1. Precautions
Be sure to observe the following precautions when performing the inspection or maintenance work.
• Periodic inspection or maintenance work must be performed by or under the direction of person who has received
training from YAMAHA.
• Always turn off the power to the machine before inspecting mechanical components. If the power to the machine
needs to be turned on during inspection, make sure that no part of anyone's body comes within the machine
movement range.
• Be careful not to allow any foreign matter to enter the machine during inspection or maintenance work.
• Use only the lubricants and grease specified by YAMAHA or a YAMAHA sales representative.
• When replacing parts, always use parts approved by YAMAHA or a YAMAHA sales representative.
• Do not modify any parts in the machine. Modification may result in poor performance or threaten operator safety.