JANETS_INM.pdf - 第194页
JaNets In structio n Manual 5. Shopflo or Setu p 5- 74 Changin g the posit ion o f a lane alread y assi gned Drag the icon of the lane already assi gned, and dr op it on the desired lane posit ion. The lane is moved to t…

JaNets Instruction Manual 5. Shopfloor Setup
5-73
Changing a tray assignment
1. Select a tray holder to which you want to move a tray on the bank attachment position.
(A tray is supposed to be moved to the tray holder you selected the last time on the tray
assignment screen.)
2. Drag a tray component you want to move on the tray assignment screen.
3. When you drop it on the tray assignment screen, the tray holder to which the tray is to be
assigned changes.
You can also change a tray assignment on the Details setting screen.
1. Select a tray you want to change to display it on the Details setting screen.
2. Set the bank and the feeder position to set the tray holder to which the selected tray is to
be assigned.
Changing the component supply level number of a DTS
1. Put the “Lane” cell of a DTS component whose supply level you want to change in the editing
state on the Details setting screen.
2. When you enter the desired supply level number, the level number for supplying the
component changes.
* You cannot change the DTS attachment position itself.
Changing an assignment of a feeder having two or more lanes
You can change the feeder assignment itself or move the assigned lane if the feeder has two or
more lanes.
Changing a feeder attachment position itself
To change the feeder attachment position, follow the procedure below.
1. Select the upper section of the icon of a feeder you want to move or select the section to
which any lane is not assigned.
Figure 5.9-36 Stick feeder (3-lane type)
2. To move the feeder, perform the same operation as that for the “Changing a feeder
assignment on the layout screen”.
Lane 1 (already assigned)
Lower section of the
icon (Lane section)
Lane 2 (not assigned)
Lane 3 (already assigned)
Upper section of the icon
JaNets Instruction Manual 5. Shopfloor Setup
5-74
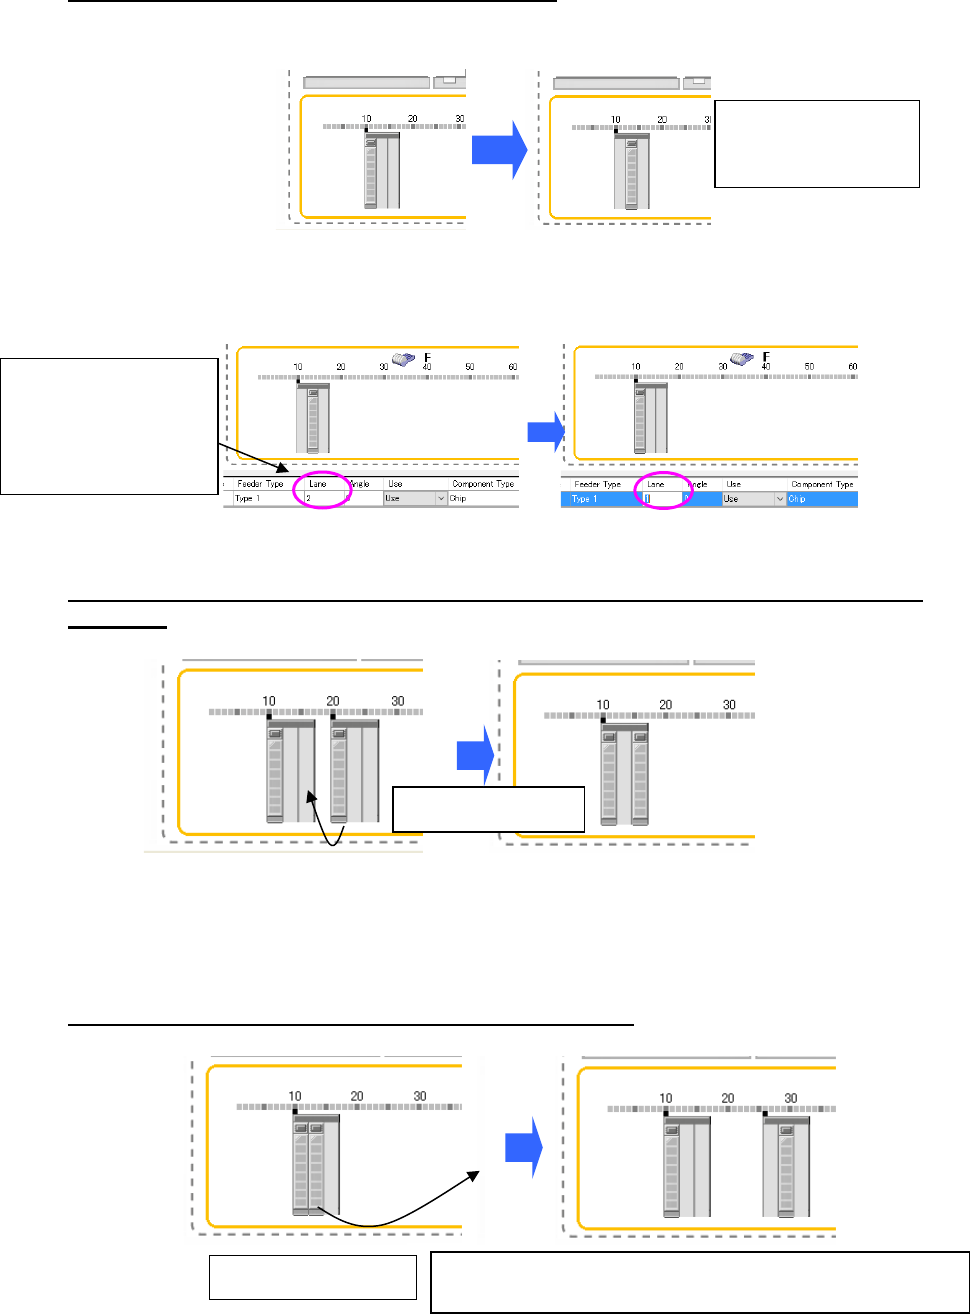
Changing the position of a lane already assigned
Drag the icon of the lane already assigned, and drop it on the desired lane position. The lane is
moved to that position.
Figure 5.9-37 Assigning a feeder having two or more lanes (Moving a lane)
You can also change the lane position on the Details setting screen.
Figure 5.9-38 Details setting screen (Before/after moving a lane)
When a lane is moved between the feeders of the same type attached on the different
positions.
Figure 5.9-39 Before/after moving a lane (between the different feeders)
* When you move a lane from a feeder to which two or more lanes are already assigned,
only a lane is moved.
When a lane is assigned to the bank attachment position
Figure 5.9-40 Moving a lane (to another attachment position)
You cannot select two
or more lanes at the
same time.
Drag & drop a lane.
Drag & drop a lane.
A new feeder is assigned to the position a lane is dropped. “1” is
subtracted from the number of the feeder resources.
Put this cell in the
editing state, and enter
the desired lane
number here (“2” in this
example).
JaNets Instruction Manual 5. Shopfloor Setup
5-75
Clearing a feeder assignment
Deleting feeders one by one
Select a feeder icon (you can two or more feeder icons) within the feeder attachment area, and
click the <Clear> button on the “Permanent Feeder Setup” screen. When the confirmation
message appears on the screen, select the <Yes> button. You can clear a feeder assignment by
performing the operation below also.
Select a feeder icon, and press the [Del] key of the keyboard. After the confirmation message
appears on the screen, clear the selected feeder.
* When you delete a tray holder itself, all components assigned to the tray holder are cleared.
* When you delete a feeder having two or more lanes, all components assigned as a lane of the
feeder are cleared.
Deleting feeders at a time
When you select the <Clear All> button on the “Permanent Feeder Setup” screen, the confirmation
message appears on the screen. Select the <Yes> button. The system clears all feeders assigned
to a machine currently displayed on the screen.
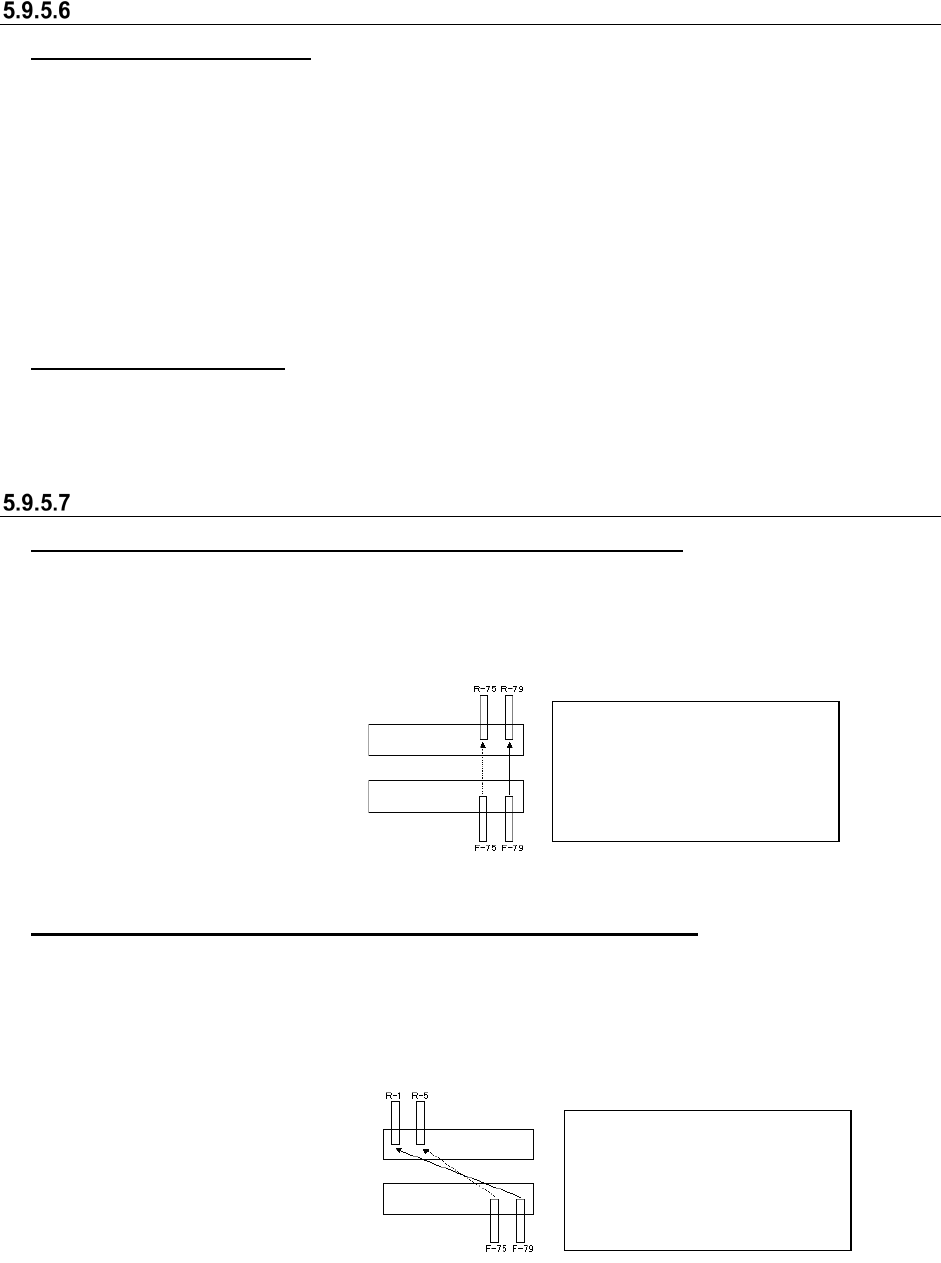
Copying a feeder assignment
Copying a feeder assignment symmetrically with respect to a line
Drag a mouse to surround a feeder(s) to be copied and select it (them). Click the right button of the
mouse to display the pop-up menu. Select the [Mirror Copy] command from this pop-up menu.
The [Mirror Copy] command is enabled for a machine equipped with the front and rear banks only.
Figure 5.9-41 Feeder assignment position when the system copies a feeder
Copying a feeder assignment symmetrically with respect to a point
Drag a mouse to surround a feeder(s) to be copied and select it (them). Click the right button of the
mouse to display the pop-up menu. Select the [Position Copy] command from this pop-up menu.
The [Position Copy] command is enabled for a machine equipped with the front and rear banks
only.
Figure 5.9-42 Feeder assignment position when the system copies a feeder
When you select a feeder on
the front side, it is copied to the
rear side. When you select a
feeder on the rear side, it is
copied to the front side.
When you select a feeder on
the front side, it is copied to the
rear side. When you select a
feeder on the rear side, it is
copied to the front side.
When feeders are copied symmetrically with respect to a point