JANETS_INM.pdf - 第219页
JaNets In structio n Manual 7. Program Editor 7- 12 RX - 7 S eries bad mark information W hen you pres s the < RX - 7 series O ption> but ton, the s creen l ike one show n below appe ars. Figure 7.4 -8 RX - 7 serie…
JaNets Instruction Manual 7. Program Editor
7-11
* Mark shape
The kinds of mark shape which an RX-7 series can define differ from those of machine types other
than an RX-7 series.
Set up the definition about a mark with an RX-7 series machine and "●" by default for the
JaNets.
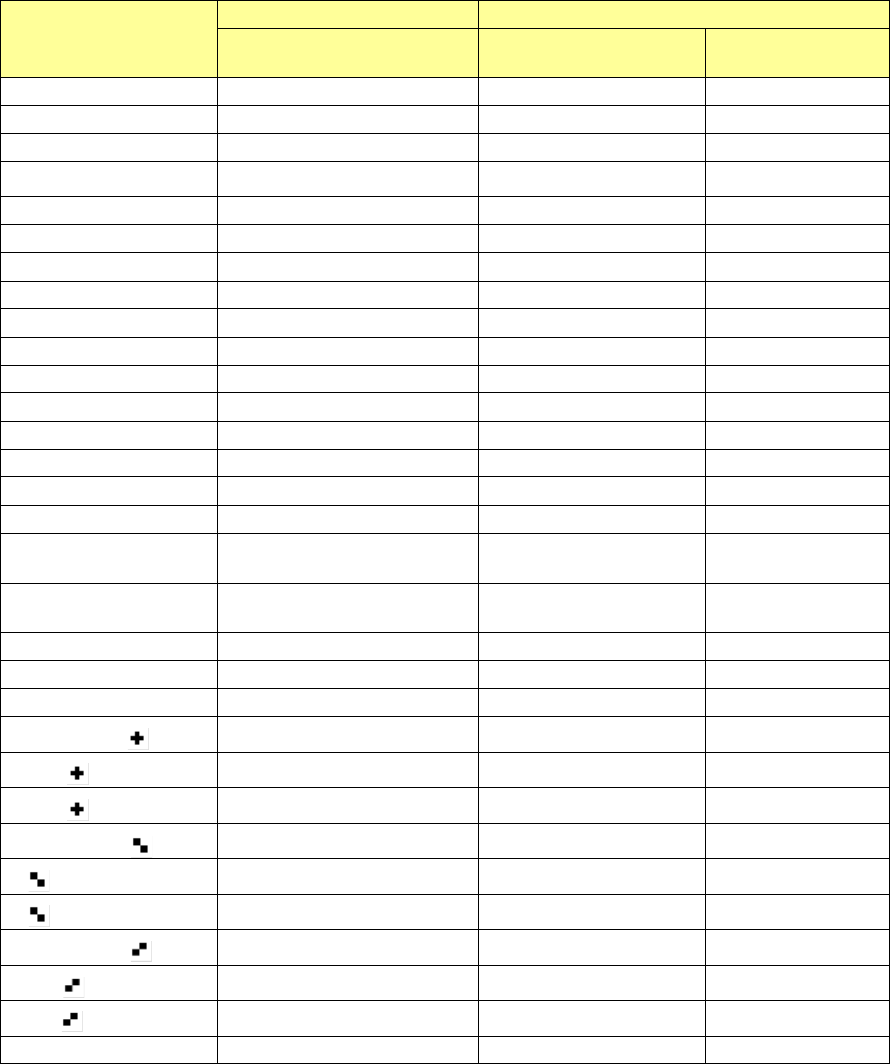
Shape
Other than RX-7 series
RX-7 series
Existence or non-existence
shape
Existence or
non-existence of shape
Direction
●
Existence
Existence
-
○
Existence
Existence
-
○
(with outline)
Non-existence
Existence
-
■ Existence Existence -
□
Existence
Existence
-
□
(with outline)
Non-existence
Existence
-
▲
Existence
Existence
Upper
□
Existence
Existence
Upper
▼
Existence
Existence
Lower
□
Existence
Existence
Lower
▲
(To the right)
Existence
Existence
Right
△
(To the right)
Existence
Existence
Right
▲
(To the right)
Existence
Existence
Left
□
(To the Left)
Existence
Existence
Left
△
(with outline)
Non-existence
Existence
Upper
▽
(with outline)
Non-existence
Existence
Lower
△
(with outline,
to the right)
Non-existence Existence Right
△
(with outline,
to the left)
Non-existence Existence Left
◆
Existence
Existence
-
◇
Existence
Existence
-
◇
(with outline)
Existence
Existence
-
Existence Existence -
(white)
Non-existence Existence -
(with outline)
Non-existence Existence -
Existence Existence Upper
(white)
Non-existence Existence Upper
(with outline)
Non-existence Existence Upper
Existence Existence Lower
(white)
Non-existence Existence Lower
(with outline)
Non-existence Existence Lower
Template
Existence
Non-existence
-

JaNets Instruction Manual 7. Program Editor
7-12
RX-7 Series bad mark information
When you press the <RX-7 series Option> button, the screen like one shown below appears.
Figure 7.4-8 RX-7 series bad mark information screen
The “RX-7 Series bad mark information” screen allows you to make settings for recognizing a bad
mark with the RX-7 series.
Table 7.4-5 Setting items to RX-7 series bad mark information
Item
Contents
Mark
Bad mark type ID
Set an ID of a bad mark type to be used.
Coordinates of bad
mark XY
Set coordinates for recognizing a bad mark.
The input range is-999.99 to999.99.
Window size
XY
Set the size of the window for recognizing a bad mark.
The input range is0.00 to999.99.
window offset
dX,dY
Set offset viewed from the coordinates for recognizing a bad mark.
The input range is-999.99 to999.99.
Mark type
Bad mark type ID
ID of a mark type
Recognizing
Set the bad mark recognition method, either “Illumination” or “Shape.”
When you click this item with the right button, the pop-up menu is displayed
on the screen.
Recognized color
Set the brightness of a bad mark.
You can set this item only when you select “Illumination” for the menu item
“Recognizing.”
□: The mark is bright as compared with the board.
■
: The mark is dark as compared with the board.
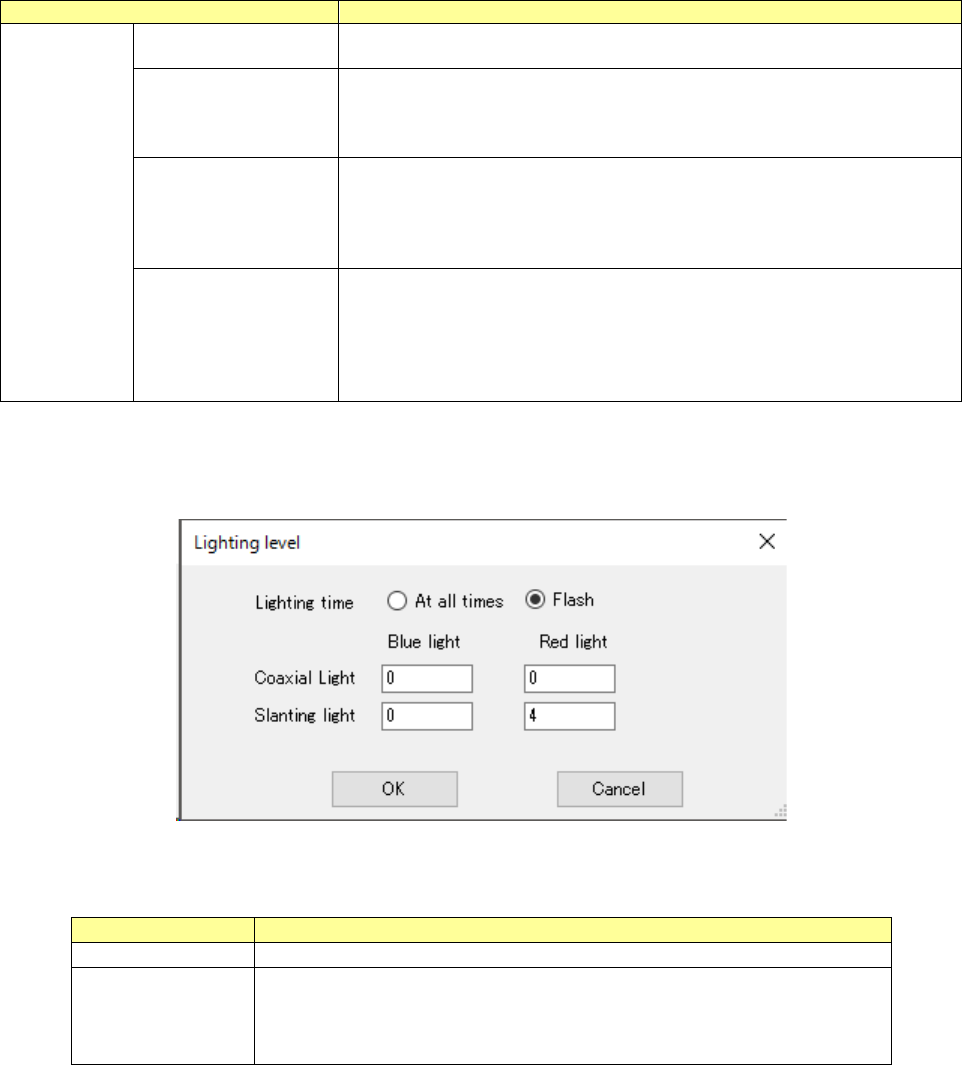
Lighting level
Set the light turning on method.
When you double-click this item, the screen for setting the light turning on
method opens.
Mark Shape
Set the mark shape.
You can set this item only when you select “Shape” for the menu item
“Recognizing.”
When you double-click this item, the screen for setting the light turning on
method opens.
Direction of mark
shape
Set the mark direction.
You can set the mark direction only when you select a shape having orien-
tations for the menu item “Mark Shape.”
Width/outer diameter
Set the mark width.
The When mark shape of ○、● ◎ Enter the outer diameter of the circle.
The input range is0.00 to999.99.
JaNets Instruction Manual 7. Program Editor
7-13
Item
Contents
Mark type
Height
Set the mark height.
The input range is0.00 to999.99.
The thickness / inside
diameter
Set the thickness of the line of the mark. .
You can set this item only when you select a linear shape.
When the mark shape is ◎, enter the diameter of the inner circle.
The input range is0.00 to999.99.
Allowable size range
Set the allowable range of the size of a found mark for the mark size speci-
fied above.
You can set this item only when you select “Shape” for the menu item
“Recognizing.”
The input range is1 to99.
Accept.
Set a threshold value of the image gradation to be used for black-and-white
judgment when you select “Illumination” for the menu item “Recognizing.”
The input range is0 to255.
Set the mark shape coincident index to be applied when a mark is recog-
nized if you select “Illumination” for the menu item “Recognizing.”
The input range is0 to1000.
When you double-click the “Lighting level” cell, the screen like one shown below appears, and you
can set the light level.
Figure 7.4-9 RX-7 Series Lighting level screen
Table 7.4-6 Setting items to RX-7 Series Lighting level
Item
Contents
Lighting time
Choose from at all times or Flash.
Lighting value
Set brightness of each lighting at the time of the mark recognition.
In the case of at all times, you will input range from 0 to 4.
In the case of Flash, it will input range is 0 to 8.
Default value is 4.