00191025-01.pdf - 第428页
SIPLACE 80S/F/G User’s Manual 9 Maintenance Edition 07/97 from S oftware Version SR.010.xx 9.5 Revolver Head, Segment Version 2 (New Nozzle Seat) 9 - 69 9.5.10.6 Cleaning and Maintaining the O-Ring and Slide Surface of t…
9 Maintenance SIPLACE 80S/F/G User’s Manual
9.5 Revolver Head, Segment Version 2 (New Nozzle Seat) Edition 07/97 from Software Version SR.010.xx
9 - 68
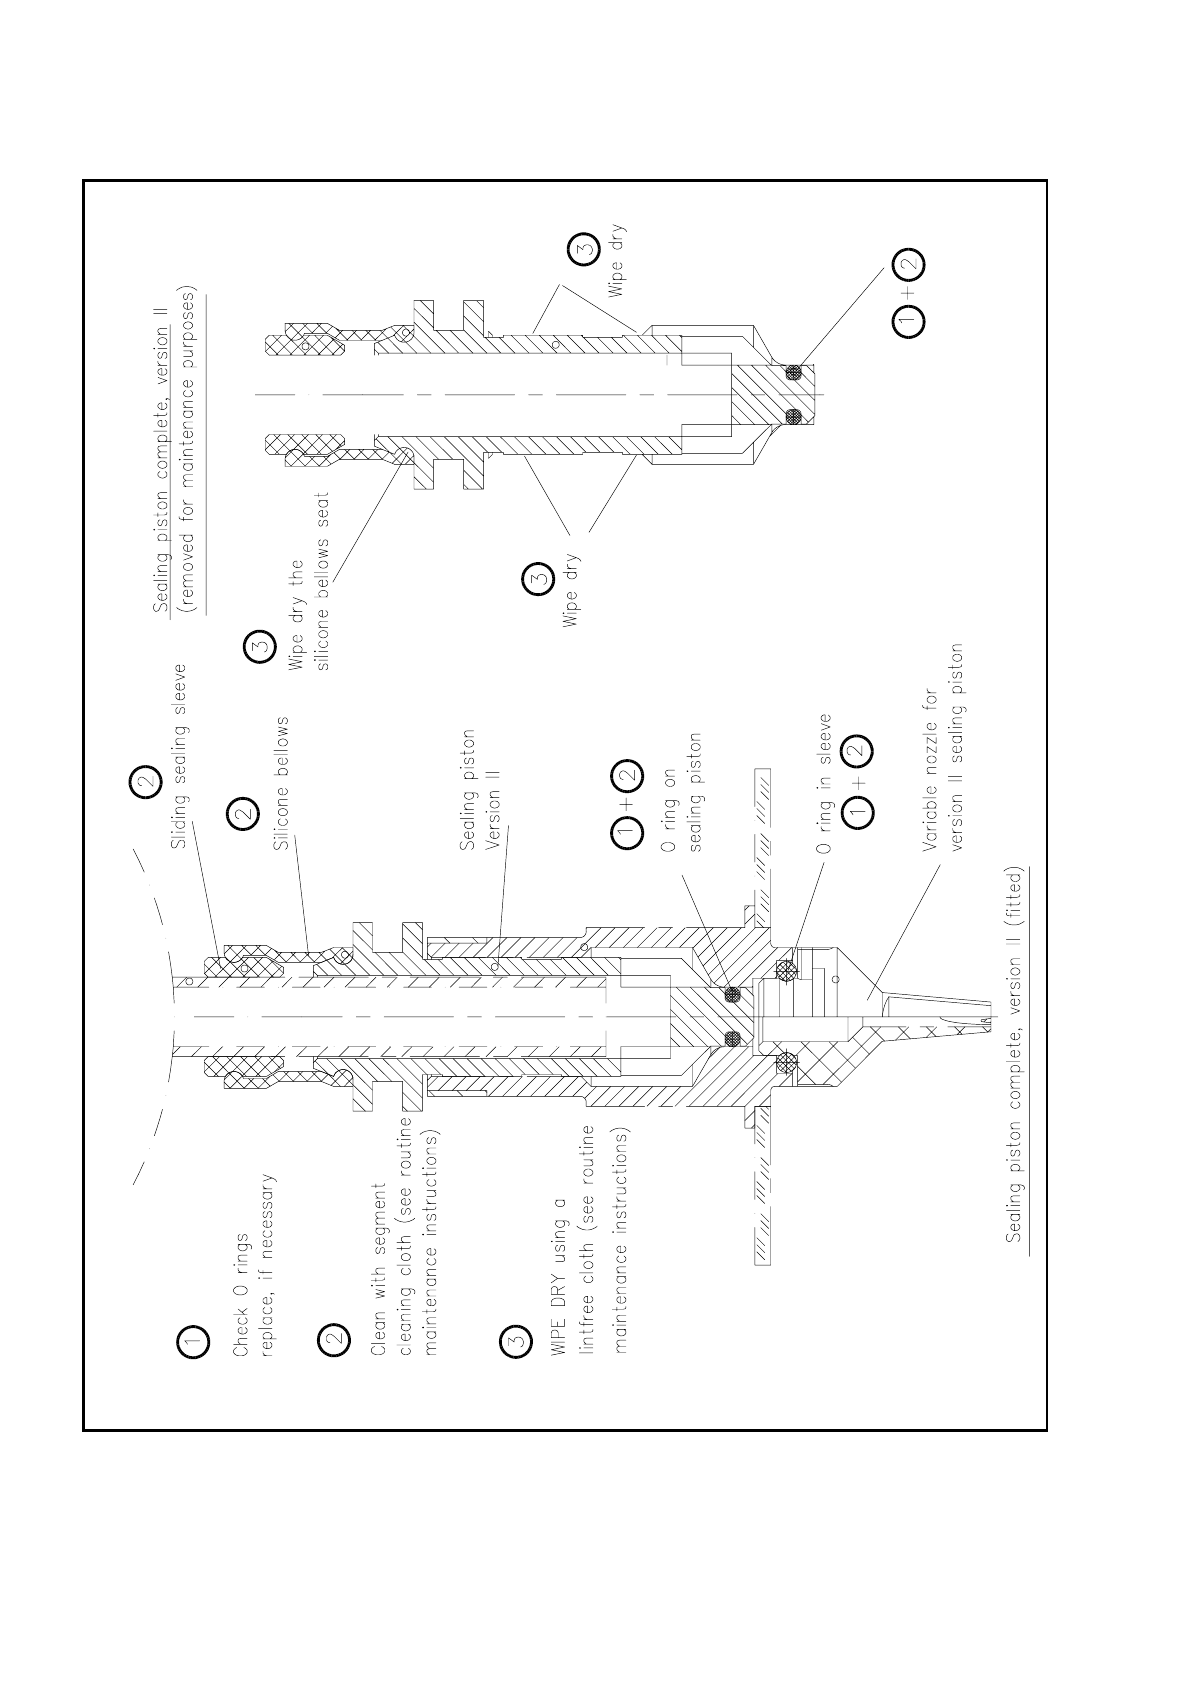
Fig. 9.5.15 Removal, installation and maintenance of the "sealing piston complete", version 2, (shown in direction of removal)

SIPLACE 80S/F/G User’s Manual 9 Maintenance
Edition 07/97 from Software Version SR.010.xx 9.5 Revolver Head, Segment Version 2 (New Nozzle Seat)
9 - 69
9.5.10.6 Cleaning and Maintaining the O-Ring and Slide Surface of the Sealing
Piston
NOTE
If the slide surface of the sealing piston (formerly called the pusher) is not cleaned or maintained, this can lead
to stiffness of operation and this in turn, for example, to fatal error message No. 28 and stopping of the place-
ment sequence.
If the O-ring at the front end of the sealing piston is not cleaned or maintained or is damaged, this can lead to
excess air and this in turn to warning No. 16 during the vacuum test "Segment airtight?" (when more than one
segment is leaky = fatal error message No. 39).
●
Remove the segments from the star as described under "Removal of the segments" .
●
Remove the sealing piston complete (see Fig. 9.5.15):
●
Remove the eccentric shaft.
●
Pull the sealing piston carefully downwards and out.
●
Cleaning and maintaining the O-ring and sealing piston:
●
Clean the O-ring with the segment maintenance cloth. If damaged use a new O-ring.
●
Wipe the slide surface of the sealing piston with the segment maintenance cloth. Then wipe the slide
surface with a lintfree cloth (according to the Short Reference Maintenance Segments Version 2).
●
Installing the "sealing piston complete" and eccentric shaft:
●
Slide the sealing piston carefully from below into the sleeve of the segment.
●
Slide the eccentric shaft with its slot vertical into the hole until the pin on the end of the eccentric shaft
engages the circumferential groove of the sealing piston.
●
Rotate the eccentric shaft until the slot is horizontal when the sealing piston is retracted and feel that it
has properly engaged.
●
Reinstall the segments as described under "Installation of the segments" .
NOTE
Segments with ballcatch are marked by "E6.1".
9.5.10.7 Replacing the O-Ring on the Sealing Piston
Spare part:
O-ring 1.75 x 0.75 NBR55, Item No. 00310170-02
●
Remove the segments as described under "Removal of the segments" .
●
Remove the sealing piston as described under the preceding maintenance work .
●
Take the old O-ring (see Fig. 9.5.15) off the sealing piston, clean the circumferential groove with the seg-
ment maintenance cloth.
●
Clean the new O-ring with the segment maintenance cloth and insert the O-ring in the circumferential
groove.
●
Wipe the slide surface of the sealing piston (see Fig. 9.5.15) with the segment maintenance cloth.

9 Maintenance SIPLACE 80S/F/G User’s Manual
9.5 Revolver Head, Segment Version 2 (New Nozzle Seat) Edition 07/97 from Software Version SR.010.xx
9 - 70
●
Wipe the slide surface dry with a lintfree cloth as specified in the Short Reference Maintenance Segments
Version 2.
●
Continue maintenance with the work described below.
9.5.10.8 Eccentric Shaft: Checking and Replacing the O-Ring,
Cleaning and Maintaining Slide Surface and O-Ring
NOTE
If the eccentric shaft and the hole is not cleaned or maintained, this can lead to stiffness of operation and this
in turn, for example, to the corresponding fatal error message.
Spare part:
O-ring for eccentric shaft, 2 x 1 NBR 55, Item No. 00315630-01, 1 piece
●
Pull the eccentric shaft out of the hole of the segment.
●
Clean and maintain the eccentric shaft with the segment maintenance cloth.
●
Remove any visible particles of dirt.
●
Check the O-ring on the eccentric shaft and if necessary insert a new O-ring in the circumferential groove
of the eccentric shaft (see Fig. 9.5.16).
●
Clean the hole and the ballcatch in accordance with the instructions provided in the Short Reference Main-
tenance Segments Version 2.
●
Remove any fluff deposits thoroughly.