00194614-08 Trainingsdoku. SG X-Serie_X4i SW70x (AL2)_EN.pdf - 第362页
Component Handling Operation X Feeder Student Guide SIPLACE X-Serie and X4I SW70x (AL2) 362 – Pre ss for longe r to move t he tape forwards. M ake sure th e cove r foil is not clamped in. 5. Display showing track on loca…
Component Handling
X Feeder Operation
361 Student Guide SIPLACE X-Serie and X4I SW70x (AL2)
X Feeder Operator Panel
10.2.7.5 X Feeder Operator Panel
Settings and Functions in the X Feeder Main Menu
10.2.7.6 Settings and Functions in the X Feeder Main Menu
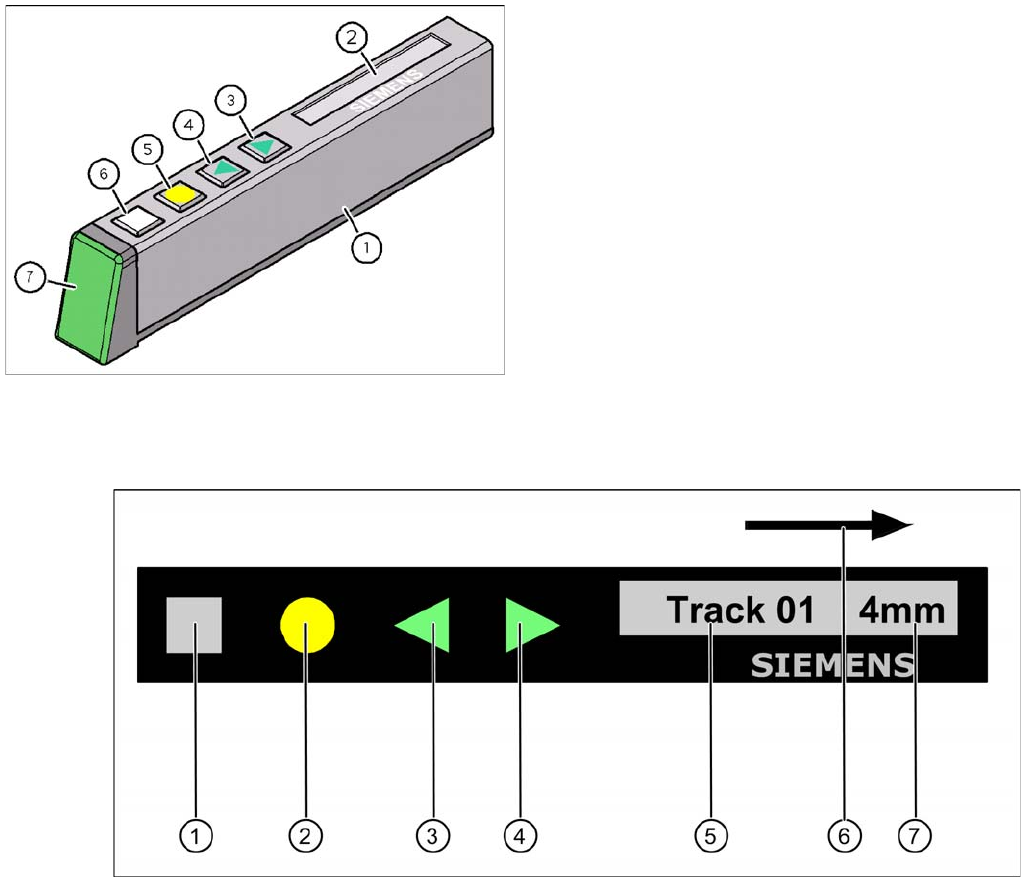
Control panel for X feeder
Legend
1. "SET" button:
– Press briefly to switch over to the next menu in the main view.
– Prolonged pressing sends a request to call up component verification.
2. "Foil" button:
– Pressing this button starts the drive motor for the cover foil, which runs until the foil has been
stretched tight and
– the motor toggle switch turns off or until the timer has counted 30 seconds.
3. "Backwards" button:
(Both functions should only be performed without the cover sheet fitted).
– Press briefly and the tape is move backwards by the set cycle step.
– Prolonged pressing moves the tape back.
4. "Forwards" button:
– Press briefly to move the tape by the set cycle step.
X Feeder Operator Panel
Legend
1. X feeder operator panel
2. LCD- Display (In the basic view shows the display the
track number and the step)
3. Button "Forward"
4. Button "Backward"
5. Button "FOIL"
6. Button "SET"
7. Status LED:
Component Handling
Operation X Feeder
Student Guide SIPLACE X-Serie and X4I SW70x (AL2) 362
– Press for longer to move the tape forwards. Make sure the cover foil is not clamped in.
5. Display showing track on location
6. Transport direction
7. Cycle step
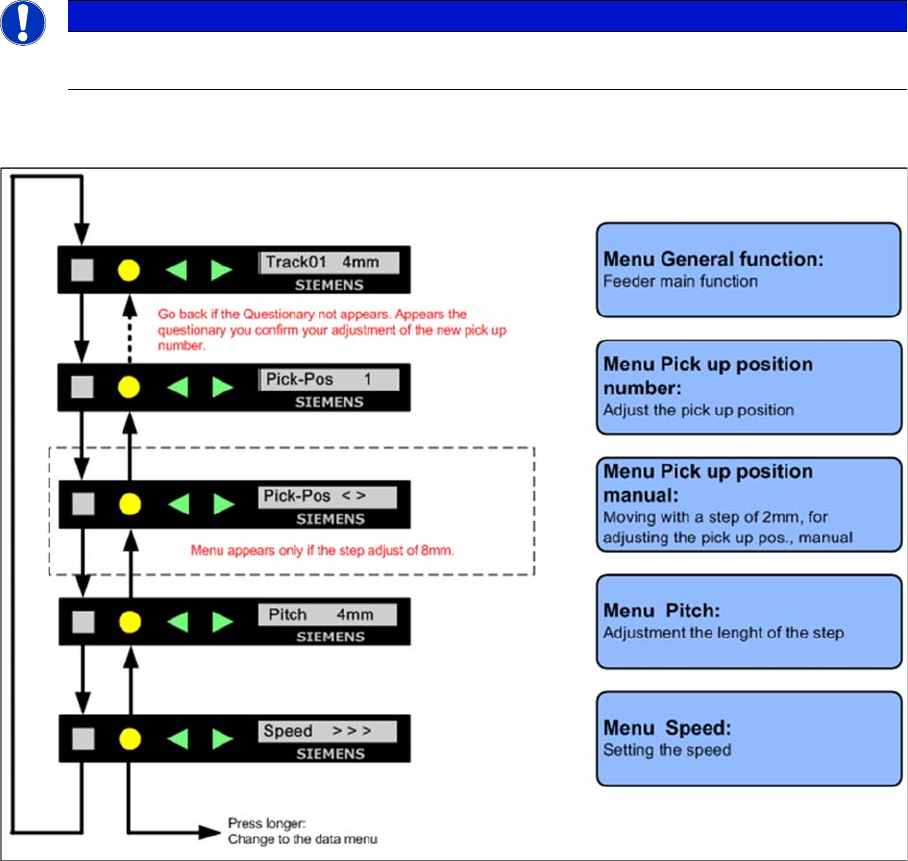
Sequence in the 8mm X Feeder Main Menu
10.2.7.7 Sequence in the 8mm X Feeder Main Menu
Sequence main menu 8mm X feeder
NOTICE
If correctly managed in SIPLACE Pro, the cycle for X feeders can be automatically set when a
recipe is downloaded.
Component Handling
X Feeder Operation
363 Student Guide SIPLACE X-Serie and X4I SW70x (AL2)
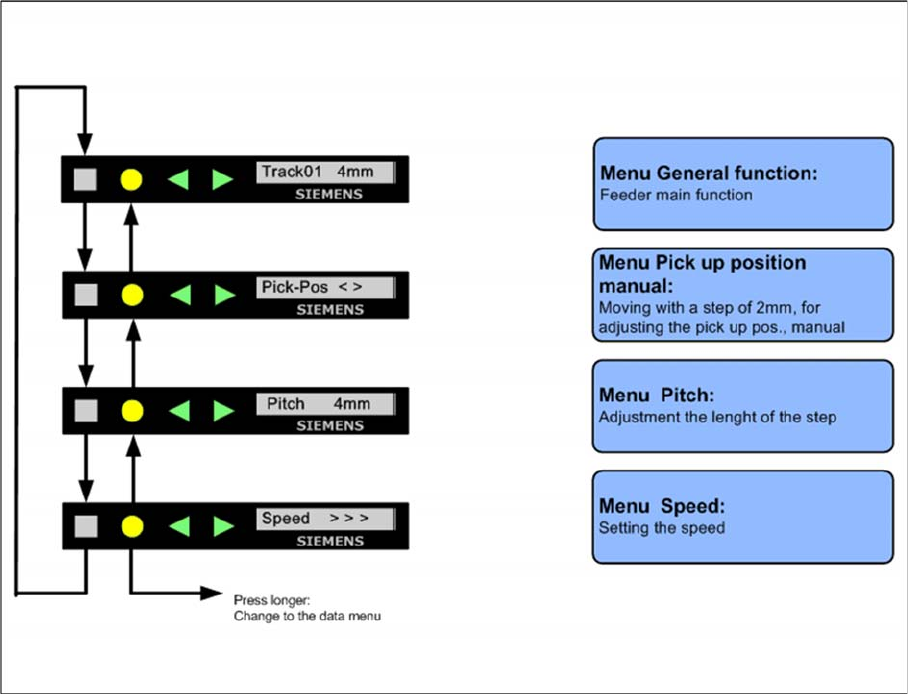
Sequence in the 12mm X Feeder Main Menu
10.2.7.8 Sequence in the 12mm X Feeder Main Menu
Sequence main menu 12mm X feeder
Setting the Pick Up Position for the 8 mm X Feeder
10.2.7.9 Setting the Pick Up Position for the 8 mm X Feeder
► Press the "SET" button.
► It appears the current pick up position on the display (e.g. Pick-Pos 3)
► With the buttons "FORWARD" or "BACKWARD" you can set the new pick up position.
► If you change the pick up position to the previous position, you will see the following message
(example assumes previous position was position 3): Pick-Pos 2 ? on the display.
► Confirm the new pick up position with the yellow button, it appears Pick-Pos 2 ! on the display.
► If pickup position 4 and an 8mm pitch were selected, you will see the menu for manually setting the
"Pickup pos < >" if you press the "SET" button.
► Depend on the Pick up position you can adjust in 2mm steps the correct pick up position.
► Was the pick up position correct appears the menu "Pitch" now and you can set the correct pitch
1,2,4,8mm with the buttons "FORWARD" or "BACKWARD".
► Press the "SET" button two times to confirm your settings.