JX-350_EPU使用说明书.pdf - 第174页
EPU Instruction M anual C hapter 4 Creating a Production Progr am 4- 126 ( 14) Update Pick Offset The component pick - up coor dinates set on the “ Pick ” data screen are r eflect ed in the “ Picking offset X YZ ” f ield…
EPU Instruction Manual Chapter 4 Creating a Production Program
4-125
(10) Cel copy
This command registers data of the selected cell (field) in the memory.
This command is effective for the cells “X,” “Y, ” “Angle” and “Component name.”
To paste the registered data into another data, execute the [Cel Paste] command
described below.
(11) Cel Paste
This command overwrites the corresponding item on a line on which the cursor is
located with data registered in the memory with the [Cel copy] command.
You can paste data from the “X,” “Y” or “Angle” cells (fields) in the same type of cell
only.
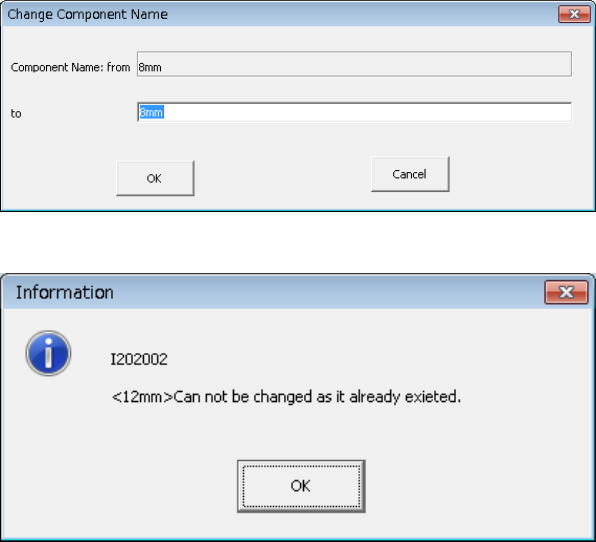
(12) Change component name
This command changes a component name.
When you select this command, the following dialog box appears on the screen.
Enter a new name to the “to” field, and click the <OK> button.
If the changed component name is duplicate with another component name, the
following message is displayed.
(13) Update layers
The layer of "Component data" is incorporated into "Placement data." The
following incorporating methods are available.
All components: The layer of all component data is incorporated into the
incorporating data.
Each component: The layer of the corresponding component data is
incorporated into the placement data.
EPU Instruction Manual Chapter 4 Creating a Production Program
4-126
(14) Update Pick Offset
The component pick-up coordinates set on the “Pick” data screen are reflected in the
“Picking offset XYZ” field on the “Component” data screen.
When you select one data record on the “Pick” data edit screen after teaching, and
the [Update Pick Offset] command on the “Edit” menu, the difference between the
default pick-up value of the selected “Pick data” and the taught result can be
reflected in the “Picking offset” of the “Component data.”
(15) Mark copy
* Not used in JX-350.
(16) Mark Paste
* Not used in JX-350.
(17) Mark database
* Not used in JX-350.
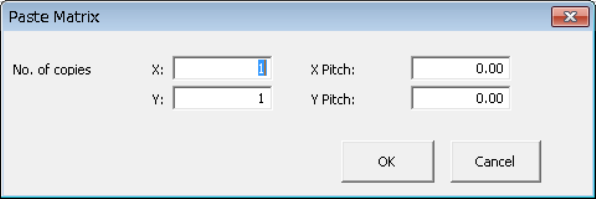
(18) Matrix Copy
This command copies data in the range selected with the [Cut] or [Copy] command to
the specified position.
* This command cannot be selected when you use the sort function.
1) Placement data
This command inserts data in the range selected with the [Cut] or [Copy] command
before the cursor position.
When you specify the “X” and “Y” fields of “No. of copies,” and “X Pitch” and “Y
Pitch” fields, the system allows you to copy the data in a matrix with adding or
subtracting the entered value to/from the component placement position in the X
direction and that in the Y direction.
After you execute the [Matrix Copy] command, all of the component IDs are
changed to “#.”
① No. of copies, X: Specify the number of times the system will copy data in the
X direction.
② No. of copies, Y: Specify the number of times the system will copy data in the
Y direction.
③ X Pitch: Specify the amount to increment or decrement the
component placement or pick-up position in the X direction.
④ Y Pitch: Specify the amount to increment or decrement the
component placement or pick-up position in the Y direction.
⑤ OK: This button pastes the data.
⑥ Cancel: This button cancels the paste operation.
EPU Instruction Manual Chapter 4 Creating a Production Program
4-127
• Example of the [Matrix Copy] command result
Component ID X Y Angle Component name
R1 5.00 10.00 45.00 1608-A
R2 10.00 10.00 0.00 1608-A
No. of copies X 3 X Pitch: 0.50
No. of copies Y 1 Y Pitch: 1.00
R1 5.00 10.00 45.00 1608-A
R1 10.00 10.00 0.00 1608-A
# 5.50 10.00 45.00 1608-A
# 10.50 10.00 0.00 1608-A
# 6.00 10.00 45.00 1608-A
# 11.00 10.00 0.00 1608-A
# 6.50 10.00 45.00 1608-A
# 11.50 10.00 0.00 1608-A
# 5.00 11.00 45.00 1608-A
# 10.00 11.00 0.00 1608-A
# 5.50 11.00 45.00 1608-A
# 10.50 11.00 0.00 1608-A
# 6.00 11.00 45.00 1608-A
# 11.00 11.00 0.00 1608-A
# 6.50 11.00 45.00 1608-A
# 11.50 11.00 0.00 1608-A
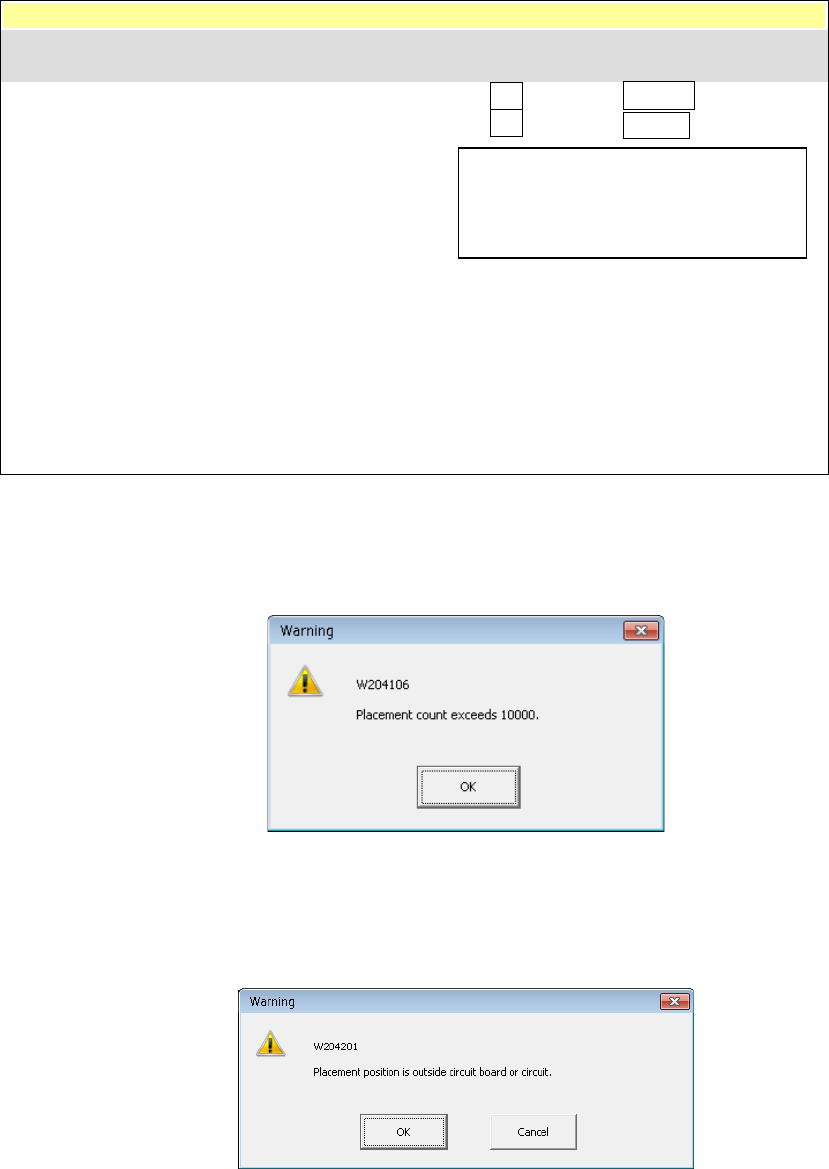
In the following cases, an error occurs and the system displays the corresponding
error message.
① The number of data records you entered exceeds the maximum number of
records.
• OK: This button cancels the copy operation. No data is copied.
② The component placement position is outside a PWB or circuit.
• OK: This button continues copying data. However, the range over mark is
appended to the error data record.
• Cancel: This button cancels the copy operation.
− The copied block is inserted above the
specified line.
− All of the Component IDs are set to “#”.
Component ID X Y Angle Component name