JX-350_EPU使用说明书.pdf - 第181页
EPU Instruction M anual C hapter 4 Creating a Production Progr am 4- 133 4.3.2 Environment setting This section descr ibes how to set the environment f or editing a production prog ram. W hen you select the [ File]/[Envi…
EPU Instruction Manual Chapter 4 Creating a Production Program
4-132
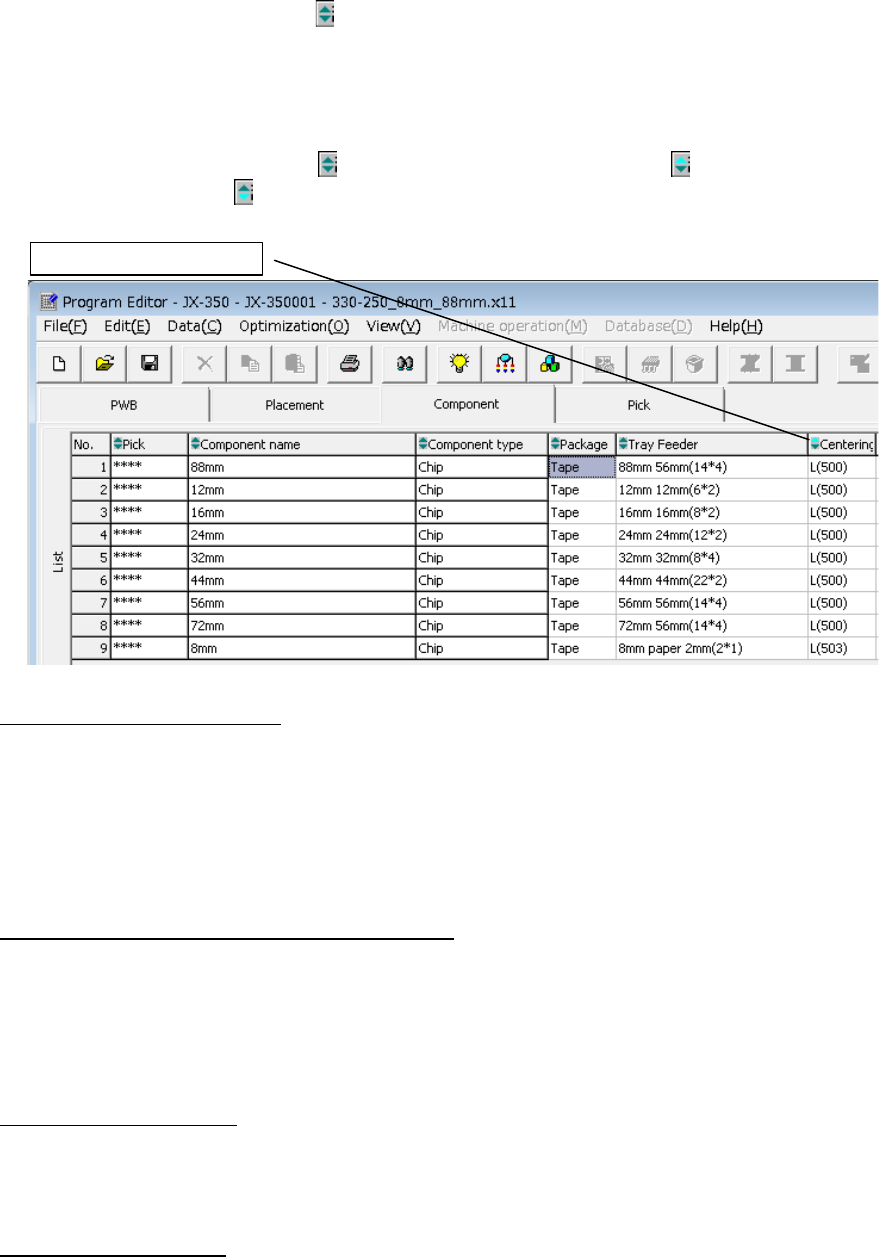
(2) Sort function on the “List” screen
When the sort image icon (
) is displayed on a column header (this is the area that
displays the item name) of the List screen, double-click this icon. You can sort data
by the column.
Every time you double-click the icon, the sort function is switched as follows (the
symbol displayed inside the icon changes to indicate the current sort function):
Disabling the sort function (
) → Sorting in ascending order ( ) → Sorting in
descending order (
) → Disabling the sort function
Clearing the sorted condition
If you load a file to the system, or if you execute the [Machine operation] command,
and then the [Continuous Measurement] command, the sorted data on all screens are
restored to its original condition (that is, not sorted condition).
If you change Pick data on the Feeder layout screen, the sorted data on the Pick List
screen are restored to its original condition.
Edit commands available during sort operation
Some Edit commands cannot be used on the screen whose data is sorted.
Not available commands are: [Cut], [Delete], [Insert line], [Duplicate] and [Matrix
Copy].
Execute these commands when data is not sorted.
Items that can be sorted
On the Placement list screen or Component list screen:
The system allows you to sort data by every item and display it.
On the Pick list screen:
The system allows you to sort data by the items: Component name, Package,
Feeder and Side (Pos.). The item “Side” works together with the item “Pos.”
Therefore, even though you sort data by either item, data under the “Side” is sorted in
order “Right front,” “Right rear,” “Light front” and “Left rear,” and the position is sorted
in ascending or descending order.
Double-click the header.
EPU Instruction Manual Chapter 4 Creating a Production Program
4-133
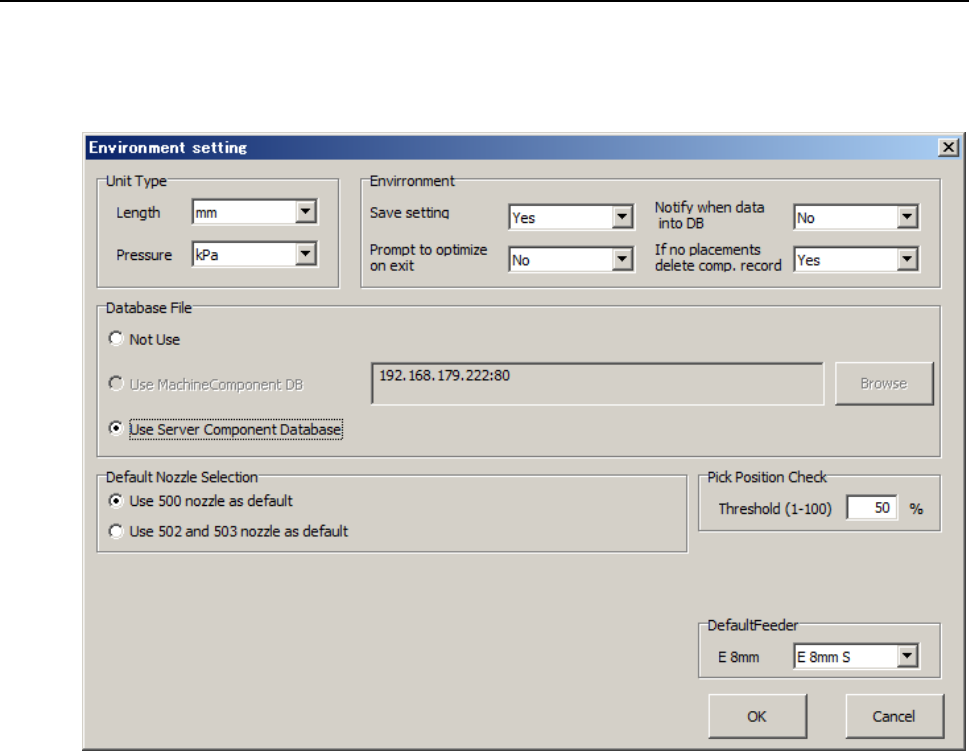
4.3.2 Environment setting
This section describes how to set the environment for editing a production program.
When you select the [File]/[Environment setting] commands from the menu bar, the
following “Environment setting” dialog box appears on the screen.
(1) Unit Type
Allows you to set units of length and pressure when you edit a program.
• Length: Select a unit among mm, 1/100 mm and inch.
• Pressure: Select a unit, either kPa or level.
(2) Environment
1) Save setting
Select whether to save the conditions under which you quit the Program Editor and
replicate it when the Program Editor starts up next time.
• Yes: The system reproduces the following items when you starts the Editor the
next time:
1. Displaying/hiding the tool bar
2. Loaded file name
3. Window size
When you start up the Editor again after quitting it, the system opens
the file you used the last time and displays the “Dimension setup”
screen.
• No: The system displays the screen for creating a new production program
when you start up the Program Editor the next time.
EPU Instruction Manual Chapter 4 Creating a Production Program
4-134
2) Prompt to optimize on exit
Select whether to display the message for optimization when you quit the Program
Editor.
• Yes: The system displays the inquiry dialog box that asks you whether to
execute the Optimization function if you try to quit the program although
you have not executed the optimization function.
• No: The system does not display the inquiry dialog box.
3) Notify when data entered into DB
Select whether to notify you that the system finishes registering data in the
database.
• Yes: The system notifies you that it registered component data into the
database when it did.
• No: The system does not notify you.
4) If no placements delete comp. record
Select whether to delete component data on a component used at the placement
position when the corresponding placement data is deleted.
• Yes: The system deletes component data when all the corresponding
components have been placed at the placement positions.
• No: The system does not delete component data.
You can delete component data that has no placement positions on
the “Component” data “List” screen.
• Notification: The system displays the “Question” message that asks you
whether to delete the corresponding component data.
(3) Database file:
Select a type of a database file you are to use. Note that you cannot select a
database that cannot be used.
A database is a file in which component data is registered. (For more details, see
Chapter 5 "Database.")
You can use only one database with the Editor.
You can create two or more databases and operate them, but You have to specify the
database file to use according to the program.
• When you use the component database of the mounter main unit
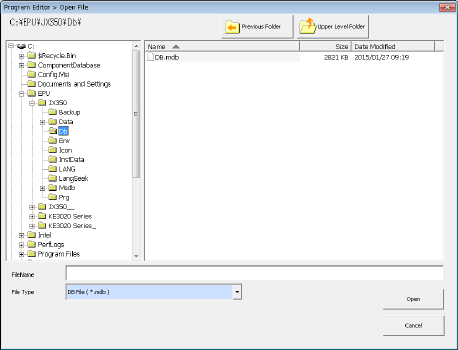
<How to set>
① Select the <Machine Component DB> button.
② Press the <Browse> button, and select a database file on the “Open File” dialog box.