00198661-02_UM_SX12-V3_EN.pdf - 第238页
5 Tasks at the placement machine Instruction manual SIPLACE SX1/ SX2 Edition V2 and V3 5.3 Switching on the SIPLACE line From software version SC.713.1 Edition 12/2020 238 5 Fig. 5.3 - 1 "Production" view after…
Instruction manual SIPLACE SX1/SX2 Edition V2 and V3 5 Tasks at the placement machine
From software version SC.713.1 Edition 12/2020 5.3 Switching on the SIPLACE line
237
5.3 Switching on the SIPLACE line
5.3.1 Starting the SIPLACE Pro Line Control GUI program
Start the program on the line computer SIPLACE Pro Line Control GUI
via the Windows Start menu
Start --> Programs --> SIPLACE Pro --> LCGUI
or
with the icon on your desktop.
Enter your user data.
The system connects to the SIPLACE Pro server and opens the user interface.
5.3.2 What to consider before switching on the stations
5
Check whether the stations are connected to the power and compressed air supplies.
Perform a sight check of the stations. Make sure that there are no obstacles in the travel
range of the gantries.
Make sure that the Z axes of all heads are in their uppermost end positions.
With waffle pack changer option: Switch the waffle pack changer on before you switch the
placement machine on.
5.3.3 Switching on the station and starting the station software user interface
5
Switch the station on at the main power switch.
After switching on, check whether the manometers show the required operating pressure.
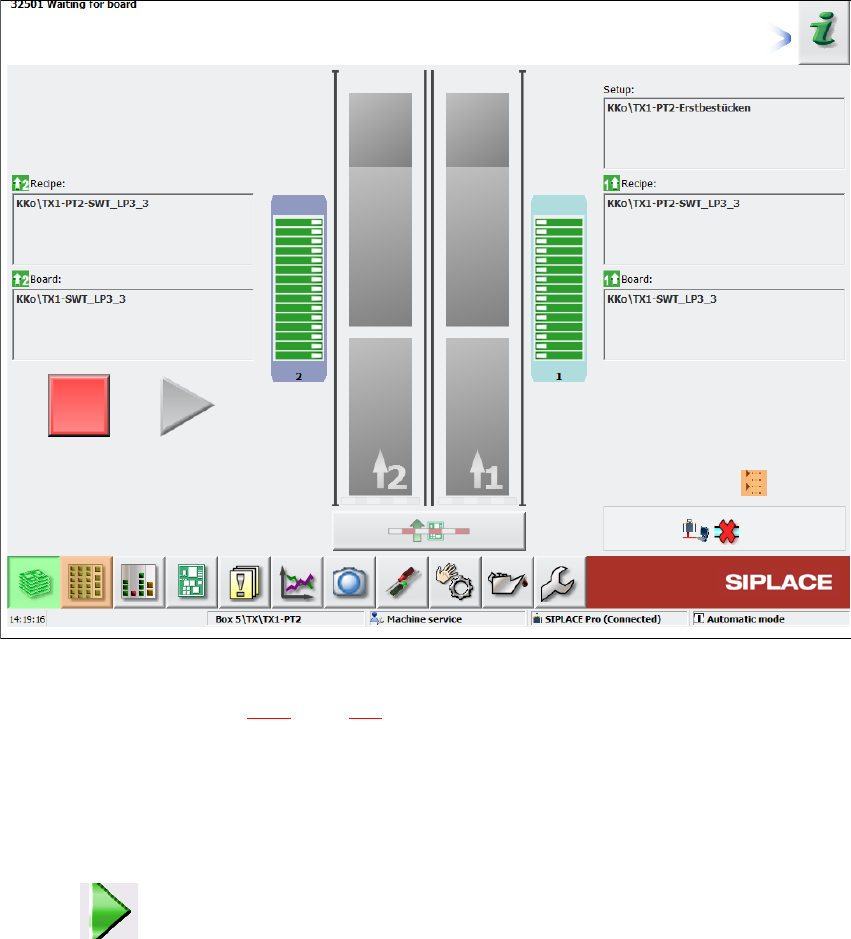
The station computer software is loaded and the "Production" view of the station software is
shown for the "Production" operator level (see following diagram).
CAUTION
Before you switch on the stations, please perform the following steps.
CAUTION
Communication problems when switching on the station!
Early switching on of station can lead to communication problems.
Only switch the station on if the monitor of the SIPLACE Pro computer shows the
"Desktop",
5 Tasks at the placement machine Instruction manual SIPLACE SX1/SX2 Edition V2 and V3
5.3 Switching on the SIPLACE line From software version SC.713.1 Edition 12/2020
238
5
Fig. 5.3 - 1 "Production" view after loading the station software (example)
The status field (see section 5.5.1, page 243) shows the current status of the station and the action
to be performed.
Press the start button when you see the request "Press Start button".
The start button is located on the input side and output side of the station.
A reference run will be performed. After completion of this reference run, the station is ready
for operation.
The icon will be shown in the working area of the user interface (enabled).
Instruction manual SIPLACE SX1/SX2 Edition V2 and V3 5 Tasks at the placement machine
From software version SC.713.1 Edition 12/2020 5.3 Switching on the SIPLACE line
239
5.3.4 Action of placement machine start button
The action performed by the start button can be set.
Open the "Check sensors and functions" view (see section 5.5.3, page 243).
The following settings are possible:
Start production automatically 5
Standard setting.
Pressing the start button automatically begins the production process.
Do not change production status 5
This is used, for example, to calibrate and test the placement machine
Pressing the start button simply closes the electricity circuit; production is not started immediately.
5
5.3.5 "Switching on the SIPLACE line" flow chart
The following flow diagram shows the actions performed after the SIPLACE line has been
switched on.
CAUTION
Machine functions can be directly started via the GUI, irrespective of the start button set-
ting. If the electrical circuit has already been closed, you do not need to confirm with the
placement machine start button.