00191413-01.pdf - 第310页
10 Production Tools / Restrictions User Manual Line Computer UNIX 10.1 Restriction Editor Software Version 501.xx 01/99 Issue 10 - 4 The main wi ndow is s ubdivid ed as foll ows: - Menu bar - Select ion ar ea - Editi ng …
User Manual Line Computer UNIX 10 Production Tools / Restrictions
Software Version 501.xx 01/99 Issue 10.1 Restriction Editor
10 - 3
10.1.3 Main Window of Restriction Editor
The areas of the main window and their functions are explained in the following.
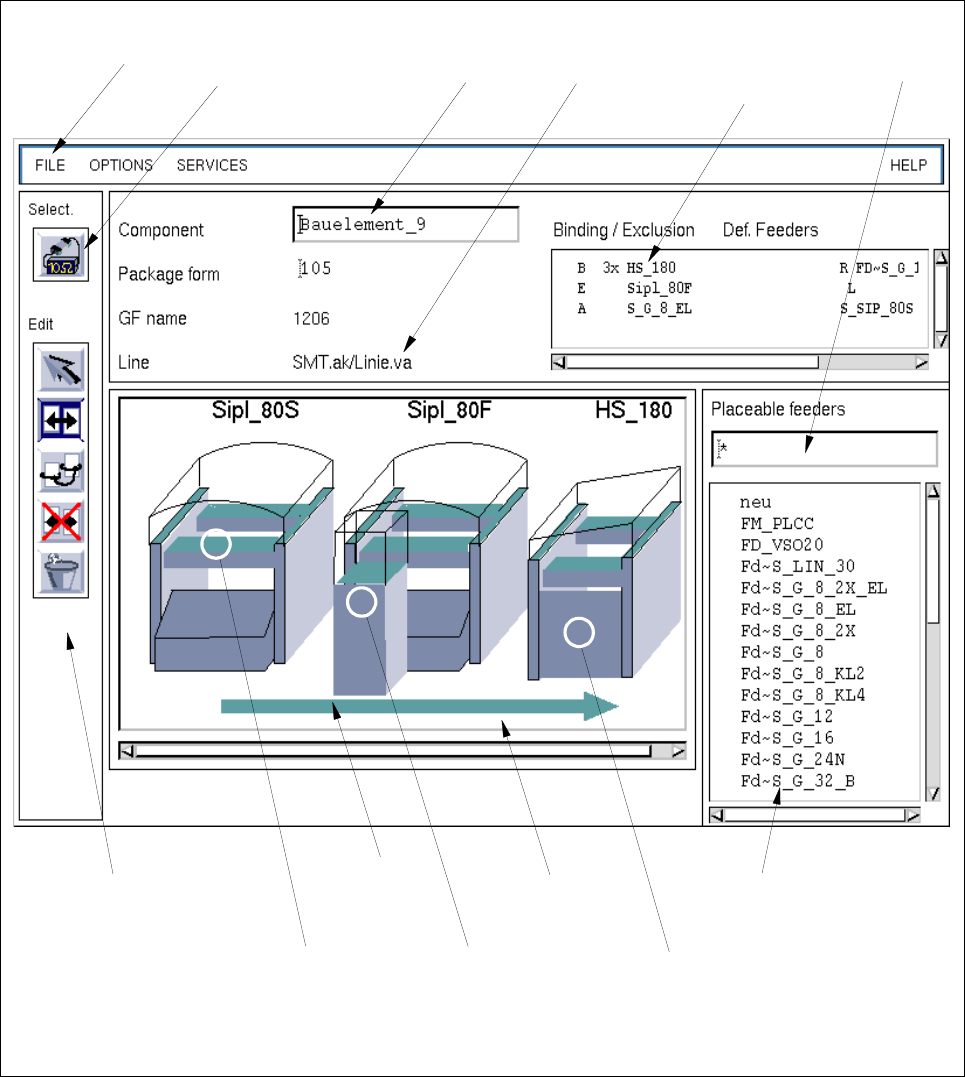
Fig. 10.1.1 Main Window "Restriction Editor"
selection field
"Placeable feeders"
display area
command area
menu bar editing field
"Component"
selection field
"Restrictions/
filter field
selection area
"Component"
name of the
line
Allocations"
selection:
complete
machine type
selection:
WPC trolley
(SIPLACE 80F)
selection:
complete line
selection:
feeder part on
the right
machine side
10 Production Tools / Restrictions User Manual Line Computer UNIX
10.1 Restriction Editor Software Version 501.xx 01/99 Issue
10 - 4
The main window is subdivided as follows:
- Menu bar
- Selection area
- Editing field
- Display area
- Selection fields
- Filter field
Menu Bar
The menu bar contains the menus "FILE", "OPTIONS", "SERVICES" and "HELP".
The "SERVICES" menu is described in section 10.1.3.1.
NOTE
Since the functions and operation of the menus "FILE", "OPTIONS" and "HELP" are similar to those in
other application programs of the line computer, they described in detail in chapt. 2.
Selection area "Component"
In this area, the component is symbolized by an icon by means of which the FSB for the selection of a new
component can be opened. The procedure to be followed is described in section 10.1.3.2.
Editing field "Component"
In this field, the name of the desired component is entered for which an allocation or restriction is to be defined.
Display area
In the display area, only those stations and station extensions of a line together with their feeder locations are
displayed symbolically, that are required for the production of the jobs contained in the lot file.
Depending on the currently active mode of the editor, the locations for which bindings and exclusions have
been defined are displayed in color (see chart below).
Selection fields
Selection field "Restrictions/Allocations"
In this field, all bindings, exclusions and allocations are displayed that were defined for the current
component.
Mode Binding
(yellow)
Exclusion
(red)
Selection
x x
Allocation
--
Binding
x-
Exclusion
-x
Deletion
--
User Manual Line Computer UNIX 10 Production Tools / Restrictions
Software Version 501.xx 01/99 Issue 10.1 Restriction Editor
10 - 5
Selection field "Placeable feeders"
In this field, all feeders are displayed that can be set up on the location selected in the display area (in accordance
with the MSC). Moreover, all "customer-specific types" that are contained in the set-up info file ".ri" are also
displayed. If in the Restriction Editor "customer-specific types" were created for a given production job, also
these are displayed, howerver, only if the Restriction Editor was started with the appopriate lot file.
Filter field
The list of the feeders contained in the selection field "Placeable feeders" can be limited by entering given
character strings.
Example: *LIN* Only linear feeders are displayed.
* All feeders suitable for set-up are displayed.
Command area (see section 10.1.3.3)
This area contains commands by means of which selections can be made, bindings and exclusions be defined
of, if required, existing allocations as well as customer-specific types that were created in the Restriction Editor
be deleted.
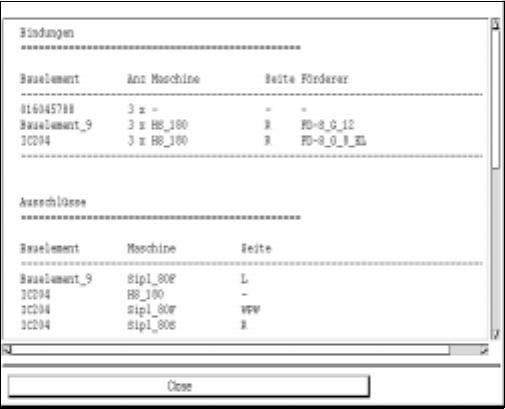
10.1.3.1 SERVICES Menu
The SERVICES menu contains only the menu option described in the following:
- Print preview
This function allows the allocations and restrictions as well as the created customer-specific types to
be displayed in a separate window.
● Select menu option SERVICES --> Print preview.
The window containing a listing of all bindings, exclusions, allocations and customer-specific
types related to the current lot file is opened.
● Click on the Close button to close the window again.