00191413-01.pdf - 第505页
User Manual Line Computer UNIX 16 MaDaMaS Software Version 501.xx 01/99 Issue 16.2 MaDaMaS Evaluation User Interface 16 - 9 The evalu ation use r inter face is sub divided into th e followin g areas: - Menu bar - Info ar…

User Manual Line Computer UNIX 16 MaDaMaS
Software Version 501.xx 01/99 Issue 16.2 MaDaMaS Evaluation User Interface
16 - 8
16.2.1 Starting MaDaMaS
● Click on the MaDaMaS icon on the desktop.
The evaluation user interface is opened by displaying the (initial) evaluation screen "Overall view"
for the current line (see Fig. 16.2.1).
NOTE
If the area containing the bar chart icon is clicked on in a station display in the view area of the desk-
top (see chapt. 3, Fig. 3.1.2), the MaDaMaS evaluation screen will open as well.
Fig. 16.2.1 Evaluation user interface - "Overall view" evaluation
menu bar
info area evaluation type
command area info line
view area
starting time
of the evaluation
end of the
evaluation
call-up of the
call-up of the
"System diagram"
evaluation
evaluation
"Track trend"
theor.:
MTBI:

User Manual Line Computer UNIX 16 MaDaMaS
Software Version 501.xx 01/99 Issue 16.2 MaDaMaS Evaluation User Interface
16 - 9
The evaluation user interface is subdivided into the following areas:
- Menu bar
- Info area
- View area
- Command area
- Info line
Menu bar
The menu bar contains the menus "FILE", "EVALUATIONS", "OPTIONS" and "HELP".
The first menu option on the "FILE" menu is explained in section 16.2.2.
The "EVALUATIONS" menu is described in section 16.2.3, the "OPTIONS" menu in section 16.2.4.
NOTE
Since the functions and the operation of the "FILE" and "HELP" menus are similar to those in other
application programs of the line computer, they are described in detail in chapt. 2 of this manual.
Info area
The following information is displayed in the info area:
- Time basis: Currently set time basis (evaluation period)
- Date and time Time of beginning and end of the evaluation
- Set-up: Name of the currently valid set-ups
- Cluster: Name of the currently valid PCBs (cluster)
View area
In most of the evaluations the view area is subdivided into a graphical area and a text area.
All the information related to the current type of evaluation that has been collected since the start time of the
evaluation, as well as the selected time basis, are displayed in these areas.
The structure of the view area and the function of the graphics and icons contained therein are described for
each evaluation in the respective sections.
NOTE
The view area is updated automatically after a PCB has exited a station or whenever a different evaluation or
time basis is selected.
An exception is the display of the "List of events". It is not updated until the "List of events" is restarted or a
new time basis is selected.
Command area (see section 16.2.5)
The command area contains three icons for the setting of the time basis, one icon for setting the Reset time
and one icon to switch the display to the previous evaluation.
Info line
This line contains a Help text or Info text related to the object the mouse cursor is pointing to.
16 MaDaMaS User Manual Line Computer UNIX
16.2 MaDaMaS Evaluation User Interface Software Version 501.xx 01/99 Issue
16 - 10
16.2.2 FILE Menu
This section only contains a description of the "Print" menu option. The remaining menu options are described
in detail in chapt. 2.
16.2.2.1 Setting Printer Options
- Printer
This menu item contains the menu options "Screen printout" and "Graphic printout".
The "Screen printout" option permits a printout of the current evaluation window to be printed out on
the printer set under "OPTIONS --> Printer", or the screen contents can be printed to a file.
The "Graphic printout" permits the complete evaluation currently displayed to be output to the selected
printer.
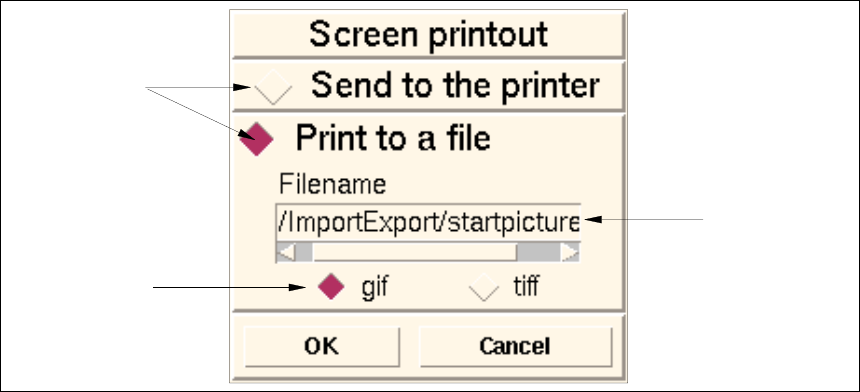
Creating a hardcopy:
● Click on FILE --> Printer --> Screen printout.
The following window for setting the printer options is opened.
● Activate the Send to the printer button if the screen contents are to be output to the printer.
● Click on OK.
The window is closed and the current evaluation screen is printed out.
● Activate the Print to a file button if the screen printout is to be printed to a file.
● Click on the button adjacent to the desired file format.
● Click on OK.
The window is closed and the screen contents (after a signal tone has sounded twice) are stored
as a file under the name of the current evaluation screen and with the set file format in the path
"/u/ImportExport".
name
of print file
file format of
the print file
command
button