00191413-01.pdf - 第447页
User Manual Line Computer UNIX 14 Control / Control Modules Software Version 501.xx 01/99 Issue 0.2 Job Control 14 - 11 14.1.4.3 Editing Barcode Type Allocati on List When usi ng PCB bar codes, the approp riate barc odes…
14 Control / Control Modules User Manual Line Computer UNIX
0.2 Job Control Software Version 501.xx 01/99 Issue
14 - 10
- Error messages...
All error messages and warnings that occurred during a producibility check are stored in the "all.error"
file. The contents of the "all.error" file can be displayed by following the procedures described below.
● Deactivate all icons in the command area.
● Select faulty job by double-clicking.
(A faulty job is identified by an "F" preceding its name).
The main window of File Display is opened (see chapt. 4). It contains all error messages and
warnings that occurred during the producibility check.
Or:
● Select faulty job by clicking on it once.
● Click on SERVICES --> Error messages...
The main window of File Display containing the contents of "all.error" file is opened.
User Manual Line Computer UNIX 14 Control / Control Modules
Software Version 501.xx 01/99 Issue 0.2 Job Control
14 - 11
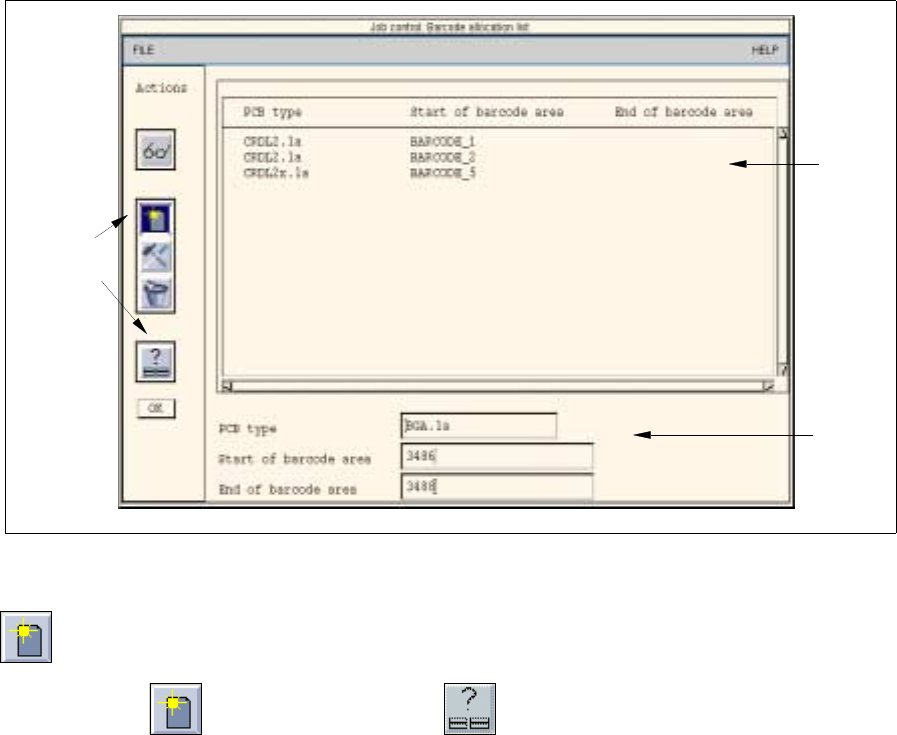
14.1.4.3 Editing Barcode Type Allocation List
When using PCB barcodes, the appropriate barcodes must be allocated to the PCBs. This is accomplished by
means of the "Barcode type allocation list..." menu option.
● Click on SERVICES --> Barcode type allocation list... (with the job list loaded).
The window containing the barcode type allocation list opens (see Fig. 14.1.3).
Here, given barcode ranges (Start barcode --> End barcode) can be allocated to the PCB types,
or existing allocations can be edited.
Fig. 14.1.3 "Barcode Type Allocation List" Window
- Editing of barcode allocations
● Click on the icon and subsequently the icon.
The FSB containing the file selection of all already-defined PCB types opens.
● Select the PCB type to which a barcode is to be allocated by double-clicking.
The FSB closes and the name of the selected PCB type is displayed in the "PCB type" editing
field.
● Click on the "Start of barcode range" editing field and enter the start barcode (e.g. 35588).
● Click on the "End of barcode range" editing field and enter the end barcode (e.g. 35598).
● Click on OK in the command area.
The new allocation is inserted into the list.
Or:
● Select an entry from the allocation list as preset value using the right mouse button.
The data are transferred to the editing fields.
● Edit the data as required and add them to the list by selecting OK.
Selection
area
Command
area
Editing
area
14 Control / Control Modules User Manual Line Computer UNIX
0.2 Job Control Software Version 501.xx 01/99 Issue
14 - 12
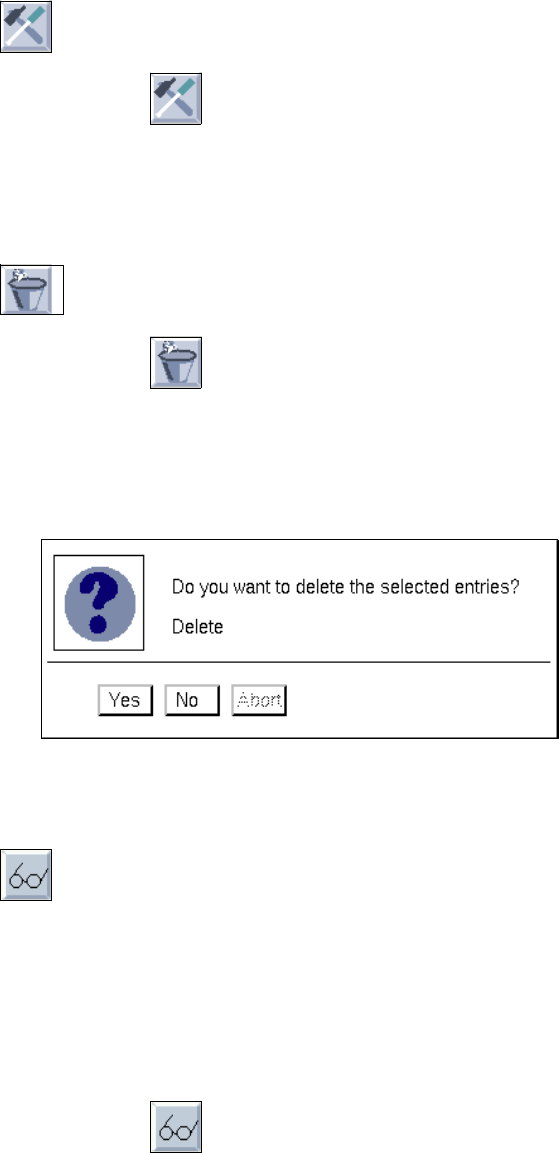
- Changing barcode allocations
● Click on the icon.
● In the list, click on the allocation that is to be changed using the right mouse button.
The data are transferred to the editing fields.
● Change the data as required and add them to the list by selecting OK.
- Deleting barcode allocations
● Activate the icon.
● Select the allocations to be deleted from the list.
The allocations will be deleted immediately if the option "Delete without confirm." is selected in
the main window.
The following dialog box is displayed if the option "Delete with confirm." is selected in the main
window.
● Click on Yes.
The dialog box closes, and the selected allocations are taken off the display.
- Search
With the aid of this command it is possible, for information purposes, to search for or to select specific
entries which may be deleted subsequently, if desired.
There are two search criteria in the search window enabling the search to be conducted either for the
"Start of barcode range" or the "PCB type". Making use of a search window, the procedure is the
same for all search operations (see also page 14 - 22).
● Deactivate all icons in the command area.
● Click on the icon.
The "Search words - barcode allocation" dialog window opens.
● Click on the search criterion Start barcode or PCB type.
● Enter the search word.
● Select Search or Search additively.
The window closes, and the data found are highlighted in the matching data are highlighted in the
selection area.
● Click on Abort if the search operation is to be abandoned.