00191413-01.pdf - 第82页
3 Desktop (Root W indow) User Manual Line Computer UNIX 3.2 Desktop User Interface Software Version 501.xx 01/99 Issue 3 - 12 - Change network configuration This men u option i s desig ned to dir ectly star t the "N…
User Manual Line Computer UNIX 3 Desktop (Root Window)
Software Version 501.xx 01/99 Issue 3.2 Desktop User Interface
3 - 11
- Change network settings
A Pentium-based computer may contain one or two LAN cards. One of them is always provided for the
communication with computers on the customer network. The settings for this LAN card can be
changed. When so doing, the old value is displayed, the new value is entered and a query asking for the
correctness of the entry is displayed until the operator responds to the same by selecting
y
and confirm-
ing by pressing RETURN.
● Click on OPTIONS --> Network --> Change network settings.
The UNIX window "Change network settings" opens.
The current network settings are displayed (IP address, Netmask, Broadcast, Domain name).
● Respond to the query as to whether some of the values are to be changed with
y
and confirm by
pressing RETURN.
● Change the IP-address or accept the preset value by pressing RETURN.
● Respond to the query about the correctness of the address with
y
and confirm by pressing RETURN.
● Change the Netmask or accept the preset value by pressing RETURN.
● Confirm the correctness of the Netmask with
y
and by pressing RETURN.
● Change the Broadcast address or accept the preset value by pressing RETURN.
● Confirm the correctness of the address with
y
and by pressing RETURN.
● Change the Domain name or accept the preset value by pressing RETURN.
● Confirm the correctness of the name with
y
and by pressing RETURN.
The data are accepted and the UNIX window closes.
● The computer system is to be shut down using the Shutdown main menu function and subse-
quently to be rebooted. The line computer system is started with the new network settings.
- Log-on of external computers
With this menu option it is possible to log external computers of the customer’s network onto the com-
puter system. These so-called external computers may be other line computers or the customer’s host
computers.
● Click on OPTIONS --> Network --> Log on external computer.
The UNIX window "Change hosts & automount configuration" opens.
● Enter the root password at the cursor position and then press the RETURN key.
● Respond to the query as to whether changes are to be made with
y
and confirm by pressing RETURN.
● Enter the Host name (name of the external computer) and confirm by pressing RETURN.
● Respond to the following query as to whether the name is correct with
y
and confirm by pressing
RETURN.
● Enter the IP-address and confirm by pressing RETURN.
● Confirm the correctness of the address with
y
and by pressing RETURN.
● Respond to the query as to whether an NFS connection is to be established with
y
or
n
and con-
firm by pressing RETURN.
If
y
was entered,
● enter the Mount path and confirm with
y
and by pressing RETURN.
● Confirm the correctness of the Mount path with
y
and by pressing RETURN.
● Respond to the query as to whether any additional changes are to be performed with
n
and con-
firm by pressing RETURN. The UNIX window closes.
3 Desktop (Root Window) User Manual Line Computer UNIX
3.2 Desktop User Interface Software Version 501.xx 01/99 Issue
3 - 12
- Change network configuration
This menu option is designed to directly start the "Network Configuration Manager" program for the
configuration of the network. This option therefore requires special caution to be exercised. Before
starting the program, the operator should already know which options to select for the correct configu-
ration.
Mainly the "Network Configuration Manager" is used for the configuration of the LAN link (output of
LAN card).
● Click on OPTIONS --> Network --> Change network configuration.
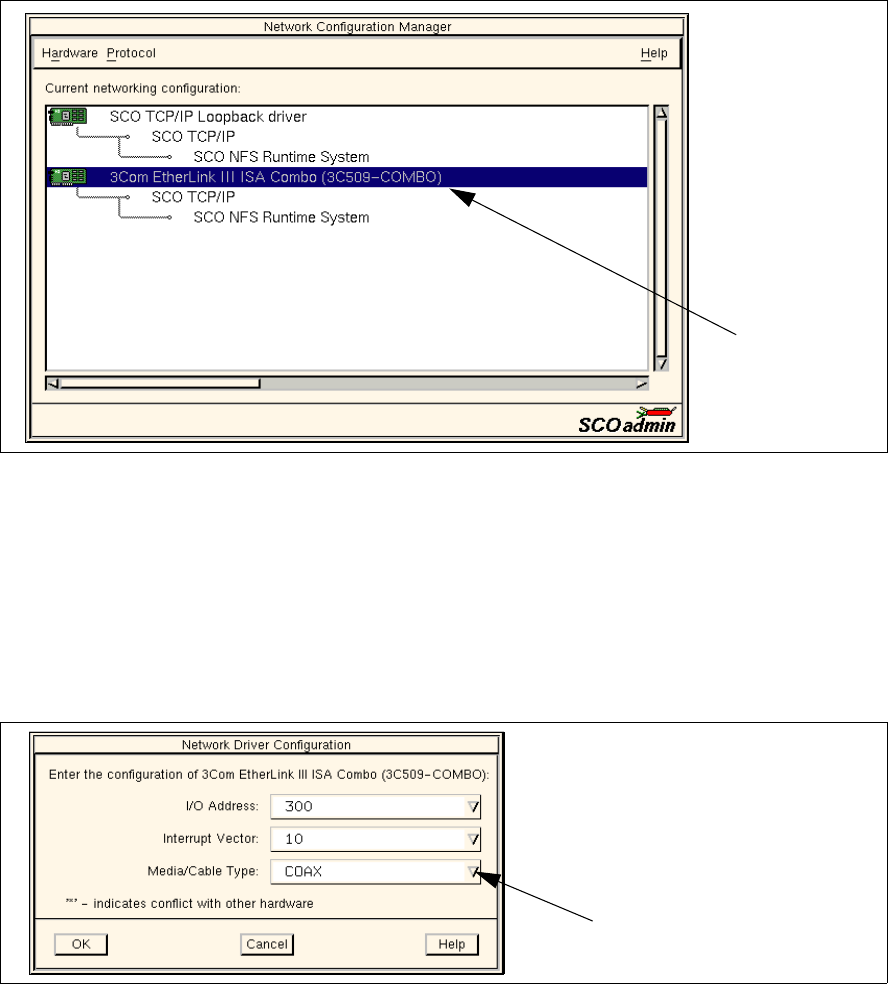
The UNIX window "Change network configuration" opens and above it the main window of the "Net-
work Configuration Manager". The current network configuration is displayed graphically in the
view area (see figure below).
Changes in the network configuration can be carried out by selecting the appropriate network component
from the view area and by using the menu options.
The procedure to be followed for the configuration of the LAN link is described in the example below.
● In the view area, click on the entry of the desired LAN card (see figure above).
The entry is darkened.
● From the Hardware menu select the Modify hardware configuration menu option.
The window for setting the LAN link opens.
● Use the appropriate arrows to configure the desired link (and cable type), the I/O address and the
interrupt.
● Click on OK to confirm the settings.
LAN card
entry
Pfeiltaste
User Manual Line Computer UNIX 3 Desktop (Root Window)
Software Version 501.xx 01/99 Issue 3.2 Desktop User Interface
3 - 13
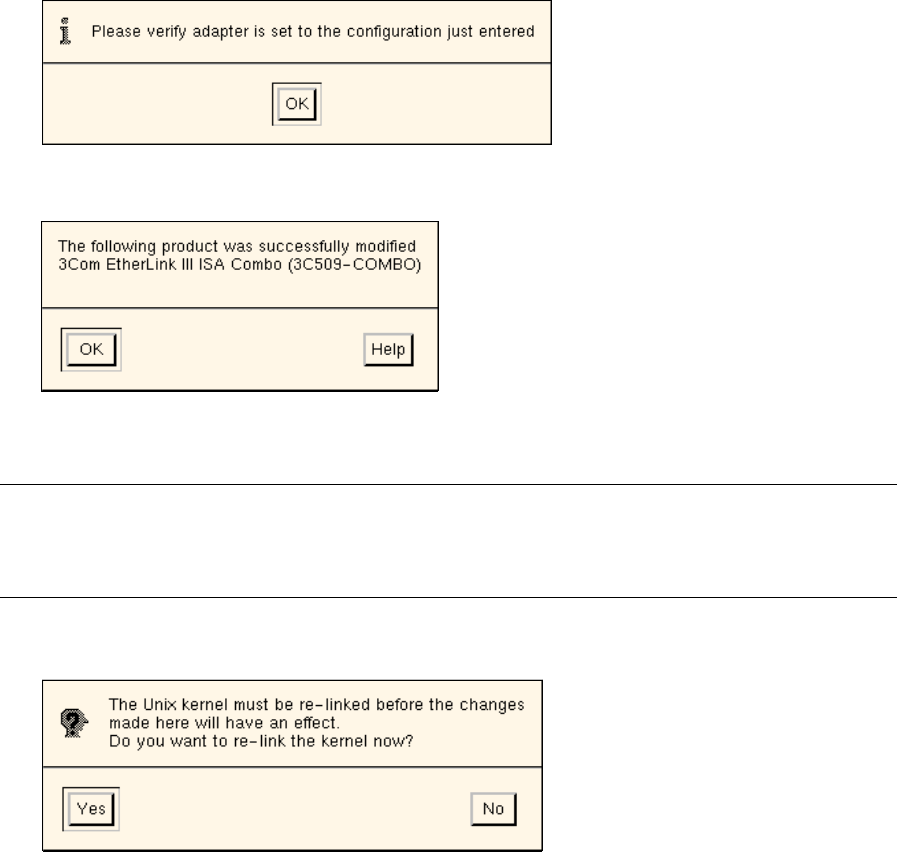
The window closes and the following info box opens.
● Close the info box by clicking on OK. The following dialog box is displayed.
● Close the dialog box by clicking on OK.
NOTE
The View hardware configuration menu option on the Hardware menu allows the current hardware
configuration of the selected LAN card to be displayed.
● To exit from the "Network Configuration Manager" click on HARDWARE --> Exit.
The following dialog box opens.
● Acknowledge the verification query by clicking on Yes.
The dialog box opens closes, and the UNIX window "Unix kernel relink" opens.
● Respond to each of the queries "Do you want this kernel to boot by default" and "Do you want the
kernel enviroment rebuilt", that will be displayed after a few minutes, with y and RETURN.
● Close the UNIX window "Unix kernel relink" by pressing RETURN.
● The main window of the "Network Configuration Manager" and the dialog box close.
Only the UNIX window "Change network configuration" remains displayed.
● Exit from the UNIX window by pressing RETURN.
● Shut down the computer system using the Shutdown main menu function and subsequently
reboot the system.
The line computer system will now be started with the new network configuration.