00191413-01.pdf - 第458页
14 Control / Cont rol Modules User Manual Line Computer UNIX 0.2 Job Control S oftware Version 501.xx 01/99 Issue 14 - 22 - (Search) This co mmand per mits job s to be filtered fr om the current l ist by me ans of di ffe…
User Manual Line Computer UNIX 14 Control / Control Modules
Software Version 501.xx 01/99 Issue 0.2 Job Control
14 - 21
- (Move)
The order in which jobs appear on the list can be shifted.
● Activate the icon.
● Click on the job to be moved with the right mouse button.
The job is highlighted.
● Click on the job below which the job to be moved is to be inserted with the left mouse button.
NOTE
It is also possible to move several jobs simultaneously. They are inserted below the job selected with
the left
mouse button in the same order they were previously selected by means of the right mouse
button.
- (Delete)
A job can be deleted from the job list. The assembly of the PCBs still on the line will not be completed.
The line must be cleared of PCBs before the new job is started!
NOTE
Selected jobs are deleted immediately
if the option "Delete without confirmation" is set. If the option
"Delete with confirmation" is set, a dialog box with the question "Do you want to delete the selected
entries?" appears. Here, the action can be triggered by clicking on Yes, or else the action can be
aborted by clicking on No.
- (Merge)
If this command is activated, the FSB containing the list of the defined lot files opens.
Lot files selected from this list can be integrated into the job list. Depending on the setting of the option
"Insert", they are inserted at the start or the end of the list, or with a mouse-click.
14 Control / Control Modules User Manual Line Computer UNIX
0.2 Job Control Software Version 501.xx 01/99 Issue
14 - 22
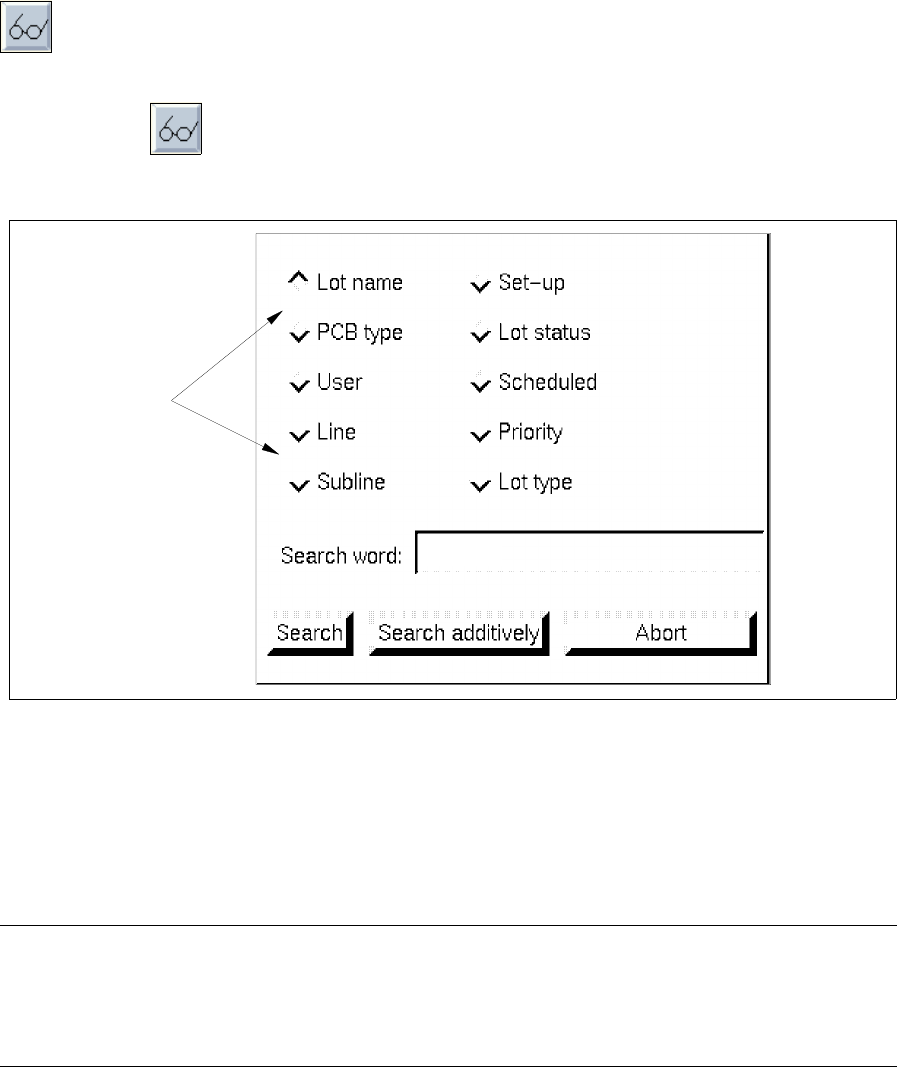
- (Search)
This command permits jobs to be filtered from the current list by means of different search criteria.
● Activate the icon.
The dialog window "Search for job data" dialog window opens.
● Activate the button for the desired search criterion, e.g. Lot name.
● Enter the search work, e.g.
test
,
in the editing field.
● Click on the Search (or Search additively) button.
The dialog window closes.
All jobs with lot names containing the character string "test" are highlighted in the current list.
NOTE
If jobs were already highlighted in the list following a prior search operation, then all jobs found during
the current search are highlighted in addition to the previously one found, if "Search additively" is
clicked on.
Search criteria
test
User Manual Line Computer UNIX 14 Control / Control Modules
Software Version 501.xx 01/99 Issue 0.2 Job Control
14 - 23
14.1.4.7 Command Area, Section "Edit"
- (Create)
If this icon is activated, a new job can be entered in the editing area.
● Activate the icon and subsequently the icon.
The edit support "Job data" (FSB) opens.
● In the FSB successively select the files required for job to be produced by double-clicking
(<PCB>.la, <line>.ak, <subline>.va and <setup>.ar). After the setup has been selected, the FSB
closes.
The names of the selected files are now displayed in the editing area in the corresponding editing
fields.
● Click on the Lot name and enter a name for the lot (max. 21 characters).
● Click on the Lot size editing field and enter a number for the nominal size of the job
(max. 10 numbers ranging from "1" through "2147483674").
● Click on the Lot type editing field and enter the letter for the lot type desired.
This letter may be an "R" denoting blanks (i.e. fixed nominal sizes are input), an "F" denoting
finished parts (i.e. more PCBs are input than predefined under the lot size) or a "U" denoting an
infinite lot (i.e. the nominal size is of no importance). No other letters are valid.
● If required, delete the default value "1" in the Priority editing field and enter a different value for
the priority of the job. (The priority values are required for Set-Up Optimization).
For defining the priority 2 characters within the range from "1" through "99" can be selected. The
higher the value the higher the priority.
● If necessary, click on the Conveyor track software switch to change the currently activated con-
veyor lane.
The display changes from 1 (= right conveyor lane when viewing in the direction of travel) to
2 (= left conveyor lane), or vice versa.
NOTE
Where a dual lane conveyor is configured, a “conveyor track” software switch is provided by means of
which the conveyor lane on which a particular job is to be processed can be selected.
The number of the conveyor lane (track) selected is displayed in the "CT" column of the job list.
● Click on the OK button in the command area.
The job will be transferred to the job list. If "Auto-Schedule On" is activated (see section 14.1.4.5),
the job will be immediately checked for producibility and subsequently processed before all other
jobs scheduled.
In the case of faulty entries, the corresponding field is surrounded by a red frame and an error
message is displayed above the job list. The faulty entries must be corrected.
NOTE
Depending on the setting of the "Insert" option (see page 14 - 17), the new job will be added at the top
or at the end of the current list, or inserted by a mouse-click (without "OK").