3OM-1075-002.pdf - 第130页
4.4.2 "P-data" T ab The corresponding tab sheet can be used to edit the placement data (P). • Sheet Layout When the "P-data" tab is pressed in the "Placement Data" tab sheet, the correspondi…
*2 "Placement Data" Edit Window
These windows can be used to edit the placement data (P) and (O).
Refer to "4.4.2 "P-data" Tab" and "4.4.3 "O-data" Tab" for
the detailed information on how to select each tab.
• Operation Procedure
Add New Unit
(1) When the second toolbar is not visible, press the [Second Toolbar]
icon ( ). The second toolbar opens.
(2) When the [Add New Unit] icon (
) is selected, a tab is added to
the last one, indicating that a new tab sheet is created.
Deletion of Unit
(1) When the second toolbar is not visible, press the [Second Toolbar]
icon (
). The second toolbar opens.
(2) Use the touch screen or the pointing device to select the unit to be
deleted.
(3) When the [Delete Unit] icon (
) is selected, the selected unit is
deleted.
When a tab (unit) between the adjacent ones is deleted, the
subsequent tabs (units) are shifted left.
Unit Copy and Paste Commands
(1) When the second toolbar is not visible, press the [Second Toolbar]
icon (
). The second toolbar opens.
(2) Use the touch screen or the pointing device to select the unit to be
copied.
(3) When the [Copy Unit] icon (
) is selected, the selected tab (unit)
is copied.
(4) Select the position of the unit to be pasted.
(5) When the [Paste Unit] icon (
) is selected, the selected tab (unit)
is pasted.
The toolbar is also provided with the [Cut Unit] icon (
).
The cut unit data can be pasted.
0206-001 2-109
AHB01EDTP
4.4 "Placement Data" Tab
4.4.2 "P-data" Tab
The corresponding tab sheet can be used to edit the placement data
(P).
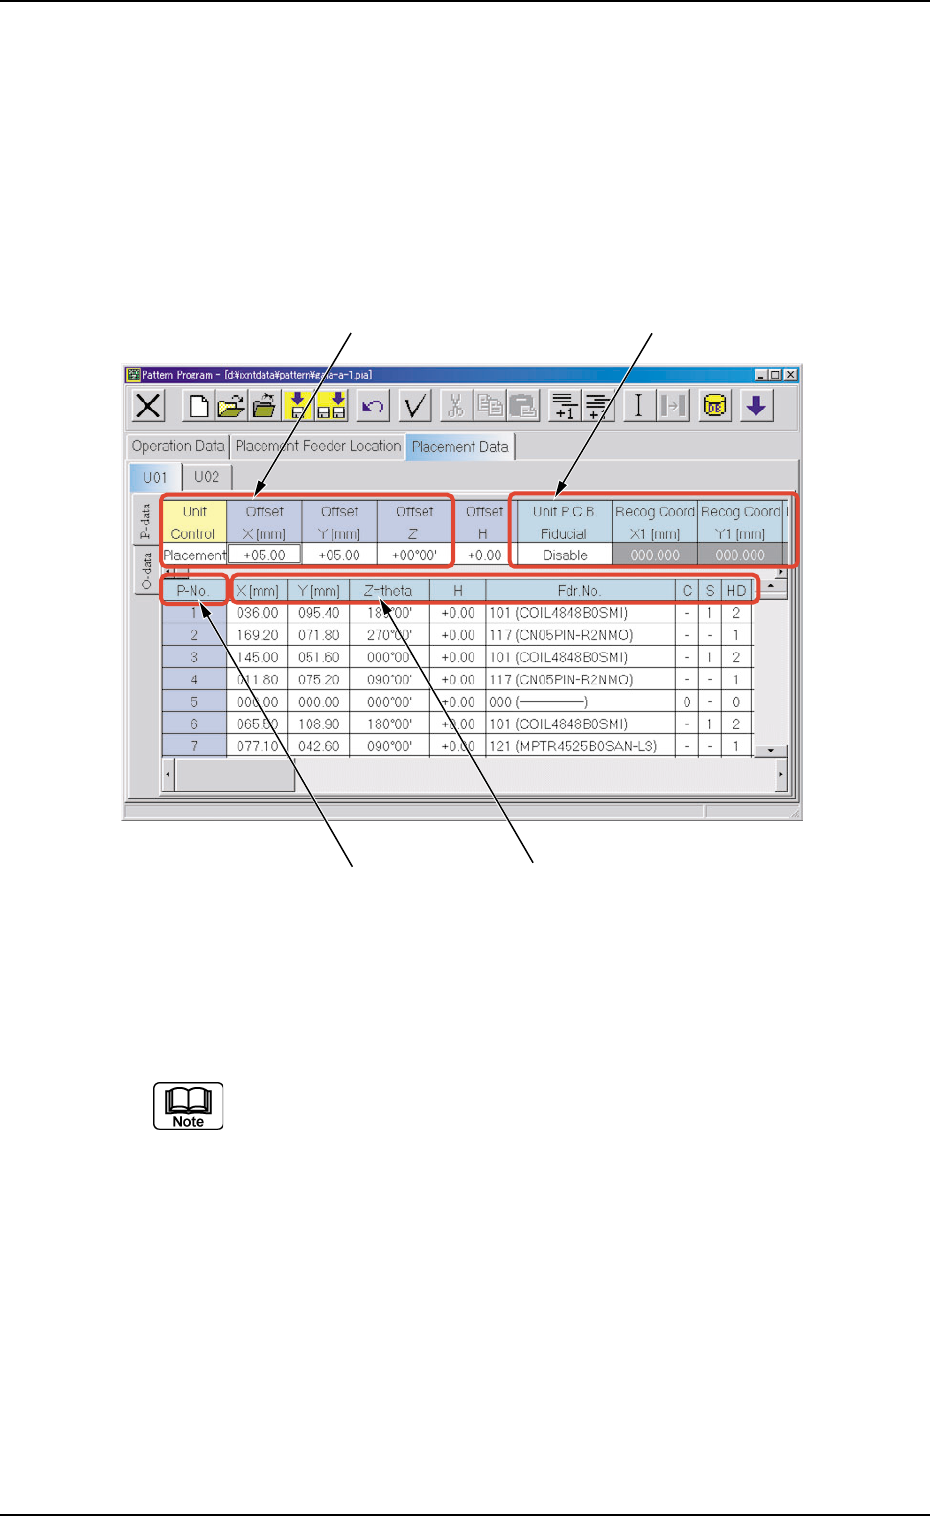
• Sheet Layout
When the "P-data" tab is pressed in the "Placement Data" tab sheet,
the corresponding tab sheet appears.
Fig. 3B176 "P-data" Tab Sheet
• Sheet Composition
Each parameter is displayed or can be entered.
Refer to "4.1.3 Basic Usage of Text Boxes" for the detailed in-
formation on how to enter each parameter.
*1 Unit Control, Offset X [mm], Offset Y [mm], Offset Z
*2 Unit P.C.B. Fiducial
Recog Coord X1 [mm], Recog Coord Y1 [mm], Recog Coord
X2 [mm], Recog Coord Y2 [mm], Fiducial Mark FM1, Fiducial
Mark FM2
When "Enable" is selected for "Unit P.C.B. Fiducial", it is required
to enter parameters in these text boxes.
*1
*2
*3
*4
0206-001 2-110 AHB01EDTP
4.4 "Placement Data" Tab
*3 P-No.
Shown are the step Nos.
Refer to "• Operation Procedure" (described later) for the
detailed information on how to add or delete a step No. (P-
No.).
*4 X [mm], Y [mm], Z=theta, H, Fdr. No., C, S, HD, PU,
Comment, V, X1 [mm], Y1 [mm], X2 [mm], Y2 [mm], FM1, FM2
• Operation Procedure
Addition of "P-No."
(1) When the [Add One Line] icon (
) is selected, a new step (line)
is added to the last one (last P-No.).
Insertion of "P-No."
(1) Use the touch screen or the pointing device to select the step in
which a new feeder No. (Fdr. No.) should be inserted.
(2) When the [Insert One Line] icon (
) is selected, a step (line) is
inserted at the selected position and the subsequent steps (P-
Nos.) are shifted down.
Deletion of "P-No."
(1) Use the touch screen or the pointing device to select the line (P-
No.) to be deleted.
(2) When the [Cut] icon (
) is selected, the selected line (P-No.) is
deleted and the subsequent lines (P-Nos.) are shifted up.
Step (P-No.) Copy and Paste Commands
(1) Use the touch screen or the pointing device to select the line (P-
No.) to be copied.
(2) When the [Copy] icon (
) is selected, the selected line (P-No.)
is copied.
(3) Select the position of the line (P-No.) to be pasted.
(4) When the [Paste] icon (
) is selected, the selected line (P-No.)
is pasted.
0206-001 2- 111
AHB01EDTP
4.4 "Placement Data" Tab