3OM-1075-002.pdf - 第140页
AHB01EDTP Component shape : Component shapes are displayed. Component type : Component types are displayed. Update time : Update time (date and time) is displayed. By pressing one of the titles (the labels arranged on to…
AHB01EDTP
[Cancel] Button
When pressed, this button opens the "Component Library" window
without the selected component ID.
The "Close", "New", and "Open" icons become available in the "Com-
ponent Library" window.
[Type Addition] Button
Open the "Type Addition" dialog box to add a component type.
Refer to "2.3.1 Type Addition" for the detailed information on
the "Type Addition" dialog box (described later).
*5 [Close] Button (
)
When pressed, this button closes the "Selection of component
ID" window.
*6 Common Display and Standard ID Display
Select the desired option buttons.
Depending on which option buttons are selected, a list of compo-
nent IDs having specific attributes appears in "*7".
Option Buttons
: A dot inside the circle indicates that the corresponding func-
tion is selected.
When " " is pressed, it changes to " ".
: The corresponding function is not selected.
When "
" is pressed, it changes to " ".
*7 "List of Component IDs" Pane
A list of component IDs is displayed.
Select the component ID whose data should be displayed in the
"Component Library" edit window or the component ID to be de-
leted, copied, or renamed.
Component ID : Component IDs are displayed.
R:When "r" is set, it indicates that the compo-
nent ID is a root one.
C:When "c" is set, it indicates that the compo-
nent ID is registered as a common one.
P:When "p" is set, it indicates that the compo-
nent ID is protected.
S:When "s" is set, it indicates that the compo-
nent ID is a standard one.
0308-004 3-4
2.2 Composition of "Selection of component ID" Window
AHB01EDTP
Component shape : Component shapes are displayed.
Component type : Component types are displayed.
Update time : Update time (date and time) is displayed.
By pressing one of the titles (the labels arranged on top of the
list), the step lines (parameters) are sorted by ID, update time,
etc.
*8 [Current], [Property...], [Delete...], [Copy...], [Rename...],
[Create Link ID] and [Merge...] Buttons
[Current] Button
When pressed, this button enables you to select the component
IDs used in the pattern program that was opened last.
[Property...] Button
When pressed, the "Property" dialog box related to the component
ID selected in "*7" appears.
Refer to "2.3.7 Property of Component ID" for the detailed
information on the "Property" dialog box.
[Delete...] Button
When pressed, this button enables you to delete the selected
component ID in "*7".
[Copy...] Button
When pressed, this button enables you to make a copy of the
component ID selected in "*7".
[Rename...] Button
When pressed, this button enables you to rename the component
ID selected in "*7"
[Create Link ID] Button
When pressed, this button enables you to create a link ID for the
component ID selected in "*7".
[Merge...] Button
When pressed, this button enables you to merge the component
IDs selected in "*7".
0308-004 3-5
2.2 Composition of "Selection of component ID" Window
AHB01EDTP
2.3 Basic Usage of "Selection of component ID"
Window
2.3.1 Type Addition
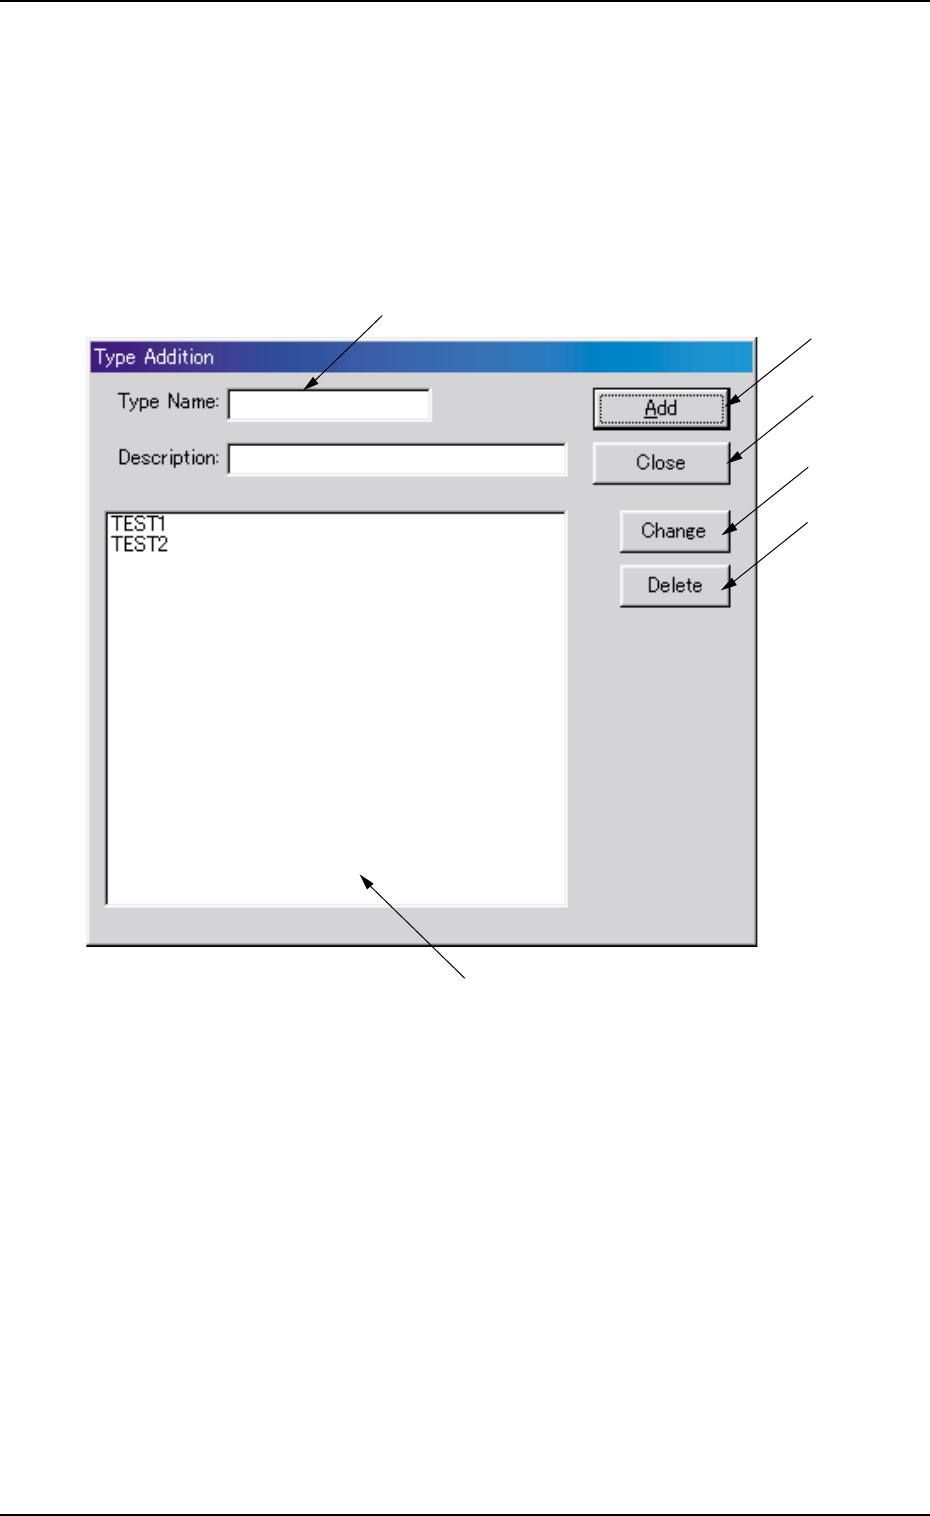
When the [Type Addition] button is pressed, the following dialog box
appears.
Fig. 3C5 "Type Addition" Dialog Box
••
••
• Composition of "Type Addition" Dialog Box
*1 Type Name, Description
Enter parameters in these text boxes.
*2 "List of Component Types" Pane
Newly created component types are displayed in this pane.
*3 [Add] Button
When this button is pressed, a type entered in the "Type Name" text
box is added as a new type.
2.3 Basic Usage of "Selection of component ID" Window
*6
*3
*4
*2
*1
*5
0206-003 3-6