YV180X_Ope_E.pdf - 第150页
5 -74 EPD8013110 Operation Chapter 5 5 Creating the PCB data 4.1 Creating pr ocedure 1 Open the Mark Info. screen. Select “Mark Info.” from the edit item menu box which appears after registering or selecting a PCB name. …
5
-73
EPD8013110
Operation
Chapter 5
5
Creating the PCB data
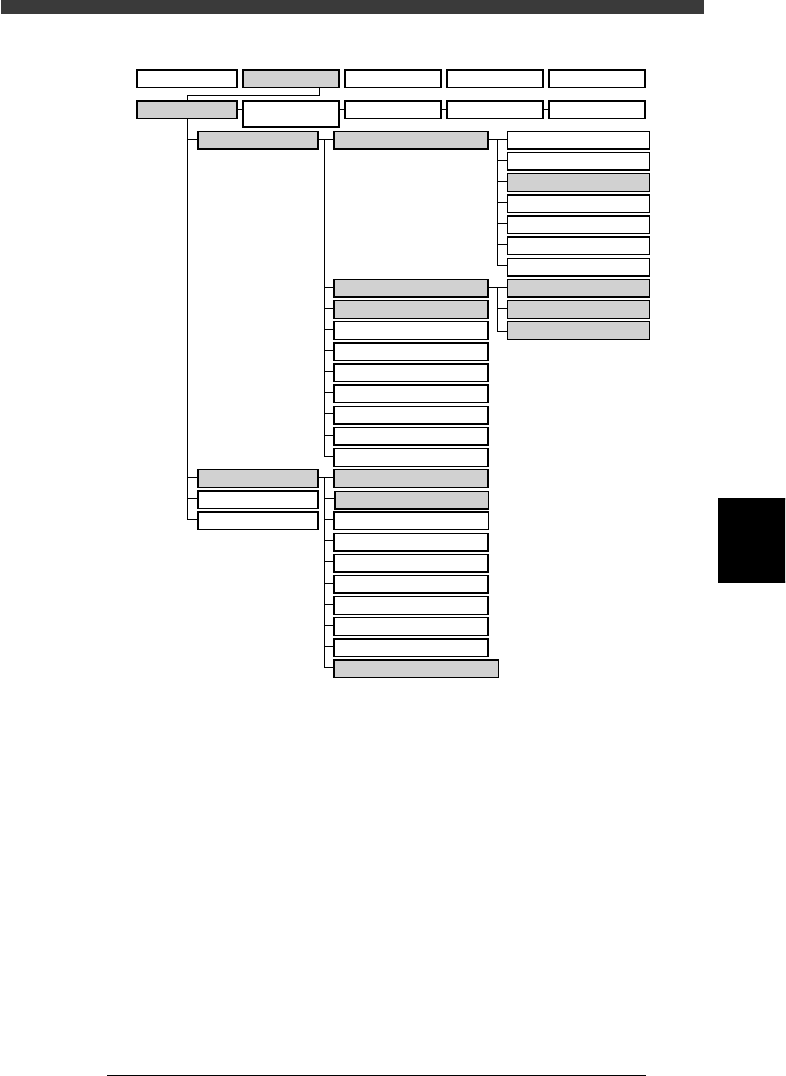
VIOS structure for “Mark Info.”
23529-C0-00
A/DISPLAY
B/UTILITY
C/EDIT_TOOL
D/FILE
PCB Info.
Mount Info.
Component Info.
Mark Info.
Blk Repeat Info.
Local Fidu.Info.
LocalBadMrkInfo.
Mark Type Info.
Mark Size Info.
Vision Info.
1/OPERATION/M 2/DATA/M 3/MAINTE/M 4/SHELL/M 0/EXIT
1/EDIT_DATA
2/DATA_
GENERATOR
3/DATABASE 4/MANUAL 0/EXIT
A1 MAIN WINDOW
A2 SUB WINDOW
A3 VIEW DATABASE NO.
A4
VISION ALIGNMENT DIC
.
A5
A6
A7 FIND NEXT
A8
A9
A0 RETURN TO EDIT
B1 ADJUST ASSISTANT
B2 DATABASE UTILITY
B3
B4
DRAW THE SHAPE(CMP)
B5
B6 SET PALLET
B7 CONVEYOR UNIT
B8
B9
B0
TEACH,TRACE CONDITION
5
-74
EPD8013110
Operation
Chapter 5
5
Creating the PCB data
4.1 Creating procedure
1 Open the Mark Info. screen.
Select “Mark Info.” from the edit item menu box which appears after
registering or selecting a PCB name. If an edit screen is open, press the
[F3] key (or select <2/1/A1 MAIN WINDOW>) to display the edit item
menu box.
Mark Info. screen
27530-C0-00
PCB :
No.
1
2
3
4
5
MARK NAME COMMENT
Mark Type Info.
Edit Term :
OBJ :Mark Info.
<<<APPLICATION>>>
<<MODE>>1/EDIT_DATA
2/DATA/M
Mark Type
Database Number
Main window Sub-window
n
NOTE
Enter the mark name and comment in the main window and various parameter values in
the sub-window. The sub-window consists of several groups of information which are
switched with the [F4] key. Press the [TAB] key to switch between the main and sub
windows.
2 Move the cursor to data registration No.
3 Enter a mark name
Enter a different name for each mark in the MARK NAME column.
4 Enter a comment.
Type any desired comment on the mark as necessary in the COMMENT
column.
5 Copy sample data from the database.
1. Press the [ESC] key, select <A3 VIEW DATABASE NO.> and press the
[ENTER] key.
A list of marks registered in the database appears.
VIEW DATABASE NO. command
27531-D8-00
<<<APPLICATION>>>
<<MODE>> 1/EDIT_DATA
<COMMAND_LIST>
A/DISPLAY
A3 VIEW DATABASE NO.
2/DATA/M
5
-75
EPD8013110
Operation
Chapter 5
5
Creating the PCB data
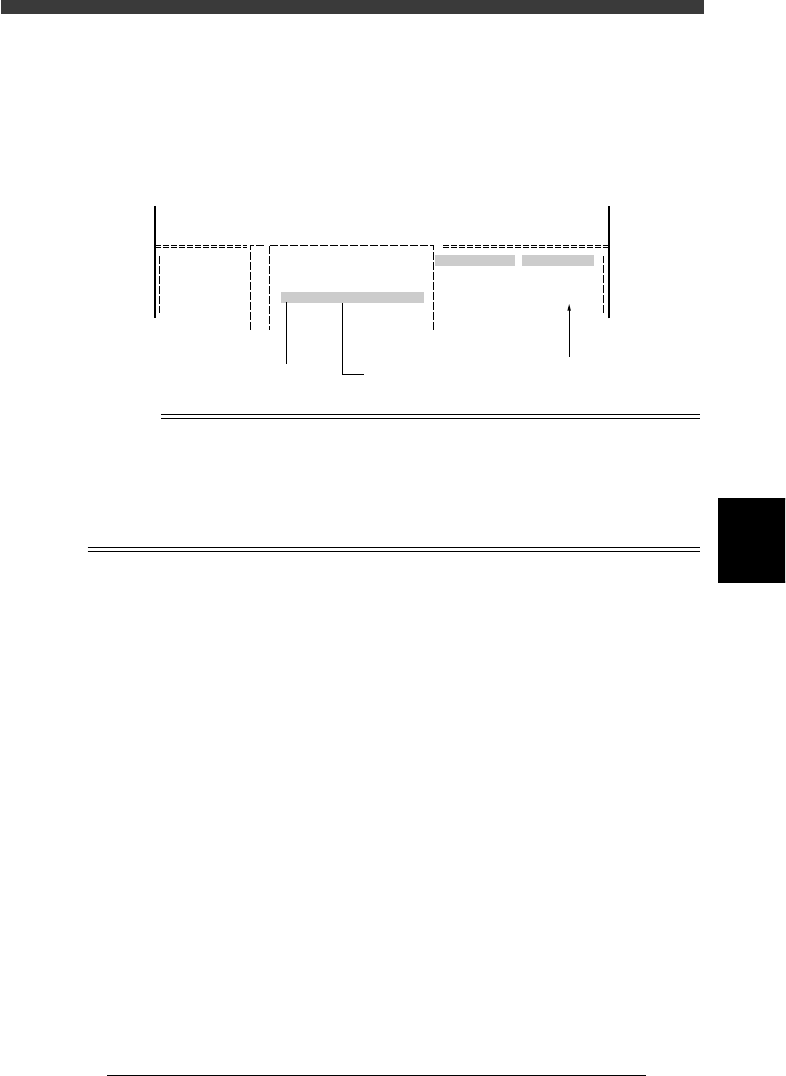
2. Use the UP/DOWN arrow keys or [PageUp] or [PageDown] key to
select the database number of the same mark or the most similar
mark in shape and press the [ENTER] key to make a copy.
The selected database No. is copied into the DataBase Number
column in the Mark Type Info. sub-window as well as other parameters
on the selected mark.
Database number selection screen
27532-C0-00
1
2
3
<<<APPLICATION>>>
<<MODE>> 1/EDIT_DATA
<COMMAND_LIST>
A/DISPLAY
A3
2/DATA/M
1
2
150
151
1.6mm_CIRCLE
1.0mm_CIRCLE
DOUBLE_CIR_1.6Cu
CIRCLE_1.0_Cu
Edit Term
Mark Type
DataBase Number
:
:
:
Fiducial
151
Mark nameDatabase number
Database No. and
parameters are copied.
Reference
You can copy the database information without using the <2/1/A3 VIEW DATABASE
NO.> command, as follows:
Press the [TAB] key to move the cursor to the right-hand screen (sub-window), then
enter the desired database number in the Database Number column in the Mark Type
Info. sub-window. Press the [F7] key to run the SET FROM DATABASE command,
and the information on the selected database number is then copied.
6 Set other parameters in the sub-windows.
Referring to “4.2 Various parameter settings” in this chapter, set other
parameters as necessary.
7 Run the Adjust Assistant.
Refer to “4.3 Adjust Assistant” in this chapter for more details.
8 Save the settings.
Exit the Adjust Assistant mode, then press the [ESC] key twice, select
<2/1/D8 SAVE PCB DATA> and press the [ENTER] key.