YV180X_Ope_E.pdf - 第267页
6 -32 EPD8013110 Operation Chapter 6 6 Using various functions 6 5.2.2 4-point fiducial T o register the 4-point fiducial mark da ta, follow the procedure belo w . Example of 4-point fiducial marks 23611-C0-00 (50, 10) (…

6
-31
EPD8013110
Operation
Chapter 6
6
Using various functions
Specifying the local fiducial mark on the Mount Info. screen
27617-C0-00
<<<APPLICATION>>> 2/DATA/M
<<MODE>> 1/EDIT_DATA
PCB :
SignOfLandPattern Comp X Y R Head FidMk
1
2
3
4
4
5
5
MadMk Skip?
OBJ :Mount Info.
No.
1
2
3
4
5
6
7
Point fiducial : Specify one piece of fiducial mark
data for one piece of mount data.
Local fiducial : Specify one piece of fiducial mark data
for tow or more pieces of mount data.
4 Open the PCB Info. screen and set the local fiducial func-
tion.
Press the [F3] key to display the edit item menu box again, then select
“PCB Info.” and set the “Local Fiduc.” parameter to “Use”.
Setting the local fiducial function on the PCB Info. screen
27618-C0-00
PCB :
Local Fiduc. Use
OBJ : PCB Info.
<<<APPLICATION>>> 2/DATA/M
<<MODE>> 1/EDIT_DATA
Set to “Use”.
5 Save the data.
Press the [ESC] key to exit the current edit screen, then select <2/1/D8
SAVE PCB DATA> and press the [ENTER] key.
This completes the local fiducial function settings.
n
NOTE
If the distance between the two fiducial marks is too close, detection and calculation
errors tend to occur.
A total of up to 512 pairs of local fiducial marks can be set for the PCB data.
6
-32
EPD8013110
Operation
Chapter 6
6
Using various functions
6
5.2.2 4-point fiducial
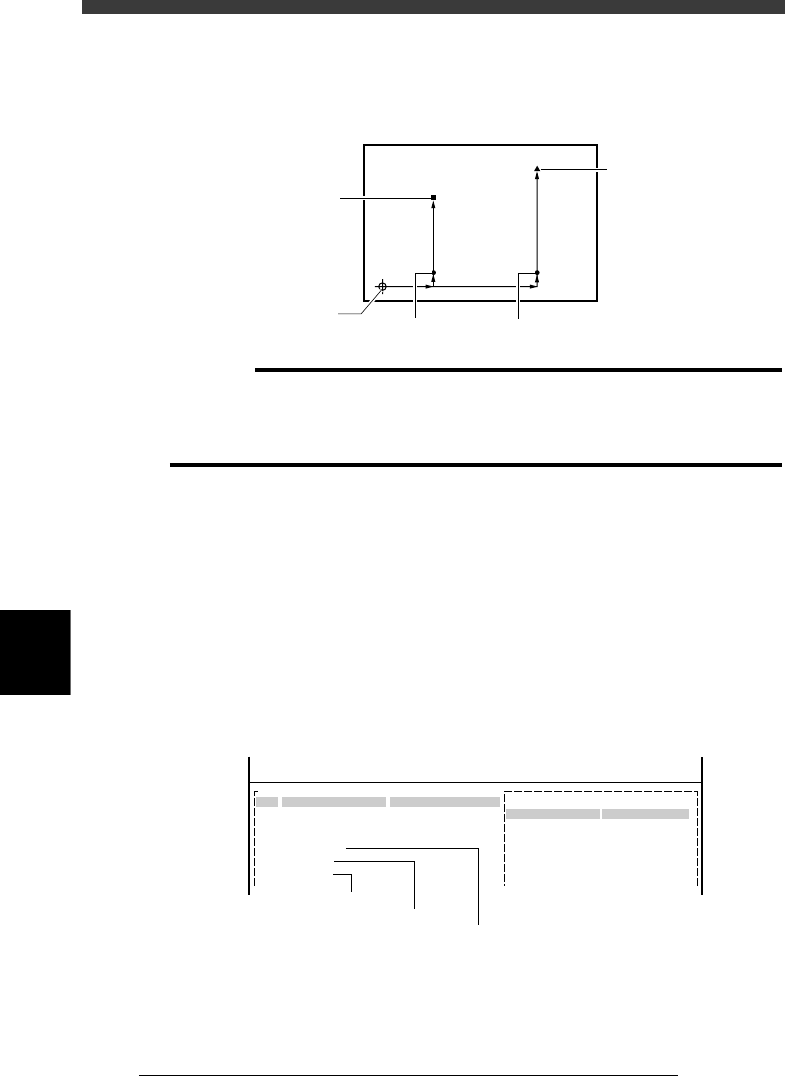
To register the 4-point fiducial mark data, follow the procedure below.
Example of 4-point fiducial marks
23611-C0-00
(50, 10)
(200, 10)
(50, 150)
(0, 0)
(200, 200)
Third mark
PCB origin
First mark
Second mark
Fourth mar
k
c
CAUTION
The following procedure for setting the fiducial function is explained, assuming that
you already have the complete PCB data needed for component mount. If you are not
yet finished with creating the PCB data, complete the PCB data first while referring to
Chapter 5 in this manual and then set the fiducial function.
1 Create the mark information.
Open the Mark Info. screen and register the fiducial mark data. When the
4 fiducial marks to be used are identical, register the data for just one
mark. If they are different from each other, register the data according to
each mark. The procedure for setting 4-point fiducial marks is the same as
that for normal fiducial marks, so refer to “4. Creating the mark informa-
tion” in Chapter 5 for more details.
The example shown in the above illustration uses the same mark for the
first and second fiducial marks, but the third and fourth marks are different
from each other. This means that three pieces of mark data need to be
registered as shown below.
4-point fiducial marks registered in the Mark Info. screen
27619-C0-00
PCB:
Mark Type Info.
Edit Term
Mark type
Database Number
OBJ : Mark Info.
MARK NAME
Fiducial_1&2
Fiducial_3
Fiducial_4
No.
13
14
15
16
17
18
COMMENT
:
:
:
V
<<<APPLICATION>>> 2/DATA/M
<<MODE>> 1/EDIT_DATA
First & second marks
Third mark
Fourth mark

6
-33
EPD8013110
Operation
Chapter 6
6
Using various functions
2 Open the Local Fidu. Info. screen and specify the fiducial
information.
Press the [F3] key in the <2/1/EDIT_DATA> mode to display the edit item
menu box. Select “Local Fidu. Info.” from the menu box and press the
[ENTER] key. Specify the fiducial information as outlined below. (In this
setting example, register the first and second marks in the first data line
and the third and fourth marks in the second data line.)
Local Fidu. Info. screen
27620-C0-00
PCB :
Mark
15
16
X1 Y1 Mrk2
15
17
Skip
Exec
Exec
Comment
X2 Y2 Type
4Local-M
4Local-S
OBJ :Local Fidu.Info.
No.
1
2
3
4
<<<APPLICATION>>> 2/DATA/M
<<MODE>> 1/EDIT_DATA
1. Register the first and second marks in the first data line as follows.
Mark : Enter the mark No. registered as the first mark
in the Mark Information.
X1, Y1 : Enter the coordinates of the first mark relative
to the PCB origin (or the block repeat No.1
point in the case of block repeat reference) in
millimeters.
Mrk2 (Mark 2) : Enter the mark No. registered as the second
mark in the Mark Information. When the
second mark is identical with the first mark,
enter “0” here.)
X2, Y2 : Enter the coordinates of the second mark
relative to the PCB origin (or the block repeat
No.1 point in the case of block repeat
reference) in millimeters.
Type : Set to “4Local-M”.
Skip : Set to “Exec” (initial setting).
Comment : You can enter a comment here as necessary.