YV180X_Ope_E.pdf - 第82页
5 -6 EPD8013110 Operation Chapter 5 5 Creating the PCB data 2.1 Registering PCB names T o create new PCB data for production, you must f irst re gister the PCB name. There are four methods for re gister ing a PCB name. 1…
5
-5
EPD8013110
Operation
Chapter 5
5
Creating the PCB data
2. Registering and selecting the PCB name
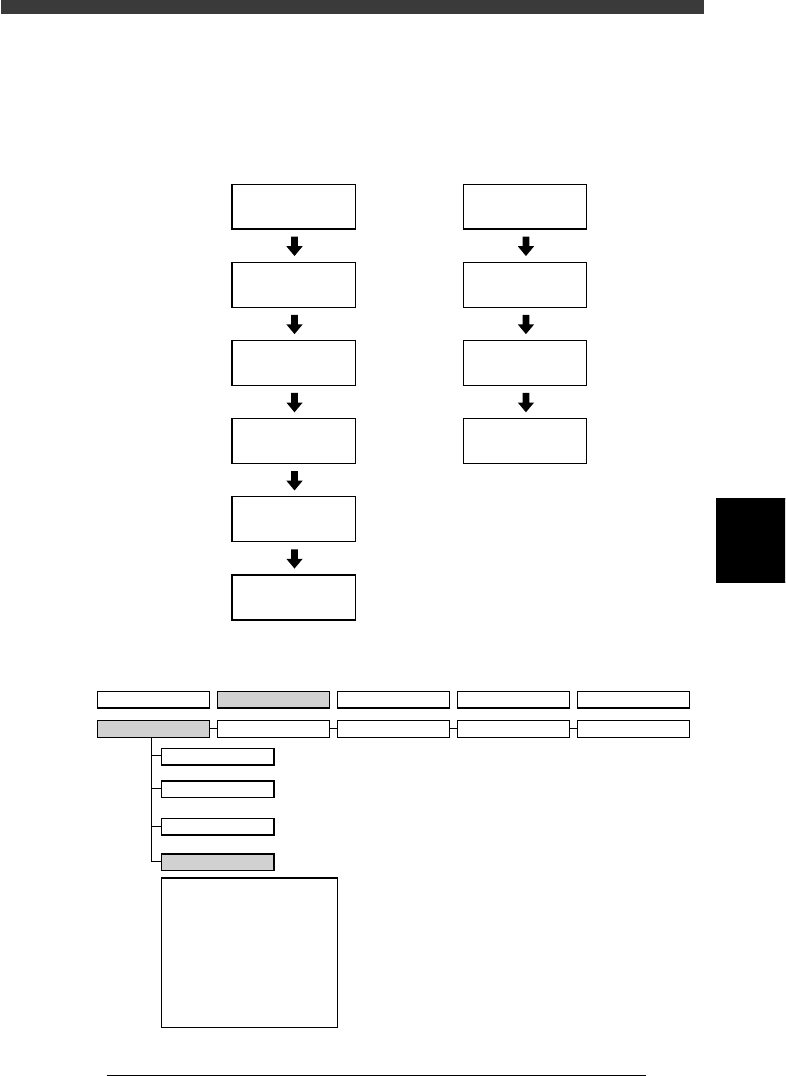
Flow chart for registering and selecting PCB name
23503-C0-00
2/DATA/M
1/EDIT_DATA
D1/SWITCH
PCB DATA
Select
PCB name
2/DATA/M
1/EDIT_DATA
D2/CREATE
PCB DATA
Input PCB name
D1/SWITCH
PCB DATA
Select
PCB name
To register a new PCB name
To select a PCB name
already registered
VIOS hierarchical structure (for registering and selecting PCB name)
23504-C0-00
1/OPERATION/M 2/DATA/M 3/MAINTE/M 4/SHELL/M 0/EXIT
1/EDIT_DATA
A/DISPLAY
D1 SWITCH PCB DATA
D2 CREATE PCB DATA
D3 DELETE PCB DATA
D4 COPY PCB DATA
D5
D6 RENAME & SAVE & EXIT
D7 CHECK DATA ROUGHLY
D8 SAVE PCB DATA
D9 ABORT PCB DATA
D0 SAVE PCB DATA & EXIT
B/UTILITY
C/EDIT_TOOL
D/FILE
2/DATA_GENERATOR
3/DATABASE 4/MANUAL 0/EXIT

5
-6
EPD8013110
Operation
Chapter 5
5
Creating the PCB data
2.1 Registering PCB names
To create new PCB data for production, you must first register the PCB
name. There are four methods for registering a PCB name.
1. Registering a new PCB name
If no basic data is found in the previously registered PCB data. You
should register a PCB name to create empty space for new PCB data
and then enter necessary data.
2. Utilizing PCB data already registered
Make a copy of PCB data which is already registered in the VIOS
software memory.
3. Converting PCB data created by a YAMAHA YM series
mounter (UFOS machine)
Convert the UFOS data into VIOS data.
4. Converting CAD data or other manufacturer’s mounter data
After converting CAD data or other manufacturer’s mounter data into a
typical format, take its component coordinate data into the VIOS to
create data that can be used with YAMAHA full vision series
mounters.
5
-7
EPD8013110
Operation
Chapter 5
5
Creating the PCB data
The following steps explain the procedure in “1. Registering a new PCB
name”. For other methods, refer to the separate manual “YVOS 2 ” avail-
able from YAMAHA.
1 Select <2/1/D2 CREATE PCB DATA> and press the [ENTER]
key.
The Create PCB box then appears on the screen.
2 Enter a PCB name.
Enter a PCB name within 20 alphanumeric characters and press the
[ENTER] key. The message “NOT EXIST” then appears on the right in the
box and the cursor moves to the “Select Execute” parameter. (Refer to the
Caution below.)
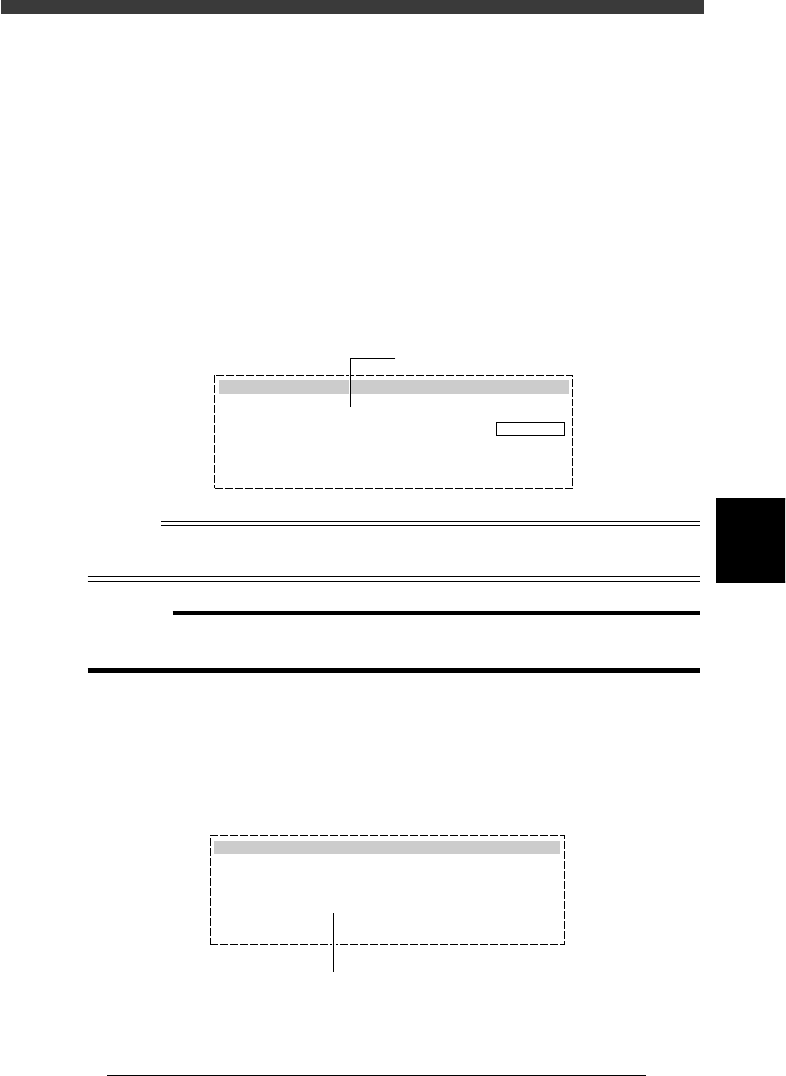
Create PCB box
27501-C0-00
Create PCB
Destination
Select Execute
[INS][DEL] to change.
[ESC] to abort, [Enter] to finish.
PCB Name
MCH Name
NOT EXIST
: PCB1
: Machine
: CANCEL
Enter the PCB name here.
n
NOTE
A space cannot be included in a PCB name. Use underbars instead.
Example: SAMPLE PCB DATA --> SAMPLE_PCB_DATA
c
CAUTION
When the message “EXIST” appears in Step 2, this means that a PCB with the same
name has already been registered, so register another PCB name.
3 Set the “Select Execute” parameter to “EXECUTE”.
Use the [INS] [DEL] or [Space] key to select “EXECUTE” and press the
[ENTER] key. The PCB name has now been registered and then the menu
box for selecting the edit item appears.
Selecting “EXECUTE” to register the new PCB name
27502-C0-00
Create PCB
Select Execute
: EXECUTE
Use [INS], [DEL] or [Space] key to set to "EXECUTE".