YV180X_Ope_E.pdf - 第41页
Chapter 4 Daily operation 1. Overview ............................................................................. 4-3 2. Inspection before operation ................................................. 4-5 3. Starting the…

3
-9
EPD8013110
Operation
Chapter 3
3
Manual operation
4. Operating the I/O monitor
The I/O monitor in MANUAL mode is useful for checking the mounter
operation status or switching mechanical parts on or off manually. The
following explains how to read or operate the digital signal output monitor
in MANUAL mode. (For more information, refer to the mounter service
manual.)
1
Select MANUAL mode.
The MANUAL mode is available in the OPERATION, DATA and MAINTE-
NANCE Managers.
2
Select <A1 INPUT/OUTPUT MONITOR> from the <A/IO
UTILITY> menu window.
The DISP. TYPE box appears for selecting the display method.
3
Select the display method.
There are two display methods, “ALL” and “SELECTION”.
Selecting “ALL” allows you to view all the digital I/O status.
Selecting “SELECTION” displays the submenu from which you can select
the specific group (such as “CONVEYOR” and “HEAD”).
4
Move the cursor to the item you want to check or operate.
When the I/O monitor is displayed, use the arrow keys to align the yellow
cursor with the item you want to check or operate. A description is
displayed in a light blue box on the screen, giving the item of the reading
and an explanation of what “0” and “1” correspond to.
5
Press the [ENTER] key to switch on and off.
Each time you press the [ENTER] key, the digit on which the cursor is
positioned switches between “0” and “1”.
To move the cursor between the output and input monitors, press the
[TAB] key.
Output monitor (left) and input monitor (right) screen
27306-C0-00
HEAD
....
....
....
....
....
....
....
OUT
00000000 ....
....
....
....
....
....
....
....
IN
T2A30
.....
.....
.....
.....
.....
.....
.....
N2260
.....
.....
.....
.....
.....
.....
.....
I/O MONITOR DISP. TYPE SELECTION
Head-A HEAD 1-8 BLOW
USUAL 0 / BLOW 1
HEAD
....
....
....
....
....
....
....
OBJECT HEAD
<<MODE>> 4/MANUAL
Use the arrow keys to move the cursor.
Description of selected item
Reference
Each time you press the [TAB] key, the yellow cursor moves between the left-half output
monitor and the right-half input monitor to switch the active monitor.

Chapter 4
Daily operation
1. Overview ............................................................................. 4-3
2. Inspection before operation ................................................. 4-5
3. Starting the machine ............................................................ 4-6
3.1 Turning the power ON ............................................................. 4-7
3.2 Return to origin ........................................................................ 4-9
4. Warm-up ............................................................................ 4-10
5. Starting PCB production..................................................... 4-13
6. Finishing PCB production ................................................... 4-22
7. Turning the power OFF ...................................................... 4-24
8. Changing the conveyor unit setup ...................................... 4-26
8.1 Conveyor unit setup flow ....................................................... 4-27
8.2 Conveyor width...................................................................... 4-29
8.3 Locate pins ............................................................................. 4-30
8.4 PCB support plates ................................................................. 4-31
8.5 Transfer hook.......................................................................... 4-32
8.6 Push-up pins .......................................................................... 4-33
8.7 Edge clamp (option) ............................................................... 4-34
9. HALFWAY CONTINUE command ...................................... 4-35
9.1 Loading the saved data ........................................................... 4-36
9.2 Editing mount flags ................................................................. 4-37
This chapter describes the routine operation for PCB production,
including the conveyor unit setups.
4
-3
EPD8013110
Operation
Chapter 4
4
Daily operation
1. Overview
This chapter explains routine production flow, including the procedures for
changing PCB type and conveyor unit setups.
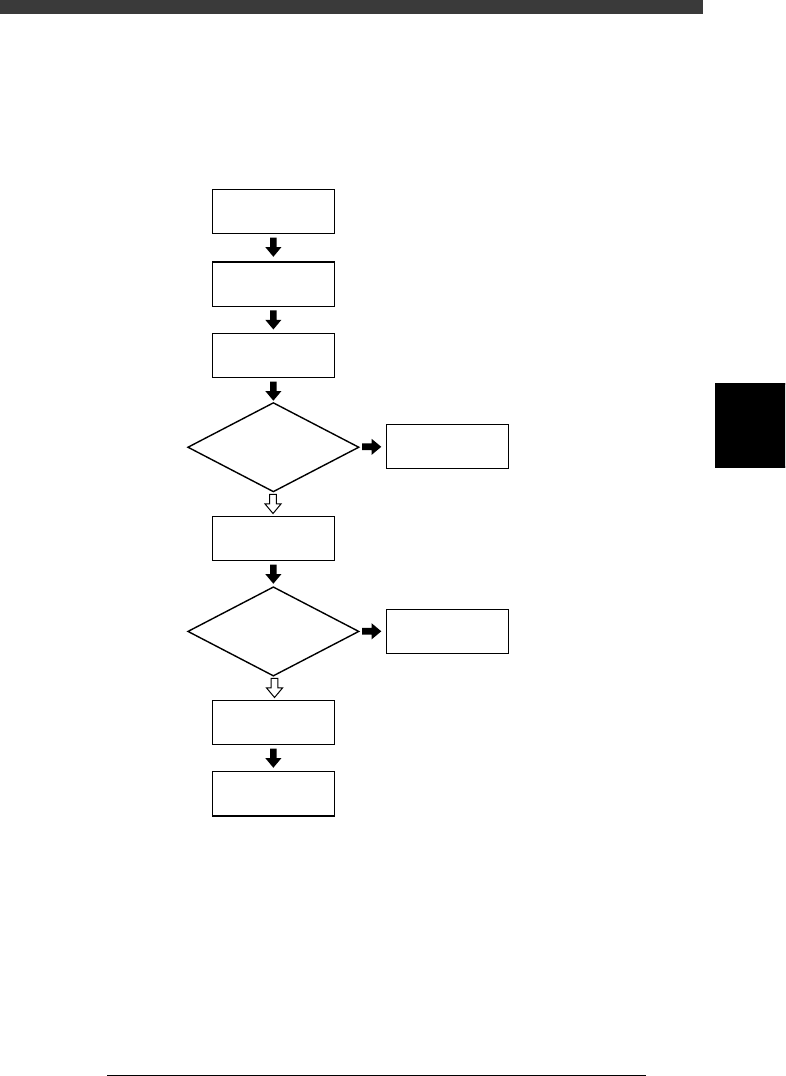
Flow chart of routine operation
23401-C0-00
☞
2
☞
3
☞
4
☞
5
☞
6
☞
8
☞
Chapter 5
☞
7
Start machine
Inspect before
operation
Warm up
Start
PCB production
Correct data
Change conveyor
unit setups
Finish
PCB production
Turn power off
Do you change
PCB type?
Error?
NO
YES
YES
NO